- Page 2 and 3:
HORTICULTURE Principles and Practic
- Page 4 and 5:
HORTICULTURE Principles and Practic
- Page 6 and 7:
With love to Theresa, quarterback;
- Page 8 and 9:
Brief Contents Preface xxi PART 1 T
- Page 10 and 11:
Contents Preface xxi PART 1 THE UND
- Page 12 and 13:
5.3 PLANT GROWTH PROCESSES 160 5.4
- Page 14 and 15:
8.20 COMMON GREENHOUSE DISEASES 276
- Page 16 and 17:
12.3 INTERNAL ENVIRONMENTAL CONTROL
- Page 18 and 19:
PART 6 Summary 541 References and S
- Page 20 and 21:
22.18 INDOOR COMPOSTING SYSTEMS 668
- Page 22 and 23:
Preface Horticulture is the area of
- Page 24 and 25:
ACKNOWLEDGMENTS I am very grateful
- Page 26 and 27:
PART 1 THE UNDERLYING SCIENCE CHAPT
- Page 28 and 29:
1 What Is Horticulture? PURPOSE AND
- Page 30 and 31:
(a) (c) (b) (d) FIGURE 1-1 The many
- Page 32 and 33:
FIGURE 1 Bridge. The plaza view of
- Page 34 and 35:
CYCADS Many people mistake these pr
- Page 36 and 37:
FIGURE 2 The world's largest unbran
- Page 38 and 39:
FIGURE 2 Sold flowers are loaded on
- Page 40 and 41:
FIGURE 1-4 Formal landscaping featu
- Page 42 and 43:
1.4 ROLEOFTHENURSERY AND SEED INDUS
- Page 44 and 45:
1.5 HORTICULTURE AND SOCIETY Hortic
- Page 46 and 47:
TABLE 1-3 U.S. Horticultural Export
- Page 48 and 49:
Turfgrass Operation 1. Landscape te
- Page 50 and 51:
What Is Horticulture? This site pro
- Page 52 and 53:
Examples of botanical gardens http:
- Page 54 and 55:
2 Classifying and Naming Horticultu
- Page 56 and 57:
Eight major taxa are commonly used
- Page 58 and 59:
TABLE 2-3 The Divisions of the King
- Page 60 and 61:
HISTORY OF PLANT TAXONOMY PAUL R. F
- Page 62 and 63:
AGE OF HERBALISTS Two major events
- Page 64 and 65:
possible system of nomenclature. Ho
- Page 66 and 67:
TABLE 1 Type Categories for Plant N
- Page 68 and 69:
2.3 OTHER CLASSIFICATION SYSTEMS (O
- Page 70 and 71:
2. Shrubs. A shrub has no main trun
- Page 72 and 73:
Simple Fruits Fleshy Fruits Drupe B
- Page 74 and 75:
FIGURE 2-14 A pome, represented by
- Page 76 and 77:
2.3.5 CLASSIFICATION OF VEGETABLES
- Page 78 and 79:
(a) (b) FIGURE 2-22 (Source: George
- Page 80 and 81:
FIGURE 2-25 A narrowleaf plant. (So
- Page 82 and 83:
FIGURE 2-29 Parts of a typical gras
- Page 84 and 85:
such as rosemary, sage, thyme, marj
- Page 86 and 87:
c. Leaves d. Bulbs 2. Cut across (t
- Page 88 and 89:
Whole plant Organs FIGURE 3-1 Level
- Page 90 and 91:
ibonucleic acid (RNA), proteins, an
- Page 92 and 93:
called cristae; this extreme foldin
- Page 94 and 95:
By virtue of its position, the prim
- Page 96 and 97:
Phloem Tissue Structurally, phloem
- Page 98 and 99:
(a) Stalk (b) Culm FIGURE 3-5 Cross
- Page 100 and 101:
Scale Compressed stem (a) Whole bul
- Page 102 and 103:
Upper epidermis Palisade layer FIGU
- Page 104 and 105:
usually occur in xerophytes. In cer
- Page 106 and 107:
FIGURE 3-22 Selected common leaf ma
- Page 108 and 109:
FIGURE 3-25 Selected common leaf ti
- Page 110 and 111:
absorption of water and minerals fr
- Page 112 and 113:
Outer bark Inner bark FIGURE 3-37 T
- Page 114 and 115:
Anther Filament Stamen FIGURE 3-41
- Page 116 and 117:
Exocarp Parts of a typi- FIGURE 3-4
- Page 118 and 119:
PRACTICAL EXPERIENCE LABORATORY 1.
- Page 120 and 121:
4.1 CLIMATE, WEATHER, AND HORTICULT
- Page 122 and 123:
concentration in the atmosphere.A c
- Page 124 and 125:
TABLE 4-1 Climatic Adaptation of Se
- Page 126 and 127:
and upward. Another important gener
- Page 128 and 129:
Rate of photosynthesis mg/sq. dm/hr
- Page 130 and 131:
and plants that flower under only c
- Page 132 and 133:
times of the year. Growers start th
- Page 134 and 135:
content. This section is sometimes
- Page 136 and 137:
TABLE 4-7 Soil Mineral Nutrients Es
- Page 138 and 139:
Micronutrients (Trace Elements) Mic
- Page 140 and 141:
Neutral FIGURE 4-11 A representatio
- Page 142 and 143:
4.4 FERTILIZERS Fertilizer sources
- Page 144 and 145:
One of the most commonly used contr
- Page 146 and 147:
Chlorosis (the yellowing of green l
- Page 148 and 149:
Fertilizers may be applied before p
- Page 150 and 151:
It is neither practical nor safe to
- Page 152 and 153:
Solution: How much of ammonium nitr
- Page 154 and 155:
1°C (34°F), the optimum temperatu
- Page 156 and 157:
Cellulose sponge Perched water tabl
- Page 158 and 159:
Overhead Sprinkler Irrigation Water
- Page 160 and 161:
FIGURE 4-19 Furrow irrigation of le
- Page 162 and 163:
can self-install an underground irr
- Page 164 and 165:
1. Surface drainage. Surface draina
- Page 166 and 167:
Secondary Tillage Primary tillage i
- Page 168 and 169:
(a) (b) (c) (d) FIGURE 4-20 (Source
- Page 170 and 171:
texture. The most commonly used gra
- Page 172 and 173:
TABLE 4-11 Selected Standard Mixes
- Page 174 and 175:
Steam Pasteurization Steam pasteuri
- Page 176 and 177:
Maracher, H. 1986. Mineral nutritio
- Page 178 and 179:
5 Plant Physiology PURPOSE AND EXPE
- Page 180 and 181:
Growth in an organism follows a cer
- Page 182 and 183:
5.1.2 THE ROLE OF SIGNALS IN GROWTH
- Page 184 and 185:
waxes are embedded. Waxes consist o
- Page 186 and 187:
5.3.1 PHOTOSYNTHESIS Photosynthesis
- Page 188 and 189:
CO 2 FIGURE 5-6 The C 4 pathway of
- Page 190 and 191:
Growth and Development The general
- Page 192 and 193:
TABLE 5-2 Energy Produced from Aero
- Page 194 and 195:
Certain plants are adapted to dry e
- Page 196 and 197:
conditions exist to sustain growth
- Page 198 and 199:
Shoot Elongation In certain plants,
- Page 200 and 201:
for success, since high temperature
- Page 202 and 203:
FIGURE 5-13 Ripening of plantain sh
- Page 204 and 205:
Terminal bud removed Unbranched pla
- Page 206 and 207:
conditions—pertaining to light, m
- Page 208 and 209:
them to maturity. The major process
- Page 210 and 211:
6 Breeding Horticultural Plants PUR
- Page 212 and 213:
Similarly, there can be no plant br
- Page 214 and 215:
APPLICATION, CHALLENGES, AND PROSPE
- Page 216 and 217:
hit with target DNA. Therefore, it
- Page 218 and 219:
Generally, within ten days of exper
- Page 220 and 221:
Aziz A.N., Sauve R.J., Zhou S., 200
- Page 222 and 223:
(b) F 1 Rr Rr round round F 2 RR R
- Page 224 and 225:
e.g., Aa × Aa), the lethal allele
- Page 226 and 227:
eeder’s equation. Simply stated,
- Page 228 and 229:
Before the seed or product becomes
- Page 230 and 231:
6.18.2 THE GENERAL STEPS OF RDNA TE
- Page 232 and 233:
2. Political disagreement. There ar
- Page 234 and 235:
REFERENCES AND SUGGESTED READING Ac
- Page 236 and 237:
PART 2 PROTECTING HORTICULTURAL PLA
- Page 238 and 239:
7 Biological Enemies of Horticultur
- Page 240 and 241:
8. Weeds may clog drains, waterways
- Page 242 and 243:
is also a root parasite that obtain
- Page 244 and 245:
LEGISLATIVE Both state and federal
- Page 246 and 247:
Example Integrated cultural, physic
- Page 248 and 249:
7.4.2 IMPORTANT INSECT ORDERS Insec
- Page 250 and 251:
Egg FIGURE 7-3 Life cycle of an ins
- Page 252 and 253:
sucking insects (also found with so
- Page 254 and 255:
FIGURE 7-12 Corn earworm damage. (S
- Page 256 and 257:
TABLE 7-1 Selected Fungal Diseases
- Page 258 and 259:
7.6.1 SMALL ANIMALS Rabbits, mice,
- Page 260 and 261:
FIGURE 7-16 The disease triangle. P
- Page 262 and 263:
fungitoxic exudates in its leaves,
- Page 264 and 265:
SUMMARY Insects are a major class o
- Page 266 and 267:
For the home growers or those who c
- Page 268 and 269:
for consumers and the environment).
- Page 270 and 271:
TABLE 8-1 Strategy 4: Strategies an
- Page 272 and 273:
gibberellic acid spray overcomes st
- Page 274 and 275:
In a competitive industry, a variet
- Page 276 and 277:
Chemicals gain access to humans thr
- Page 278 and 279:
2. Pesticide management. Controllin
- Page 280 and 281:
Every organism has its natural enem
- Page 282 and 283:
TABLE 8-3 Selected Examples of Biol
- Page 284 and 285:
1 2 YEAR 3 4 FIGURE 8-5 cycle. A cr
- Page 286 and 287:
6. Heat treatment. In the greenhous
- Page 288 and 289:
Organic Compounds (Organics) Organi
- Page 290 and 291:
under enclosed conditions (e.g., wa
- Page 292 and 293:
FIGURE 8-9 A tractor-mounted spraye
- Page 294 and 295:
8.11.9 LANDSCAPE PESTS AND THEIR CO
- Page 296 and 297:
application, a particular herbicide
- Page 298 and 299:
Further, they do not provide unifor
- Page 300 and 301:
SUMMARY Herbicides are chemicals us
- Page 302 and 303:
Sulfur may be applied for both prev
- Page 304 and 305:
8.23 PREVENTING GREENHOUSE DISEASES
- Page 306 and 307:
PART 3 PROPAGATING HORTICULTURAL PL
- Page 308 and 309:
9 Sexual Propagation PURPOSE AND EX
- Page 310 and 311:
Anther Microspore Megaspore mother
- Page 312 and 313:
Lettuce seeds Red light Darkness Fa
- Page 314 and 315:
FEDERAL AND STATE SEED LAWS Federal
- Page 316 and 317:
Germination Test In laboratory prac
- Page 318 and 319:
FIGURE 15 The essential structures
- Page 320 and 321:
processing into flour or meal). How
- Page 322 and 323:
physiologically immature seeds must
- Page 324 and 325:
seeds may be treated in this way be
- Page 326 and 327:
The two basic modes of seedling eme
- Page 328 and 329:
locations in the field. Home garden
- Page 330 and 331:
FIGURE 9-9 A plastic flat. (Source:
- Page 332 and 333:
(a) (b) FIGURE 9-12 (a) Sowing seed
- Page 334 and 335:
y the gardener or grower. Whatever
- Page 336 and 337:
REFERENCES AND SUGGESTED READING Co
- Page 338 and 339:
species enables vegetative propagat
- Page 340 and 341:
for rapid rooting. There are two ba
- Page 342 and 343:
Cutting involving one node (e.g., s
- Page 344 and 345:
This practice is especially importa
- Page 346 and 347:
10.6.4 STICKING THE CUTTING Cutting
- Page 348 and 349:
(a) Indexing by budding Diseased pl
- Page 350 and 351:
10.11 M ETHODS OF GRAFTING Grafting
- Page 352 and 353:
Scion Wax FIGURE 10-17 Steps in bar
- Page 354 and 355:
MODULE 3 BUDDING 10.12 TYPES OF BUD
- Page 356 and 357:
MODULE 4 LAYERING 10.13 TYPES OF LA
- Page 358 and 359:
Buried part of shoot is nicked FIGU
- Page 360 and 361:
variety of ways. In air layering, a
- Page 362 and 363:
FIGURE 10-34 by using cormels. Prop
- Page 364 and 365:
Psuedobulbs In the Dendrobium orchi
- Page 366 and 367:
The technique is used widely in cro
- Page 368 and 369:
PART 4 GROWING PLANTS INDOORS CHAPT
- Page 370 and 371:
11 Growing Houseplants PURPOSE AND
- Page 372 and 373:
TABLE 11-1 Common houseplants Commo
- Page 374 and 375:
Saddle leaf Philodendron selloum To
- Page 376 and 377:
Window Displays Plants in windows e
- Page 378 and 379:
CONTAINER GARDENS DR. TERRI W. STAR
- Page 380 and 381:
annuals and hardy perennial species
- Page 382 and 383:
of the large container filled with
- Page 384 and 385:
perfection about four to six weeks
- Page 386 and 387:
FIGURE 11-6 Flowers displayed on th
- Page 388 and 389:
TABLE 11-5 Plant Selected Plants fo
- Page 390 and 391:
The lighting condition near these w
- Page 392 and 393:
Fluorescent Lights Fluorescent ligh
- Page 394 and 395:
may be used for one pot or a group
- Page 396 and 397:
garden rooms, atriums, or a large c
- Page 398 and 399:
The photoperiod affects when the ho
- Page 400 and 401:
patted firm to keep the plant erect
- Page 402 and 403:
Other Materials Apart from clay and
- Page 404 and 405:
(a) ( FIGURE 11-25 Support for plan
- Page 406 and 407:
TABLE 11-7 Common Problems of House
- Page 408 and 409:
• Keep soil moist all the time
- Page 410 and 411:
• Prefers high temperatures • P
- Page 412 and 413:
amount and quality of light. If sup
- Page 414 and 415:
12 Controlled-Environment Horticult
- Page 416 and 417:
6. Curvilinear 7. Curved eave 8. Do
- Page 418 and 419:
Detached greenhouses have several a
- Page 420 and 421:
12.2.3 FRAME DESIGN There are two b
- Page 422 and 423:
horticultural business a less-expen
- Page 424 and 425:
Texas, Hawaii, and California. The
- Page 426 and 427:
source of heat for times when the t
- Page 428 and 429:
FIGURE 12-17 Greenhouse production
- Page 430 and 431:
FIGURE 12-21 Moving tables allowing
- Page 432 and 433:
Research program on greenhouse engi
- Page 434 and 435:
greenhouses equipped with a variety
- Page 436 and 437:
FIGURE 1 Annual energy required per
- Page 438 and 439:
This system was demonstrated in a 5
- Page 440 and 441:
FIGURE 6 Amounts of waste energy ut
- Page 442 and 443:
Ekholt, B.A., D.R. Mears, M.S. Gini
- Page 444 and 445:
or object to be warmed. Failure to
- Page 446 and 447:
objects in its path (e.g., the floo
- Page 448 and 449:
FIGURE 12-27 Motorized ventilation
- Page 450 and 451:
FIGURE 12-30 Movable internal shade
- Page 452 and 453:
FIGURE 12-33 A high pressure sodium
- Page 454 and 455:
Source of Water The quality of loca
- Page 456 and 457:
FIGURE 12-37 Overhead sprinkler irr
- Page 458 and 459:
Intermittent Feed Greenhouse plants
- Page 460 and 461:
However, in winter, greenhouse vent
- Page 462 and 463:
OUTCOMES ASSESSMENT 1. Explain the
- Page 464 and 465:
. Foliage or green plants. Foliage
- Page 466 and 467:
2. Labor. The size of the labor for
- Page 468 and 469:
FIGURE 13-1 Greenhouse production o
- Page 470 and 471:
FIGURE 13-2 Lettuce plug is inserte
- Page 472 and 473:
13.8.4 AGGREGATE HYDROPONIC SYSTEMS
- Page 474 and 475:
(a) (b) (c) FIGURE 13-6 Plug produc
- Page 476 and 477:
14 Growing Succulents PURPOSE AND E
- Page 478 and 479:
FIGURE 14-3 Leaf succulent represen
- Page 480 and 481:
frost-hardy. Their rosettes are usu
- Page 482 and 483:
TABLE 14-1 Plant Selected Popular S
- Page 484 and 485:
(a) (b) FIGURE 14-12 Typical bromel
- Page 486 and 487:
14.7.1 WHAT ARE CACTI? 14.7 CACTI C
- Page 488 and 489:
FIGURE 14-16 Opuntia. (Source: Crai
- Page 490 and 491:
FIGURE 14-23 Mammillaria. (Source:
- Page 492 and 493:
FIGURE 14-28 Both desert and jungle
- Page 494 and 495:
Growing mix Gravel Cacti (a) (b) FI
- Page 496 and 497:
PART5 GROWING PLANTS OUTDOORS: ORNA
- Page 498 and 499:
15 Principles of Landscaping PURPOS
- Page 500 and 501:
8. Create recreational grounds. Suc
- Page 502 and 503:
knowledge, with concern for resourc
- Page 504 and 505:
(a) (b) (c) FIGURE 15-2 The occurre
- Page 506 and 507:
GUIDELINES FOR LANDSCAPE DESIGN DAV
- Page 508 and 509:
the landscape. Some very successful
- Page 510 and 511:
Rhythm and Line Panoramic view of a
- Page 512 and 513:
FIGURE 15-10 A formal garden. The e
- Page 514 and 515:
How frequently do they entertain? A
- Page 516 and 517:
the patio should be located on the
- Page 518 and 519:
15.7.1 SELECTING PLANTS A homeowner
- Page 520 and 521:
Plant Arrangement in the Landscape
- Page 522 and 523:
Shadow FIGURE 15-15 Planting a tree
- Page 524 and 525:
SUMMARY Landscaping enhances the su
- Page 526 and 527:
3. Supply materials on a timely bas
- Page 528 and 529:
such as preparation rooms (for mixi
- Page 530 and 531:
of environmental fluctuations. Furt
- Page 532 and 533:
FIGURE 16-4 A bare-root tree seedli
- Page 534 and 535:
17 Installation of the Landscape PU
- Page 536 and 537:
for walks, driveways, and patios (F
- Page 538 and 539:
Planting may be limited to accentin
- Page 540 and 541:
17.3.3 PREPARING THE BED The soil s
- Page 542 and 543:
FIGURE 17-4 Bedding plants raised i
- Page 544 and 545:
SUMMARY Bedding plants are largely
- Page 546 and 547:
TABLE 17-6 Selected Ground Covers T
- Page 548 and 549:
TABLE 17-7 Selected Ornamental Gras
- Page 550 and 551:
they determine the success and surv
- Page 552 and 553:
12. Wildlife attraction. Trees in t
- Page 554 and 555:
pennsylvanica), hackberry (Celtis s
- Page 556 and 557:
y winds. A stake, which is often a
- Page 558 and 559:
TABLE 17-8 Selected Narrowleaf Ever
- Page 560 and 561:
TABLE 17-11 Selected Deciduous Shru
- Page 562 and 563:
Blooming bushes 1. Blue mist shrub
- Page 564 and 565:
Planting Bulblets and Bulbils Speci
- Page 566 and 567:
may be divided such that each secti
- Page 568 and 569:
FIGURE 18-1 (Source: George Acquaah
- Page 570 and 571:
Cool-Season (Temperate) Grasses In
- Page 572 and 573:
Growth Habit Turfgrasses are the mo
- Page 574 and 575:
Heavy Use Lawns on playgrounds and
- Page 576 and 577:
The seed should be free from weeds
- Page 578 and 579:
Source of Sod As with seed, sod sup
- Page 580 and 581:
A plug of sod FIGURE 18-7 Plugging
- Page 582 and 583:
way, plants are able to adapt to th
- Page 584 and 585:
form of a can placed on the lawn wi
- Page 586 and 587:
TABLE 18-3 Some Common Lawn and Tur
- Page 588 and 589:
even surface soil surface for layin
- Page 590 and 591:
MacCaskey, M. 1987. All about lawns
- Page 592 and 593:
Pruning is sometimes done in conjun
- Page 594 and 595:
4. Pruning may be done to reduce th
- Page 596 and 597:
19.4.2 SAWS A saw may be designed t
- Page 598 and 599:
defeat the purpose of pruning. The
- Page 600 and 601:
Bud withers as cut end dries back d
- Page 602 and 603:
19.6 STRATEGIES FOR PRUNING ABOVEGR
- Page 604 and 605:
Rejuvenation Pruning Cut canes to a
- Page 606 and 607:
3. In the third and subsequent year
- Page 608 and 609:
(a) Cut Prune (b) FIGURE 19-16 Step
- Page 610 and 611:
Eucalyptus and Paulownia are amenab
- Page 612 and 613:
TRAINING & PRUNING DECIDUOUS FRUIT
- Page 614 and 615:
Summer pruning eliminates an energy
- Page 616 and 617:
a) b) FIGURE 2 Newly planted apple
- Page 618 and 619:
FIGURE 6 Wooden limb spreaders can
- Page 620 and 621:
FIGURE 9. An apple tree trained to
- Page 622 and 623:
years to promote continued lateral
- Page 624 and 625:
Horizontal Espalier The horizontal
- Page 626 and 627:
19.16.1 CANE FRUITS Cane fruits are
- Page 628 and 629:
FIGURE 19-26 Shearing of Christmas
- Page 630 and 631:
pyramid-like form that is wider at
- Page 632 and 633:
After selecting the appropriate spe
- Page 634 and 635:
PART 6 GROWING PLANTS OUTDOORS: VEG
- Page 636 and 637:
20 Growing Vegetables Outdoors PURP
- Page 638 and 639:
The National Agricultural Statistic
- Page 640 and 641:
(This item omitted from WebBook edi
- Page 642 and 643:
growers should take to determine an
- Page 644 and 645:
pests and reduce/ eliminate hail da
- Page 646 and 647:
square yard (10 to 68 grams per squ
- Page 648 and 649:
High tunnels help increase the prof
- Page 650 and 651:
(This item omitted from WebBook edi
- Page 652 and 653:
20.4 VEGETABLE MARKET TYPES Fresh V
- Page 654 and 655:
Establishing the Crop Planting into
- Page 656 and 657:
home water supply from the tap. Thi
- Page 658 and 659:
Cole crop Cabbage Root Potato Bean
- Page 660 and 661:
6. Adequate nutrition. While overfe
- Page 662 and 663:
variable, ranging from creamy yello
- Page 664 and 665:
There are two general production pr
- Page 666 and 667:
This toxin is heat resistant and no
- Page 668 and 669:
large, or jumbo. The bulb may be sw
- Page 670 and 671:
REFERENCES Growing selected vegetab
- Page 672 and 673:
TABLE 21-1 Popular Herbs and Their
- Page 674 and 675:
(a) (b) (c) (d) (e) (f) FIGURE 21-1
- Page 676 and 677:
22 Organic Farming PURPOSE AND EXPE
- Page 678 and 679:
22.3 PRINCIPLES OF ORGANIC FARMING
- Page 680 and 681:
and the specific materials to be us
- Page 682 and 683: 22.8 MANAGING SOIL PHYSICAL QUALITY
- Page 684 and 685: preemergent or early postemergent o
- Page 686 and 687: Composting is a deliberate activity
- Page 688 and 689: 22.14.5 THE CARBON-TO-NITROGEN RATI
- Page 690 and 691: Moisture Supply Water is required b
- Page 692 and 693: Compost materials FIGURE 22-4 a wir
- Page 694 and 695: As microbial decomposition proceeds
- Page 696 and 697: Establishment and Management of an
- Page 698 and 699: night, freezing can occur in spring
- Page 700 and 701: accomplished by stratification. It
- Page 702 and 703: transmitted by the dagger nematode
- Page 704 and 705: PART 7 SPECIAL TECHNIQUES AND HANDL
- Page 706 and 707: 24 Cut Flowers and Floral Design PU
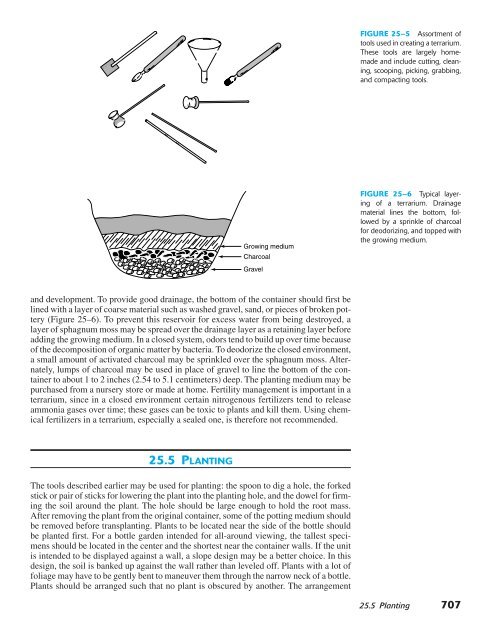
- Page 708 and 709: to more than four-fold in standard
- Page 710 and 711: Temperature and Humidity Wilting re
- Page 712 and 713: FLORAL DESIGN: AN OVERVIEW BY WM. J
- Page 714 and 715: Principle Definition Types (or Uses
- Page 716 and 717: pH value-a measure of the acidity o
- Page 718 and 719: FIGURE 6 Parallel Design-Parallel d
- Page 720 and 721: 24.3.2 TOOLS AND MATERIALS The tool
- Page 722 and 723: 3. Establish the focal point. 4. Ad
- Page 724 and 725: Natural Drying To dry naturally, fl
- Page 726 and 727: 24.4.3 DRIED FLOWER ARRANGEMENTS Dr
- Page 728 and 729: 25 Terrarium Culture PURPOSE AND EX
- Page 730 and 731: FIGURE 25-3 Terrarium containers ar
- Page 734 and 735: 25.6.7 ENHANCING THE DISPLAY Certai
- Page 736 and 737: (a) (b) FIGURE 26-1 Bonsai can be c
- Page 738 and 739: TABLE 26-3 Plant A Selection of Pop
- Page 740 and 741: 26.3.1 COLLECTING BONSAI PLANTS FRO
- Page 742 and 743: Strip bark Bare branch FIGURE 26-9
- Page 744 and 745: 26.5.2 SANITATION It is critical to
- Page 746 and 747: 27 Postharvest Handling and Marketi
- Page 748 and 749: whereas oranges are picked (they ha
- Page 750 and 751: (b) (a) (c) (d) (e1) (e2) (f) FIGUR
- Page 752 and 753: To reduce packaging injury, contain
- Page 754 and 755: is replaced by the by-product of re
- Page 756 and 757: Stored produce may lose some color,
- Page 758 and 759: with pricing. When selling by volum
- Page 760 and 761: (a) (b) FIGURE 27-5 Horticultural p
- Page 762 and 763: APPENDIX A Temperature: Converting
- Page 764 and 765: APPENDIX B Metric Conversion Chart
- Page 766 and 767: APPENDIX D Common and Scientific Na
- Page 768 and 769: Pecan (Carya illinoensis) Peony (Pa
- Page 770 and 771: GLOSSARY A Abaxial Turned away from
- Page 772 and 773: Cellulose A complex carbohydrate th
- Page 774 and 775: Floriculture The science and practi
- Page 776 and 777: M Macronutrient An essential elemen
- Page 778 and 779: Root cap A mass of hard cells cover
- Page 780 and 781: INDEX A-frame, 395 A-horizon, 108 A
- Page 782 and 783:
defined, 390 fertilization, 432-434
- Page 784 and 785:
Radiant heaters, 378 Radicle, 90 Re
- Page 786 and 787:
color plate 1 (a) (b) (c) (d) (e) M
- Page 788 and 789:
color plate 3 (b) (a) (c) (d) (e) (
- Page 790 and 791:
color plate 5 (a) (b) (d) (c) (e) (
- Page 792 and 793:
color plate 7 (b) (c) (d) (a) (e) (
- Page 794 and 795:
color plate 9 (a) (b) (c) (d) (e) (
- Page 796 and 797:
color plate 11 (a) (c) (b) (d) Grow
- Page 798 and 799:
color plate 13 (a) (b) (c) (d) (e)
- Page 800 and 801:
color plate 15 (a) (b) (c) (d) (e)
- Page 802 and 803:
color plate 17 (a) (b) (c) (d) (e)
- Page 804 and 805:
color plate 19 (a) (b) (c) (d) (e)
- Page 806 and 807:
color plate 21 (a) (b) (c) (e) (d)
- Page 808 and 809:
color plate 23 (c) (b) (a) (d) (e)
- Page 810 and 811:
color plate 25 (c) (a) (b) (d) (e)
- Page 812 and 813:
color plate 27 (a1) (a2) (b2) (b1)
- Page 814 and 815:
color plate 29 (a) (b) (c) (d) (e)
- Page 816 and 817:
color plate 31 (a) (b) (c) Floral d