Spry User Guide - Support - Adobe
Spry User Guide - Support - Adobe
Spry User Guide - Support - Adobe

You also want an ePaper? Increase the reach of your titles
YUMPU automatically turns print PDFs into web optimized ePapers that Google loves.
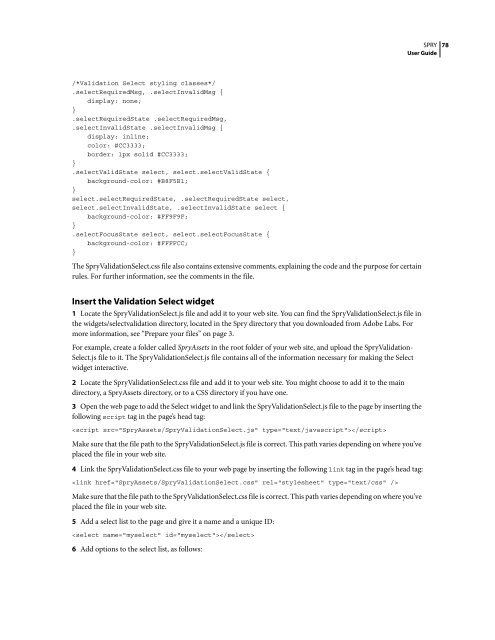
*Validation Select styling classes*/<br />
.selectRequiredMsg, .selectInvalidMsg {<br />
display: none;<br />
}<br />
.selectRequiredState .selectRequiredMsg,<br />
.selectInvalidState .selectInvalidMsg {<br />
display: inline;<br />
color: #CC3333;<br />
border: 1px solid #CC3333;<br />
}<br />
.selectValidState select, select.selectValidState {<br />
background-color: #B8F5B1;<br />
}<br />
select.selectRequiredState, .selectRequiredState select,<br />
select.selectInvalidState, .selectInvalidState select {<br />
background-color: #FF9F9F;<br />
}<br />
.selectFocusState select, select.selectFocusState {<br />
background-color: #FFFFCC;<br />
}<br />
The <strong>Spry</strong>ValidationSelect.css file also contains extensive comments, explaining the code and the purpose for certain<br />
rules. For further information, see the comments in the file.<br />
Insert the Validation Select widget<br />
1 Locate the <strong>Spry</strong>ValidationSelect.js file and add it to your web site. You can find the <strong>Spry</strong>ValidationSelect.js file in<br />
the widgets/selectvalidation directory, located in the <strong>Spry</strong> directory that you downloaded from <strong>Adobe</strong> Labs. For<br />
more information, see “Prepare your files” on page 3.<br />
For example, create a folder called <strong>Spry</strong>Assets in the root folder of your web site, and upload the <strong>Spry</strong>Validation-<br />
Select.js file to it. The <strong>Spry</strong>ValidationSelect.js file contains all of the information necessary for making the Select<br />
widget interactive.<br />
2 Locate the <strong>Spry</strong>ValidationSelect.css file and add it to your web site. You might choose to add it to the main<br />
directory, a <strong>Spry</strong>Assets directory, or to a CSS directory if you have one.<br />
3 Open the web page to add the Select widget to and link the <strong>Spry</strong>ValidationSelect.js file to the page by inserting the<br />
following script tag in the page’s head tag:<br />
<br />
Make sure that the file path to the <strong>Spry</strong>ValidationSelect.js file is correct. This path varies depending on where you’ve<br />
placed the file in your web site.<br />
4 Link the <strong>Spry</strong>ValidationSelect.css file to your web page by inserting the following link tag in the page’s head tag:<br />
<br />
Makesurethatthefilepathtothe<strong>Spry</strong>ValidationSelect.cssfileiscorrect.Thispathvariesdependingonwhereyou’ve<br />
placed the file in your web site.<br />
5 Add a select list to the page and give it a name and a unique ID:<br />
<br />
6 Add options to the select list, as follows:<br />
SPRY<br />
<strong>User</strong> <strong>Guide</strong><br />
78