

Brother XL-6053/6063 - Guide utilisateur
Brother XL-6053/6063 - Guide utilisateur
Brother XL-6053/6063 - Guide utilisateur

You also want an ePaper? Increase the reach of your titles
YUMPU automatically turns print PDFs into web optimized ePapers that Google loves.
KNOWING YOUR SEWING MACHINE<br />
CONOZCA SU MÁQUINA DE COSER<br />
CONOSCERE LA MACCHINA DA CUCIRE<br />
Changing the Presser Foot<br />
CAUTION<br />
• Always turn off the power before changing the presser<br />
foot. If the power is on and controller is stepped on, the<br />
machine will start and may cause injury.<br />
• Always use the correct presser foot for the selected<br />
stitch pattern. If the wrong presser foot is used, the<br />
needle may strike the presser foot and bend or break,<br />
and may cause injury.<br />
• Only use presser feet for this machine. Using other<br />
presser feet may lead to accident or injury.<br />
It may be necessary to change the presser foot according to your<br />
sewing needs.<br />
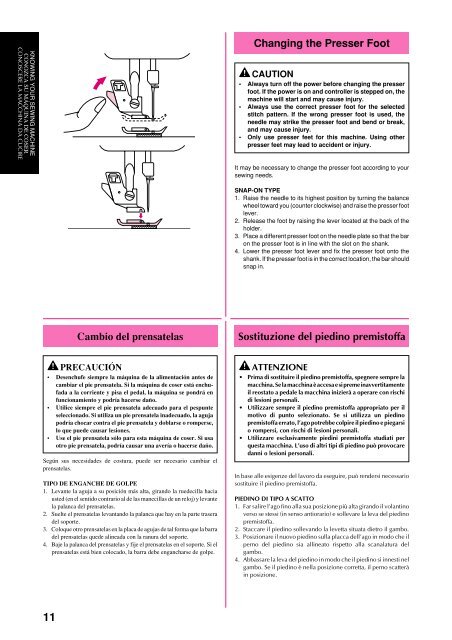
SNAP-ON TYPE<br />
1. Raise the needle to its highest position by turning the balance<br />
wheel toward you (counter clockwise) and raise the presser foot<br />
lever.<br />
2. Release the foot by raising the lever located at the back of the<br />
holder.<br />
3. Place a different presser foot on the needle plate so that the bar<br />
on the presser foot is in line with the slot on the shank.<br />
4. Lower the presser foot lever and fix the presser foot onto the<br />
shank. If the presser foot is in the correct location, the bar should<br />
snap in.<br />
Cambio del prensatelas<br />
Sostituzione del piedino premistoffa<br />
PRECAUCIÓN<br />
• Desenchufe siempre la máquina de la alimentación antes de<br />
cambiar el pie prensatela. Si la máquina de coser está enchufada<br />
a la corriente y pisa el pedal, la máquina se pondrá en<br />
funcionamiento y podría hacerse daño.<br />
• Utilice siempre el pie prensatela adecuado para el pespunte<br />
seleccionado. Si utiliza un pie prensatela inadecuado, la aguja<br />
podría chocar contra el pie prensatela y doblarse o romperse,<br />
lo que puede causar lesiones.<br />
• Use el pie prensatela sólo para esta máquina de coser. Si usa<br />
otro pie prensatela, podría causar una avería o hacerse daño.<br />
Según sus necesidades de costura, puede ser necesario cambiar el<br />
prensatelas.<br />
TIPO DE ENGANCHE DE GOLPE<br />
1. Levante la aguja a su posición más alta, girando la ruedecilla hacia<br />
usted (en el sentido contrario al de las manecillas de un reloj) y levante<br />
la palanca del prensatelas.<br />
2. Suelte el prensatelas levantando la palanca que hay en la parte trasera<br />
del soporte.<br />
3. Coloque otro prensatelas en la placa de agujas de tal forma que la barra<br />
del prensatelas quede alineada con la ranura del soporte.<br />
4. Baje la palanca del prensatelas y fije el prensatelas en el soporte. Si el<br />
prensatelas está bien colocado, la barra debe engancharse de golpe.<br />
ATTENZIONE<br />
• Prima di sostituire il piedino premistoffa, spegnere sempre la<br />
macchina. Se la macchina è accesa e si preme inavvertitamente<br />
il reostato a pedale la macchina inizierà a operare con rischi<br />
di lesioni personali.<br />
• Utilizzare sempre il piedino premistoffa appropriato per il<br />
motivo di punto selezionato. Se si utilizza un piedino<br />
premistoffa errato, l’ago potrebbe colpire il piedino e piegarsi<br />
o rompersi, con rischi di lesioni personali.<br />
• Utilizzare esclusivamente piedini premistoffa studiati per<br />
questa macchina. L’uso di altri tipi di piedino può provocare<br />
danni o lesioni personali.<br />
In base alle esigenze del lavoro da eseguire, può rendersi necessario<br />
sostituire il piedino premistoffa.<br />
PIEDINO DI TIPO A SCATTO<br />
1. Far salire l’ago fino alla sua posizione più alta girando il volantino<br />
verso se stessi (in senso antiorario) e sollevare la leva del piedino<br />
premistoffa.<br />
2. Staccare il piedino sollevando la levetta situata dietro il gambo.<br />
3. Posizionare il nuovo piedino sulla placca dell’ago in modo che il<br />
perno del piedino sia allineato rispetto alla scanalatura del<br />
gambo.<br />
4. Abbassare la leva del piedino in modo che il piedino si innesti nel<br />
gambo. Se il piedino è nella posizione corretta, il perno scatterà<br />
in posizione.<br />
11


