

Brother XL-6053/6063 - Guide utilisateur
Brother XL-6053/6063 - Guide utilisateur
Brother XL-6053/6063 - Guide utilisateur

Create successful ePaper yourself
Turn your PDF publications into a flip-book with our unique Google optimized e-Paper software.
USING ATTACHMENTS AND APPLICATIONS<br />
USO DE ACCESORIOS Y APLICACIONES<br />
GUARNIZIONI E APPLICAZIONI<br />
A<br />
1 2<br />
Zipper Insertion<br />
Pattern Stitch Length Foot<br />
(Straight Stitch<br />
(Center Needle Position))<br />
2-3 Zipper Foot<br />
3<br />
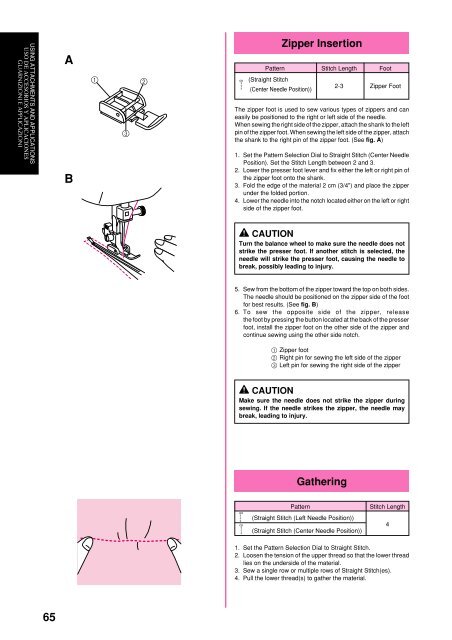
The zipper foot is used to sew various types of zippers and can<br />
easily be positioned to the right or left side of the needle.<br />
When sewing the right side of the zipper, attach the shank to the left<br />
pin of the zipper foot. When sewing the left side of the zipper, attach<br />
the shank to the right pin of the zipper foot. (See fig. A)<br />
B<br />
1. Set the Pattern Selection Dial to Straight Stitch (Center Needle<br />
Position). Set the Stitch Length between 2 and 3.<br />
2. Lower the presser foot lever and fix either the left or right pin of<br />
the zipper foot onto the shank.<br />
3. Fold the edge of the material 2 cm (3/4") and place the zipper<br />
under the folded portion.<br />
4. Lower the needle into the notch located either on the left or right<br />
side of the zipper foot.<br />
CAUTION<br />
Turn the balance wheel to make sure the needle does not<br />
strike the presser foot. If another stitch is selected, the<br />
needle will strike the presser foot, causing the needle to<br />
break, possibly leading to injury.<br />
5. Sew from the bottom of the zipper toward the top on both sides.<br />
The needle should be positioned on the zipper side of the foot<br />
for best results. (See fig. B)<br />
6. To sew the opposite side of the zipper, release<br />
the foot by pressing the button located at the back of the presser<br />
foot, install the zipper foot on the other side of the zipper and<br />
continue sewing using the other side notch.<br />
1 Zipper foot<br />
2 Right pin for sewing the left side of the zipper<br />
3 Left pin for sewing the right side of the zipper<br />
CAUTION<br />
Make sure the needle does not strike the zipper during<br />
sewing. If the needle strikes the zipper, the needle may<br />
break, leading to injury.<br />
Gathering<br />
Pattern<br />
(Straight Stitch (Left Needle Position))<br />
(Straight Stitch (Center Needle Position))<br />
Stitch Length<br />
4<br />
1. Set the Pattern Selection Dial to Straight Stitch.<br />
2. Loosen the tension of the upper thread so that the lower thread<br />
lies on the underside of the material.<br />
3. Sew a single row or multiple rows of Straight Stitch(es).<br />
4. Pull the lower thread(s) to gather the material.<br />
65


