

Brother XL-6053/6063 - Guide utilisateur
Brother XL-6053/6063 - Guide utilisateur
Brother XL-6053/6063 - Guide utilisateur

Create successful ePaper yourself
Turn your PDF publications into a flip-book with our unique Google optimized e-Paper software.
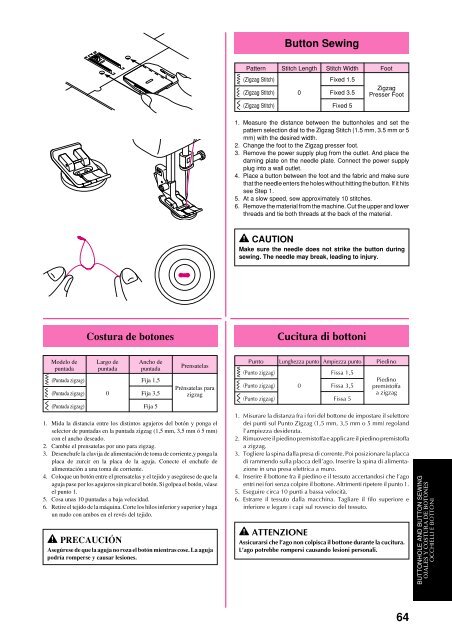
Button Sewing<br />
Pattern Stitch Length Stitch Width Foot<br />
(Zigzag Stitch) Fixed 1.5<br />
(Zigzag Stitch) 0 Fixed 3.5<br />
(Zigzag Stitch) Fixed 5<br />
Zigzag<br />
Presser Foot<br />
1. Measure the distance between the buttonholes and set the<br />
pattern selection dial to the Zigzag Stitch (1.5 mm, 3.5 mm or 5<br />
mm) with the desired width.<br />
2. Change the foot to the Zigzag presser foot.<br />
3. Remove the power supply plug from the outlet. And place the<br />
darning plate on the needle plate. Connect the power supply<br />
plug into a wall outlet.<br />
4. Place a button between the foot and the fabric and make sure<br />
that the needle enters the holes without hitting the button. If it hits<br />
see Step 1.<br />
5. At a slow speed, sew approximately 10 stitches.<br />
6. Remove the material from the machine. Cut the upper and lower<br />
threads and tie both threads at the back of the material.<br />
CAUTION<br />
Make sure the needle does not strike the button during<br />
sewing. The needle may break, leading to injury.<br />
Costura de botones<br />
Cucitura di bottoni<br />
Modelo de Largo de Ancho de<br />
puntada puntada puntada<br />
(Puntada zigzag) Fija 1,5<br />
(Puntada zigzag) 0 Fija 3,5<br />
(Puntada zigzag) Fija 5<br />
Prensatelas<br />
Prénsatelas para<br />
zigzag<br />
1. Mida la distancia entre los distintos agujeros del botón y ponga el<br />
selector de puntadas en la puntada zigzag (1,5 mm, 3,5 mm ó 5 mm)<br />
con el ancho deseado.<br />
2. Cambie el prensatelas por uno para zigzag.<br />
3. Desenchufe la clavija de alimentación de toma de corriente,y ponga la<br />
placa de zurcir en la placa de la aguja. Conecte el enchufe de<br />
alimentación a una toma de corriente.<br />
4. Coloque un botón entre el prensatelas y el tejido y asegúrese de que la<br />
aguja pase por los agujeros sin picar el botón. Si golpea el botón, véase<br />
el punto 1.<br />
5. Cosa unas 10 puntadas a baja velocidad.<br />
6. Retire el tejido de la máquina. Corte los hilos inferior y superior y haga<br />
un nudo con ambos en el revés del tejido.<br />
PRECAUCIÓN<br />
Asegúrese de que la aguja no roza el botón mientras cose. La aguja<br />
podría romperse y causar lesiones.<br />
Punto Lunghezza punto Ampiezza punto Piedino<br />
(Punto zigzag) Fissa 1,5<br />
(Punto zigzag) 0 Fissa 3,5<br />
(Punto zigzag) Fissa 5<br />
Piedino<br />
premistoffa<br />
a zigzag<br />
1. Misurare la distanza fra i fori del bottone de impostare il selettore<br />
dei punti sul Punto Zigzag (1,5 mm, 3,5 mm o 5 mm) regoland<br />
l’ampiezza desiderata.<br />
2. Rimuovere il piedino premistoffa e applicare il piedino premistoffa<br />
a zigzag.<br />
3. Togliere la spina dalla presa di corrente. Poi posizionare la placca<br />
di rammendo sulla placca dell’ago. Inserire la spina di alimentazione<br />
in una presa elettrica a muro.<br />
4. Inserire il bottone fra il piedino e il tessuto accertandosi che l’ago<br />
entri nei fori senza colpire il bottone. Altrimenti ripetere il punto 1.<br />
5. Eseguire circa 10 punti a bassa velocità.<br />
6. Estrarre il tessuto dalla macchina. Tagliare il filo superiore e<br />
inferiore e legare i capi sul rovescio del tessuto.<br />
ATTENZIONE<br />
Assicurarsi che l’ago non colpisca il bottone durante la cucitura.<br />
L’ago potrebbe rompersi causando lesioni personali.<br />
BUTTONHOLE AND BUTTON SEWING<br />
OJALES Y COSTURA DE BOTONES<br />
OCCHIELLI E BOTTONI<br />
64


