

Brother XL-6053/6063 - Guide utilisateur
Brother XL-6053/6063 - Guide utilisateur
Brother XL-6053/6063 - Guide utilisateur

You also want an ePaper? Increase the reach of your titles
YUMPU automatically turns print PDFs into web optimized ePapers that Google loves.
(Model <strong>XL</strong>-6060, <strong>XL</strong>-6061, <strong>XL</strong>-6062, <strong>XL</strong>-<strong>6063</strong>, <strong>XL</strong>-6050, <strong>XL</strong>-<br />
6051, <strong>XL</strong>-6052, <strong>XL</strong>-<strong>6053</strong>, <strong>XL</strong>-6040, <strong>XL</strong>-6041, <strong>XL</strong>-6042, <strong>XL</strong>-6043)<br />
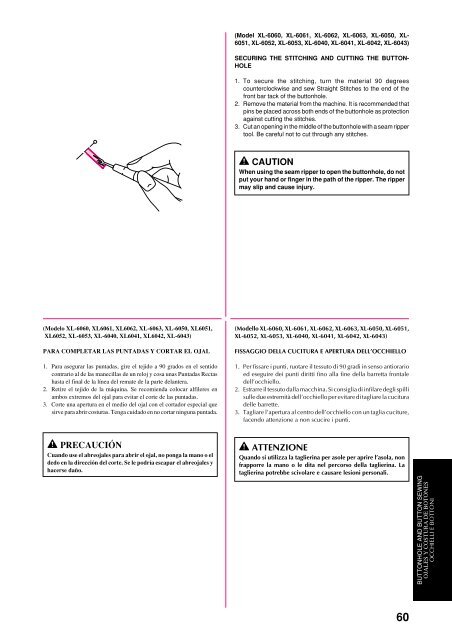
SECURING THE STITCHING AND CUTTING THE BUTTON-<br />
HOLE<br />
1. To secure the stitching, turn the material 90 degrees<br />
counterclockwise and sew Straight Stitches to the end of the<br />
front bar tack of the buttonhole.<br />
2. Remove the material from the machine. It is recommended that<br />
pins be placed across both ends of the buttonhole as protection<br />
against cutting the stitches.<br />
3. Cut an opening in the middle of the buttonhole with a seam ripper<br />
tool. Be careful not to cut through any stitches.<br />
CAUTION<br />
When using the seam ripper to open the buttonhole, do not<br />
put your hand or finger in the path of the ripper. The ripper<br />
may slip and cause injury.<br />
(Modelo <strong>XL</strong>-6060, <strong>XL</strong>6061, <strong>XL</strong>6062, <strong>XL</strong>-<strong>6063</strong>, <strong>XL</strong>-6050, <strong>XL</strong>6051,<br />
<strong>XL</strong>6052, <strong>XL</strong>-<strong>6053</strong>, <strong>XL</strong>-6040, <strong>XL</strong>6041, <strong>XL</strong>6042, <strong>XL</strong>-6043)<br />
PARA COMPLETAR LAS PUNTADAS Y CORTAR EL OJAL<br />
1. Para asegurar las puntadas, gire el tejido a 90 grados en el sentido<br />
contrario al de las manecillas de un reloj y cosa unas Puntadas Rectas<br />
hasta el final de la línea del remate de la parte delantera.<br />
2. Retire el tejido de la máquina. Se recomienda colocar alfileres en<br />
ambos extremos del ojal para evitar el corte de las puntadas.<br />
3. Corte una apertura en el medio del ojal con el cortador especial que<br />
sirve para abrir costuras. Tenga cuidado en no cortar ninguna puntada.<br />
(Modello <strong>XL</strong>-6060, <strong>XL</strong>-6061, <strong>XL</strong>-6062, <strong>XL</strong>-<strong>6063</strong>, <strong>XL</strong>-6050, <strong>XL</strong>-6051,<br />
<strong>XL</strong>-6052, <strong>XL</strong>-<strong>6053</strong>, <strong>XL</strong>-6040, <strong>XL</strong>-6041, <strong>XL</strong>-6042, <strong>XL</strong>-6043)<br />
FISSAGGIO DELLA CUCITURA E APERTURA DELL’OCCHIELLO<br />
1. Per fissare i punti, ruotare il tessuto di 90 gradi in senso antiorario<br />
ed eseguire dei punti diritti fino alla fine della barretta frontale<br />
dell’occhiello.<br />
2. Estrarre il tessuto dalla macchina. Si consiglia di infilare degli spilli<br />
sulle due estremità dell’occhiello per evitare di tagliare la cucitura<br />
delle barrette.<br />
3. Tagliare l’apertura al centro dell’occhiello con un taglia cuciture,<br />
facendo attenzione a non scucire i punti.<br />
PRECAUCIÓN<br />
Cuando use el abreojales para abrir el ojal, no ponga la mano o el<br />
dedo en la dirección del corte. Se le podría escapar el abreojales y<br />
hacerse daño.<br />
ATTENZIONE<br />
Quando si utilizza la taglierina per asole per aprire l’asola, non<br />
frapporre la mano o le dita nel percorso della taglierina. La<br />
taglierina potrebbe scivolare e causare lesioni personali.<br />
BUTTONHOLE AND BUTTON SEWING<br />
OJALES Y COSTURA DE BOTONES<br />
OCCHIELLI E BOTTONI<br />
60


