

Brother XL-6053/6063 - Guide utilisateur
Brother XL-6053/6063 - Guide utilisateur
Brother XL-6053/6063 - Guide utilisateur

Create successful ePaper yourself
Turn your PDF publications into a flip-book with our unique Google optimized e-Paper software.
BUTTONHOLE AND BUTTON SEWING<br />
OJALES Y COSTURA DE BOTONES<br />
OCCHIELLI E BOTTONI<br />
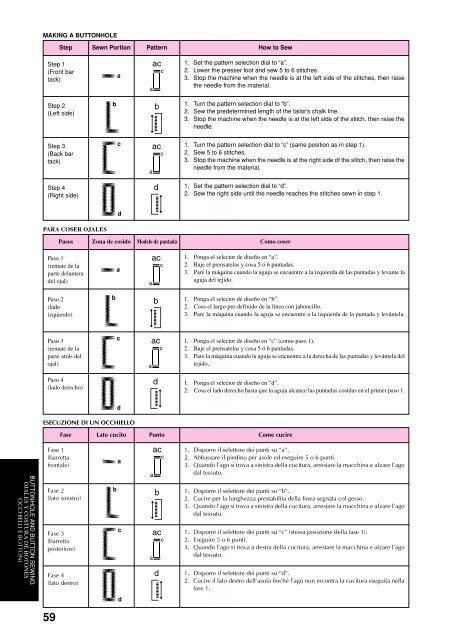
MAKING A BUTTONHOLE<br />
Step Sewn Portion Pattern How to Sew<br />
Step 1<br />
(Front bar<br />
tack)<br />
a<br />
1. Set the pattern selection dial to “a”.<br />
2. Lower the presser foot and sew 5 to 6 stitches.<br />
3. Stop the machine when the needle is at the left side of the stitches, then raise<br />
the needle from the material.<br />
Step 2<br />
(Left side)<br />
b<br />
1. Turn the pattern selection dial to “b”.<br />
2. Sew the predetermined length of the tailor’s chalk line.<br />
3. Stop the machine when the needle is at the left side of the stitch, then raise the<br />
needle.<br />
Step 3<br />
(Back bar<br />
tack)<br />
c<br />
1. Turn the pattern selection dial to “c” (same position as in step 1).<br />
2. Sew 5 to 6 stitches.<br />
3. Stop the machine when the needle is at the right side of the stitch, then raise the<br />
needle from the material.<br />
Step 4<br />
(Right side)<br />
1. Set the pattern selection dial to “d”.<br />
2. Sew the right side until the needle reaches the stitches sewn in step 1.<br />
PARA COSER OJALES<br />
d<br />
Pasos Zona de cosido Modelo de puntada Como coser<br />
txt_F<br />
Paso 1<br />
(remate de la<br />
parte delantera<br />
del ojal)<br />
a<br />
1. Ponga el selector de diseño en “a”.<br />
2. Baje el prensatelas y cosa 5 ó 6 puntadas.<br />
3. Pare la máquina cuando la aguja se encuentre a la izquierda de las puntadas y levante la<br />
aguja del tejido.<br />
Paso 2<br />
(lado<br />
izquierdo)<br />
b<br />
1. Ponga el selector de diseño en “b”.<br />
2. Cosa el largo pre-definido de la línea con jaboncillo.<br />
3. Pare la máquina cuando la aguja se encuentre a la izquierda de la puntada y levántela.<br />
Paso 3<br />
(remate de la<br />
parte atrás del<br />
ojal)<br />
Paso 4<br />
(lado derecho)<br />
c<br />
1. Ponga el selector de diseño en “c” (como paso 1).<br />
2. Baje el prensatelas y cosa 5 ó 6 puntadas.<br />
3. Pare la máquina cuando la aguja se encuentre a la derecha de las puntadas y levántela del<br />
tejido.<br />
1. Ponga el selector de diseño en “d”.<br />
2. Cosa el lado derecho hasta que la aguja alcance las puntadas cosidas en el primer paso 1.<br />
d<br />
ESECUZIONE DI UN OCCHIELLO<br />
Fase Lato cucito Punto Come cucire<br />
Fase 1<br />
(barretta<br />
frontale)<br />
a<br />
1. Disporre il selettore dei punti su “a”.<br />
2. Abbassare il piedino per asole ed eseguire 5 o 6 punti.<br />
3. Quando l’ago si trova a sinistra della cucitura, arrestare la macchina e alzare l’ago<br />
dal tessuto.<br />
Fase 2<br />
(lato sinistro)<br />
b<br />
1. Disporre il selettore dei punti su “b”.<br />
2. Cucire per la lunghezza prestabilita della linea segnata col gesso.<br />
3. Quando l’ago si trova a sinistra della cucitura, arrestare la macchina e alzare l’ago<br />
dal tessuto.<br />
Fase 3<br />
(barretta<br />
posteriore)<br />
c<br />
1. Disporre il selettore dei punti su “c” (stessa posizione della fase 1).<br />
2. Eseguire 5 o 6 punti.<br />
3. Quando l’ago si trova a destra della cucitura, arrestare la macchina e alzare l’ago<br />
dal tessuto.<br />
Fase 4<br />
(lato destro)<br />
59<br />
d<br />
1. Disporre il selettore dei punti su “d”.<br />
2. Cucire il lato destro dell’asola finché l’ago non incontra la cucitura eseguita nella<br />
fase 1.


