

Brother XL-6053/6063 - Guide utilisateur
Brother XL-6053/6063 - Guide utilisateur
Brother XL-6053/6063 - Guide utilisateur

You also want an ePaper? Increase the reach of your titles
YUMPU automatically turns print PDFs into web optimized ePapers that Google loves.
A<br />
Elastic Stitching<br />
Pattern Stitch Length Stitch Width<br />
(Elastic Stitch) F-2.5 Fixed 5<br />
B<br />
The Elastic Stitch can be used for 3 functions: mending, sewing<br />
elastic or joining fabric. Each is explained below.<br />
Set the Pattern Selection Dial to Elastic Stitch.<br />
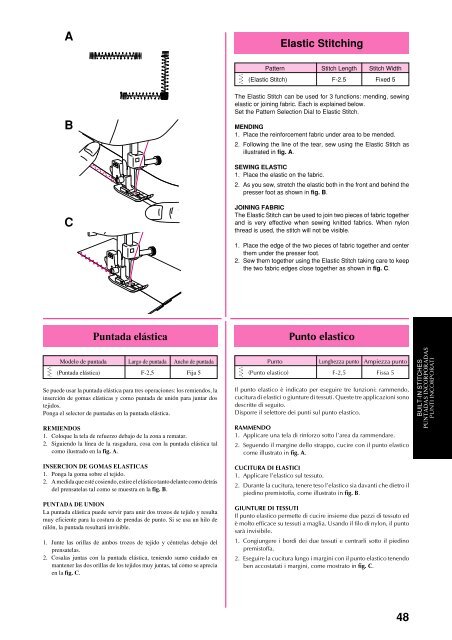
MENDING<br />
1. Place the reinforcement fabric under area to be mended.<br />
2. Following the line of the tear, sew using the Elastic Stitch as<br />
illustrated in fig. A.<br />
SEWING ELASTIC<br />
1. Place the elastic on the fabric.<br />
2. As you sew, stretch the elastic both in the front and behind the<br />
presser foot as shown in fig. B.<br />
C<br />
JOINING FABRIC<br />
The Elastic Stitch can be used to join two pieces of fabric together<br />
and is very effective when sewing knitted fabrics. When nylon<br />
thread is used, the stitch will not be visible.<br />
1. Place the edge of the two pieces of fabric together and center<br />
them under the presser foot.<br />
2. Sew them together using the Elastic Stitch taking care to keep<br />
the two fabric edges close together as shown in fig. C.<br />
Puntada elástica<br />
Punto elastico<br />
Modelo de puntada Largo de puntada Ancho de puntada<br />
(Puntada elástica) F-2,5 Fija 5<br />
Se puede usar la puntada elástica para tres operaciones: los remiendos, la<br />
inserción de gomas elásticas y como puntada de unión para juntar dos<br />
tejidos.<br />
Ponga el selector de puntadas en la puntada elástica.<br />
REMIENDOS<br />
1. Coloque la tela de refuerzo debajo de la zona a rematar.<br />
2. Siguiendo la línea de la rasgadura, cosa con la puntada elástica tal<br />
como ilustrado en la fig. A.<br />
Punto Lunghezza punto Ampiezza punto<br />
(Punto elastico) F-2,5 Fissa 5<br />
Il punto elastico è indicato per eseguire tre funzioni: rammendo,<br />
cucitura di elastici o giunture di tessuti. Queste tre applicazioni sono<br />
descritte di seguito.<br />
Disporre il selettore dei punti sul punto elastico.<br />
RAMMENDO<br />
1. Applicare una tela di rinforzo sotto l’area da rammendare.<br />
2. Seguendo il margine dello strappo, cucire con il punto elastico<br />
come illustrato in fig. A.<br />
BUILT-IN STITCHES<br />
PUNTADAS INCORPORADAS<br />
PUNTI INCORPORATI<br />
INSERCION DE GOMAS ELASTICAS<br />
1. Ponga la goma sobre el tejido.<br />
2. A medida que esté cosiendo, estire el elástico tanto delante como detrás<br />
del prensatelas tal como se muestra en la fig. B.<br />
PUNTADA DE UNION<br />
La puntada elástica puede servir para unir dos trozos de tejido y resulta<br />
muy eficiente para la costura de prendas de punto. Si se usa un hilo de<br />
nilón, la puntada resultará invisible.<br />
1. Junte las orillas de ambos trozos de tejido y céntrelas debajo del<br />
prensatelas.<br />
2. Cosalas juntas con la puntada elástica, teniendo sumo cuidado en<br />
mantener las dos orillas de los tejidos muy juntas, tal como se aprecia<br />
en la fig. C.<br />
CUCITURA DI ELASTICI<br />
1. Applicare l’elastico sul tessuto.<br />
2. Durante la cucitura, tenere teso l’elastico sia davanti che dietro il<br />
piedino premistoffa, come illustrato in fig. B.<br />
GIUNTURE DI TESSUTI<br />
Il punto elastico permette di cucire insieme due pezzi di tessuto ed<br />
è molto efficace su tessuti a maglia. Usando il filo di nylon, il punto<br />
sarà invisibile.<br />
1. Congiungere i bordi dei due tessuti e centrarli sotto il piedino<br />
premistoffa.<br />
2. Eseguire la cucitura lungo i margini con il punto elastico tenendo<br />
ben accostatati i margini, come mostrato in fig. C.<br />
48


