

Brother XL-6053/6063 - Guide utilisateur
Brother XL-6053/6063 - Guide utilisateur
Brother XL-6053/6063 - Guide utilisateur

You also want an ePaper? Increase the reach of your titles
YUMPU automatically turns print PDFs into web optimized ePapers that Google loves.
BUTTONHOLE AND BUTTON SEWING<br />
OJALES Y COSTURA DE BOTONES<br />
OCCHIELLI E BOTTONI<br />
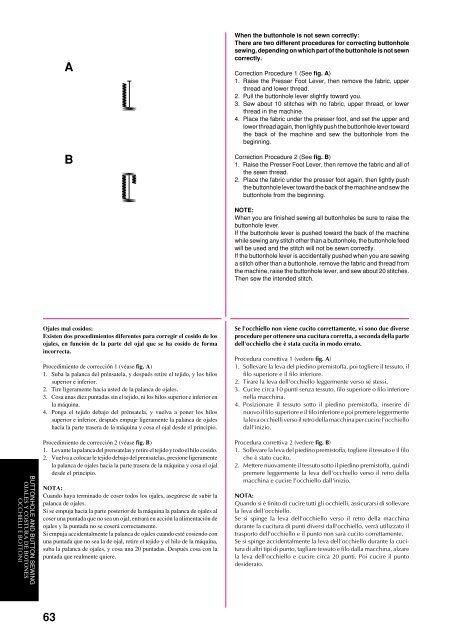
A<br />
B<br />
When the buttonhole is not sewn correctly:<br />
There are two different procedures for correcting buttonhole<br />
sewing, depending on which part of the buttonhole is not sewn<br />
correctly.<br />
Correction Procedure 1 (See fig. A)<br />
1. Raise the Presser Foot Lever, then remove the fabric, upper<br />
thread and lower thread.<br />
2. Pull the buttonhole lever slightly toward you.<br />
3. Sew about 10 stitches with no fabric, upper thread, or lower<br />
thread in the machine.<br />
4. Place the fabric under the presser foot, and set the upper and<br />
lower thread again, then lightly push the buttonhole lever toward<br />
the back of the machine and sew the buttonhole from the<br />
beginning.<br />
Correction Procedure 2 (See fig. B)<br />
1. Raise the Presser Foot Lever, then remove the fabric and all of<br />
the sewn thread.<br />
2. Place the fabric under the presser foot again, then lightly push<br />
the buttonhole lever toward the back of the machine and sew the<br />
buttonhole from the beginning.<br />
NOTE:<br />
When you are finished sewing all buttonholes be sure to raise the<br />
buttonhole lever.<br />
If the buttonhole lever is pushed toward the back of the machine<br />
while sewing any stitch other than a buttonhole, the buttonhole feed<br />
will be used and the stitch will not be sewn correctly.<br />
If the buttonhole lever is accidentally pushed when you are sewing<br />
a stitch other than a buttonhole, remove the fabric and thread from<br />
the machine, raise the buttonhole lever, and sew about 20 stitches.<br />
Then sew the intended stitch.<br />
Ojales mal cosidos:<br />
Existen dos procedimientos diferentes para corregir el cosido de los<br />
ojales, en función de la parte del ojal que se ha cosido de forma<br />
incorrecta.<br />
Procedimiento de corrección 1 (véase fig. A)<br />
1. Suba la palanca del prénsatela, y después retire el tejido, y los hilos<br />
superior e inferior.<br />
2. Tire ligeramente hacia usted de la palanca de ojales.<br />
3. Cosa unas diez puntadas sin el tejido, ni los hilos superior e inferior en<br />
la máquina.<br />
4. Ponga el tejido debajo del prénsatela, y vuelva a poner los hilos<br />
superior e inferior, después empuje ligeramente la palanca de ojales<br />
hacia la parte trasera de la máquina y cosa el ojal desde el principio.<br />
Procedimiento de corrección 2 (véase fig. B)<br />
1. Levante la palanca del prensatelas y retire el tejido y todo el hilo cosido.<br />
2. Vuelva a colocar le tejido debajo del prensatelas, presione ligeramente<br />
la palanca de ojales hacia la parte trasera de la máquina y cosa el ojal<br />
desde el principio.<br />
NOTA:<br />
Cuando haya terminado de coser todos los ojales, asegúrese de subir la<br />
palanca de ojales.<br />
Si se empuja hacia la parte posterior de la máquina la palanca de ojales al<br />
coser una puntada que no sea un ojal, entrará en acción la alimentación de<br />
ojales y la puntada no se coserá correctamente.<br />
Si empuja accidentalmente la palanca de ojales cuando esté cosiendo con<br />
una puntada que no sea la de ojal, retire el tejido y el hilo de la máquina,<br />
suba la palanca de ojales, y cosa una 20 puntadas. Después cosa con la<br />
puntada que realmente quiere.<br />
Se l'occhiello non viene cucito correttamente, vi sono due diverse<br />
procedure per ottenere una cucitura corretta, a seconda della parte<br />
dell'occhiello che è stata cucita in modo errato.<br />
Procedura correttiva 1 (vedere fig. A)<br />
1. Sollevare la leva del piedino premistoffa, poi togliere il tessuto, il<br />
filo superiore e il filo inferiore.<br />
2. Tirare la leva dell'occhiello leggermente verso sé stessi.<br />
3. Cucire circa 10 punti senza tessuto, filo superiore o filo inferiore<br />
nella macchina.<br />
4. Posizionare il tessuto sotto il piedino premistoffa, inserire di<br />
nuovo il filo superiore e il filo inferiore e poi premere leggermente<br />
la leva occhielli verso il retro della macchina per cucire l’occhiello<br />
dall’inizio.<br />
Procedura correttiva 2 (vedere fig. B)<br />
1. Sollevare la leva del piedino premistoffa, togliere il tessuto e il filo<br />
che è stato cucito.<br />
2. Mettere nuovamente il tessuto sotto il piedino premistoffa, quindi<br />
premere leggermente la leva dell'occhiello verso il retro della<br />
macchina e cucire l'occhiello dall'inizio.<br />
NOTA:<br />
Quando si è finito di cucire tutti gli occhielli, assicurarsi di sollevare<br />
la leva dell’occhiello.<br />
Se si spinge la leva dell'occhiello verso il retro della macchina<br />
durante la cucitura di punti diversi dall'occhiello, verrà utilizzato il<br />
trasporto dell'occhiello e il punto non sarà cucito correttamente.<br />
Se si spinge accidentalmente la leva dell’occhiello durante la cucitura<br />
di altri tipi di punto, tagliare tessuto e filo dalla macchina, alzare<br />
la leva dell’occhiello e cucire circa 20 punti. Poi cucire il punto<br />
desiderato.<br />
63


