

Brother XL-6053/6063 - Guide utilisateur
Brother XL-6053/6063 - Guide utilisateur
Brother XL-6053/6063 - Guide utilisateur

You also want an ePaper? Increase the reach of your titles
YUMPU automatically turns print PDFs into web optimized ePapers that Google loves.
Blind Hem Stitching<br />
Pattern Stitch Length Stitch Width<br />
(Blind Hem Stitch) F-2 Fixed 3<br />
(Stretch Blind Hem Stitch) F-1.5 Fixed 4<br />
The Blind Hem Stitch is used to finish the edge of a project like the<br />
hem of a pair of pants without the stitch showing. Use the Blind Hem<br />
Stitch for any non-stretch fabrics and the Stretch Blind Hem Stitch<br />
for stretch fabrics.<br />
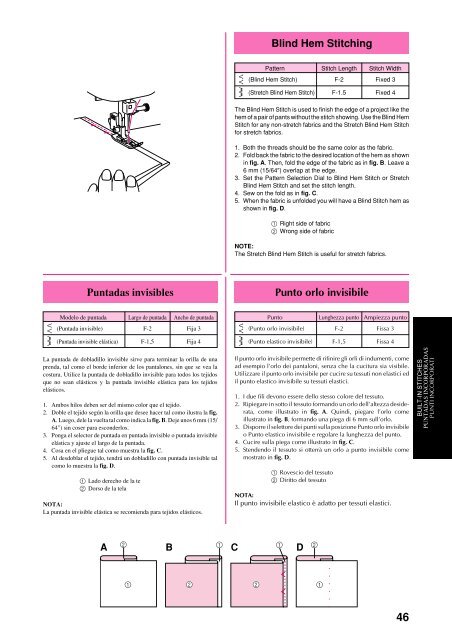
1. Both the threads should be the same color as the fabric.<br />
2. Fold back the fabric to the desired location of the hem as shown<br />
in fig. A. Then, fold the edge of the fabric as in fig. B. Leave a<br />
6 mm (15/64") overlap at the edge.<br />
3. Set the Pattern Selection Dial to Blind Hem Stitch or Stretch<br />
Blind Hem Stitch and set the stitch length.<br />
4. Sew on the fold as in fig. C.<br />
5. When the fabric is unfolded you will have a Blind Stitch hem as<br />
shown in fig. D.<br />
1 Right side of fabric<br />
2 Wrong side of fabric<br />
NOTE:<br />
The Stretch Blind Hem Stitch is useful for stretch fabrics.<br />
Puntadas invisibles<br />
Punto orlo invisibile<br />
Modelo de puntada Largo de puntada Ancho de puntada<br />
(Puntada invisible) F-2 Fija 3<br />
(Puntada invisible elástica) F-1,5 Fija 4<br />
Punto Lunghezza punto Ampiezza punto<br />
(Punto orlo invisibile) F-2 Fissa 3<br />
(Punto elastico invisibile) F-1,5 Fissa 4<br />
La puntada de dobladillo invisible sirve para terminar la orilla de una<br />
prenda, tal como el borde inferior de los pantalones, sin que se vea la<br />
costura. Utilice la puntada de dobladillo invisible para todos los tejidos<br />
que no sean elásticos y la puntada invisible elástica para los tejidos<br />
elásticos.<br />
1. Ambos hilos deben ser del mismo color que el tejido.<br />
2. Doble el tejido según la orilla que desee hacer tal como ilustra la fig.<br />
A. Luego, dele la vuelta tal como indica la fig. B. Deje unos 6 mm (15/<br />
64") sin coser para esconderlos.<br />
3. Ponga el selector de puntada en puntada invisible o puntada invisible<br />
elástica y ajuste el largo de la puntada.<br />
4. Cosa en el pliegue tal como muestra la fig. C.<br />
5. Al desdoblar el tejido, tendrá un dobladillo con puntada invisible tal<br />
como lo muestra la fig. D.<br />
1 Lado derecho de la te<br />
2 Dorso de la tela<br />
NOTA:<br />
La puntada invisible elástica se recomienda para tejidos elásticos.<br />
Il punto orlo invisibile permette di rifinire gli orli di indumenti, come<br />
ad esempio l’orlo dei pantaloni, senza che la cucitura sia visibile.<br />
Utilizzare il punto orlo invisibile per cucire su tessuti non elastici ed<br />
il punto elastico invisibile su tessuti elastici.<br />
1. I due fili devono essere dello stesso colore del tessuto.<br />
2. Ripiegare in sotto il tessuto formando un orlo dell’altezza desiderata,<br />
come illustrato in fig. A. Quindi, piegare l’orlo come<br />
illustrato in fig. B, formando una piega di 6 mm sull’orlo.<br />
3. Disporre il selettore dei punti sulla posizione Punto orlo invisibile<br />
o Punto elastico invisibile e regolare la lunghezza del punto.<br />
4. Cucire sulla piega come illustrato in fig. C.<br />
5. Stendendo il tessuto si otterrà un orlo a punto invisibile come<br />
mostrato in fig. D.<br />
1 Rovescio del tessuto<br />
2 Diritto del tessuto<br />
NOTA:<br />
Il punto invisibile elastico è adatto per tessuti elastici.<br />
BUILT-IN STITCHES<br />
PUNTADAS INCORPORADAS<br />
PUNTI INCORPORATI<br />
2<br />
1 1 2<br />
A B C D<br />
1<br />
2<br />
2<br />
1<br />
46


