

Brother XL-6053/6063 - Guide utilisateur
Brother XL-6053/6063 - Guide utilisateur
Brother XL-6053/6063 - Guide utilisateur

You also want an ePaper? Increase the reach of your titles
YUMPU automatically turns print PDFs into web optimized ePapers that Google loves.
STRAIGHT AND ZIGZAG STITCHING<br />
PUNTADAS RECTAS Y ZIGZAG<br />
CUCITURA CON PUNTO DIRITTO E ZIG-ZAG<br />
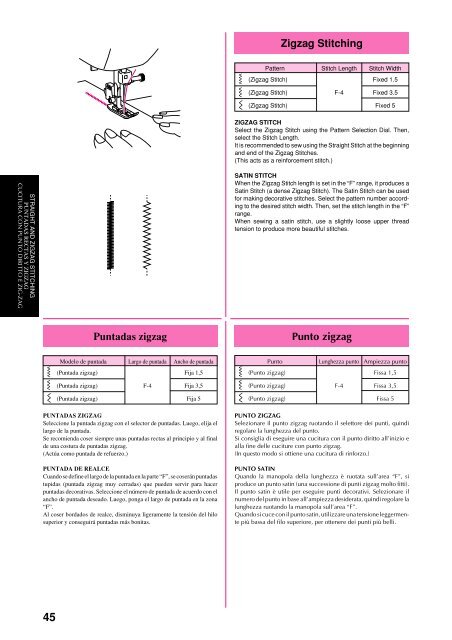
Zigzag Stitching<br />
Pattern Stitch Length Stitch Width<br />
(Zigzag Stitch) Fixed 1.5<br />
(Zigzag Stitch) F-4 Fixed 3.5<br />
(Zigzag Stitch) Fixed 5<br />
ZIGZAG STITCH<br />
Select the Zigzag Stitch using the Pattern Selection Dial. Then,<br />
select the Stitch Length.<br />
It is recommended to sew using the Straight Stitch at the beginning<br />
and end of the Zigzag Stitches.<br />
(This acts as a reinforcement stitch.)<br />
SATIN STITCH<br />
When the Zigzag Stitch length is set in the “F” range, it produces a<br />
Satin Stitch (a dense Zigzag Stitch). The Satin Stitch can be used<br />
for making decorative stitches. Select the pattern number according<br />
to the desired stitch width. Then, set the stitch length in the “F”<br />
range.<br />
When sewing a satin stitch, use a slightly loose upper thread<br />
tension to produce more beautiful stitches.<br />
Puntadas zigzag<br />
Punto zigzag<br />
Modelo de puntada Largo de puntada Ancho de puntada<br />
(Puntada zigzag) Fija 1,5<br />
(Puntada zigzag) F-4 Fija 3,5<br />
(Puntada zigzag) Fija 5<br />
PUNTADAS ZIGZAG<br />
Seleccione la puntada zigzag con el selector de puntadas. Luego, elija el<br />
largo de la puntada.<br />
Se recomienda coser siempre unas puntadas rectas al principio y al final<br />
de una costura de puntadas zigzag.<br />
(Actúa como puntada de refuerzo.)<br />
PUNTADA DE REALCE<br />
Cuando se define el largo de la puntada en la parte “F”, se coserán puntadas<br />
tupidas (puntada zigzag muy cerradas) que pueden servir para hacer<br />
puntadas decorativas. Seleccione el número de puntada de acuerdo con el<br />
ancho de puntada deseado. Luego, ponga el largo de puntada en la zona<br />
“F”.<br />
Al coser bordados de realce, disminuya ligeramente la tensión del hilo<br />
superior y conseguirá puntadas más bonitas.<br />
Punto Lunghezza punto Ampiezza punto<br />
(Punto zigzag) Fissa 1,5<br />
(Punto zigzag) F-4 Fissa 3,5<br />
(Punto zigzag) Fissa 5<br />
PUNTO ZIGZAG<br />
Selezionare il punto zigzag ruotando il selettore dei punti, quindi<br />
regolare la lunghezza del punto.<br />
Si consiglia di eseguire una cucitura con il punto diritto all’inizio e<br />
alla fine delle cuciture con punto zigzag.<br />
(In questo modo si ottiene una cucitura di rinforzo.)<br />
PUNTO SATIN<br />
Quando la manopola della lunghezza è ruotata sull’area “F”, si<br />
produce un punto satin (una successione di punti zigzag molto fitti).<br />
Il punto satin è utile per eseguire punti decorativi. Selezionare il<br />
numero del punto in base all’ampiezza desiderata, quindi regolare la<br />
lunghezza ruotando la manopola sull’area “F”.<br />
Quando si cuce con il punto satin, utilizzare una tensione leggermente<br />
più bassa del filo superiore, per ottenere dei punti più belli.<br />
45


