Brother XL-6053/6063 - Guide utilisateur
Brother XL-6053/6063 - Guide utilisateur
Brother XL-6053/6063 - Guide utilisateur
Create successful ePaper yourself
Turn your PDF publications into a flip-book with our unique Google optimized e-Paper software.
USING ATTACHMENTS AND APPLICATIONS<br />
USO DE ACCESORIOS Y APLICACIONES<br />
GUARNIZIONI E APPLICAZIONI<br />
A<br />
Monogramming and<br />
Embroidering<br />
Pattern Stitch Length Stitch Width Foot<br />
(Zigzag Stitch) Fixed 1.5<br />
(Zigzag Stitch) Any Fixed 3.5 None<br />
(Zigzag Stitch) Fixed 5<br />
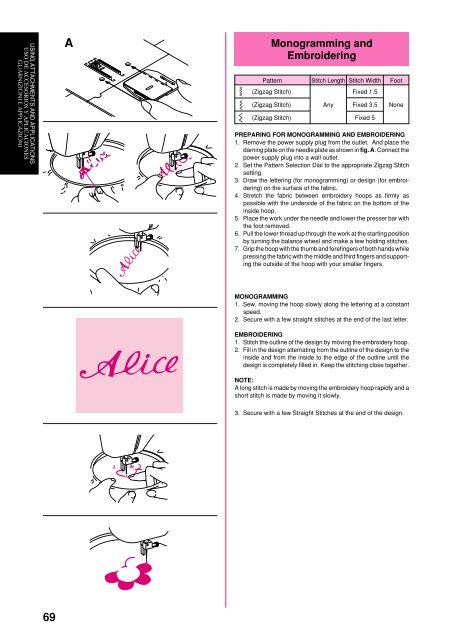
PREPARING FOR MONOGRAMMING AND EMBROIDERING<br />
1. Remove the power supply plug from the outlet. And place the<br />
darning plate on the needle plate as shown in fig. A. Connect the<br />
power supply plug into a wall outlet.<br />
2. Set the Pattern Selection Dial to the appropriate Zigzag Stitch<br />
setting.<br />
3. Draw the lettering (for monogramming) or design (for embroidering)<br />
on the surface of the fabric.<br />
4. Stretch the fabric between embroidery hoops as firmly as<br />
possible with the underside of the fabric on the bottom of the<br />
inside hoop.<br />
5. Place the work under the needle and lower the presser bar with<br />
the foot removed.<br />
6. Pull the lower thread up through the work at the starting position<br />
by turning the balance wheel and make a few holding stitches.<br />
7. Grip the hoop with the thumb and forefingers of both hands while<br />
pressing the fabric with the middle and third fingers and supporting<br />
the outside of the hoop with your smaller fingers.<br />
MONOGRAMMING<br />
1. Sew, moving the hoop slowly along the lettering at a constant<br />
speed.<br />
2. Secure with a few straight stitches at the end of the last letter.<br />
EMBROIDERING<br />
1. Stitch the outline of the design by moving the embroidery hoop.<br />
2. Fill in the design alternating from the outline of the design to the<br />
inside and from the inside to the edge of the outline until the<br />
design is completely filled in. Keep the stitching close together.<br />
NOTE:<br />
A long stitch is made by moving the embroidery hoop rapidly and a<br />
short stitch is made by moving it slowly.<br />
3. Secure with a few Straight Stitches at the end of the design.<br />
69


