Quark to InDesignCS3 Conversion Guide - InDesign User Group
Quark to InDesignCS3 Conversion Guide - InDesign User Group
Quark to InDesignCS3 Conversion Guide - InDesign User Group

Create successful ePaper yourself
Turn your PDF publications into a flip-book with our unique Google optimized e-Paper software.
what else should I know about<br />
transparency?<br />
Dragging and dropping effects.<br />
You can easily transfer transparency<br />
settings from one object <strong>to</strong><br />
others by dragging and dropping.<br />
To drag and drop effects, select an<br />
object or a graphic <strong>to</strong> which transparency<br />
effects are applied. The<br />
Effects panel identifies the object<br />
attributes—Object, Stroke, Fill, Text,<br />
or Graphic—<strong>to</strong> which effects are<br />
applied by displaying an “fx” label<br />
<strong>to</strong> the right of the attribute. Drag<br />
an “fx” label on<strong>to</strong> another object <strong>to</strong><br />
transfer effects settings. (Note: When<br />
you drag and drop effects, Blending<br />
Mode and Opacity are not transferred;<br />
only Pho<strong>to</strong>shop effects, such<br />
as Drop Shadow, Inner and Outer<br />
Glow, and so on, are transferred.)<br />
Knockout groups. When a group<br />
of objects is selected and you select<br />
the Knockout <strong>Group</strong> option in the<br />
Effects panel, every object in the<br />
group knocks out the other objects<br />
in the group. Blending modes and<br />
opacity applied <strong>to</strong> individual objects<br />
in the group are ignored relative <strong>to</strong><br />
other objects in the group, while<br />
objects beneath the selected group<br />
are still visible relative <strong>to</strong> the group,<br />
and are affected by the blending<br />
modes or opacity settings applied <strong>to</strong><br />
objects within the group and <strong>to</strong> the<br />
group as a whole.<br />
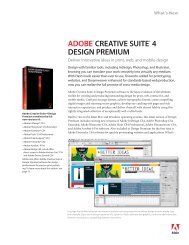
In the example on the left, a bevel and<br />
emboss effect is applied <strong>to</strong> the stroke of a<br />
text frame. At right, the effect was applied <strong>to</strong><br />
three other text frames by dragging the fx<br />
icon (<strong>to</strong> the right of stroke) in the Effects<br />
panel and dropping it on<strong>to</strong> the frames.<br />
tips:<br />
wORkIng wIth tRAnsPAREnCY<br />
• If you apply settings in the Effects dialog box without first selecting an object,<br />
each object you draw subsequently will have those new settings applied.<br />
• Select the Isolate Blending option in the Effects panel <strong>to</strong> restrict blending modes<br />
so they affect only the selected group. Objects beneath the group won’t interact<br />
with the blending modes applied <strong>to</strong> objects in the group.<br />
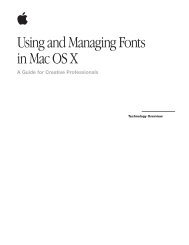
these examples demonstrate the knockout group feature. In both examples, the green<br />
frame on the left is behind a group of four empty frames <strong>to</strong> which opacity values are applied.<br />
At left, knockout group is not selected, and the opacity values applied <strong>to</strong> the frames in the<br />
group affect the other objects in the group as well as the underlying green frame. At right,<br />
knockout group is selected, and the frames in the group are knocked out of other objects in<br />
the group (that is, the opacity values are ignored and the objects are opaque, relative <strong>to</strong> each<br />
other) but retain their opacity relative <strong>to</strong> the underlying green frame.<br />
Creative Effects 51