

5800 Refrigerated Sampler Service Guide - Isco
5800 Refrigerated Sampler Service Guide - Isco
5800 Refrigerated Sampler Service Guide - Isco

Create successful ePaper yourself
Turn your PDF publications into a flip-book with our unique Google optimized e-Paper software.
<strong>5800</strong> <strong>Refrigerated</strong> <strong>Sampler</strong> <strong>Service</strong> <strong>Guide</strong><br />
Section 2 Sample Delivery System<br />
2.3.3 Pump Housing Cover<br />
and Band<br />
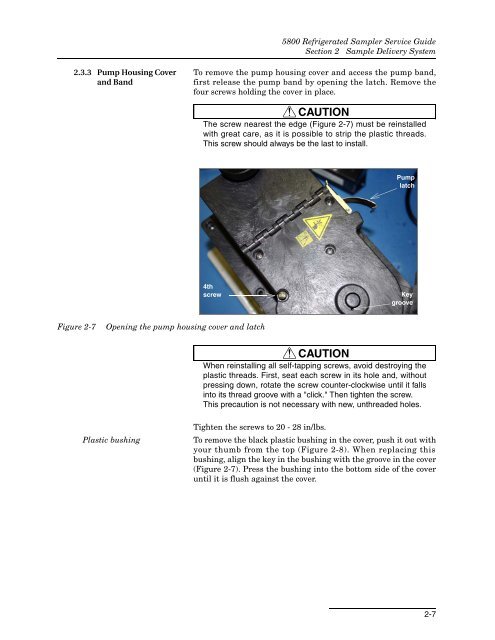
To remove the pump housing cover and access the pump band,<br />
first release the pump band by opening the latch. Remove the<br />
four screws holding the cover in place.<br />
CAUTION<br />
The screw nearest the edge (Figure 2-7) must be reinstalled<br />
with great care, as it is possible to strip the plastic threads.<br />
This screw should always be the last to install.<br />
Pump<br />
latch<br />
4th<br />
screw<br />
Key<br />
groove<br />
Figure 2-7<br />
Opening the pump housing cover and latch<br />
CAUTION<br />
When reinstalling all self-tapping screws, avoid destroying the<br />
plastic threads. First, seat each screw in its hole and, without<br />
pressing down, rotate the screw counter-clockwise until it falls<br />
into its thread groove with a "click." Then tighten the screw.<br />
This precaution is not necessary with new, unthreaded holes.<br />
Plastic bushing<br />
Tighten the screws to 20 - 28 in/lbs.<br />
To remove the black plastic bushing in the cover, push it out with<br />
your thumb from the top (Figure 2-8). When replacing this<br />
bushing, align the key in the bushing with the groove in the cover<br />
(Figure 2-7). Press the bushing into the bottom side of the cover<br />
until it is flush against the cover.<br />
2-7


