Series 04 Ku-Band TVRO Antenna
Series 04 Ku-Band TVRO Antenna
Series 04 Ku-Band TVRO Antenna

You also want an ePaper? Increase the reach of your titles
YUMPU automatically turns print PDFs into web optimized ePapers that Google loves.
<strong>Series</strong> <strong>04</strong> <strong>Ku</strong>-<strong>Band</strong> <strong>TVRO</strong> <strong>Antenna</strong><br />
Functional Testing<br />
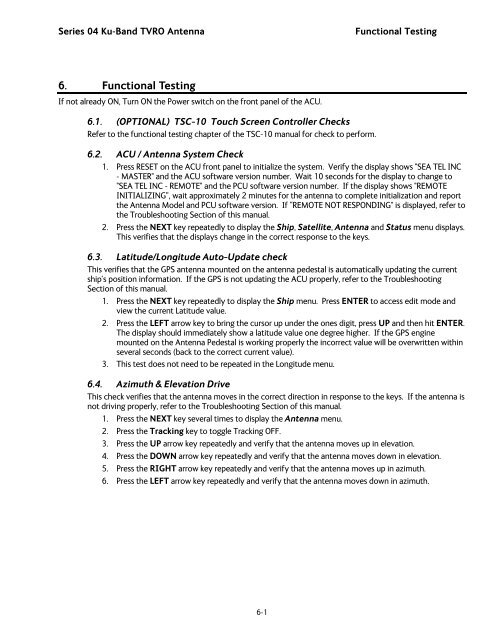
6. Functional Testing<br />
If not already ON, Turn ON the Power switch on the front panel of the ACU.<br />
6.1. (OPTIONAL) TSC-10 Touch Screen Controller Checks<br />
Refer to the functional testing chapter of the TSC-10 manual for check to perform.<br />
6.2. ACU / <strong>Antenna</strong> System Check<br />
1. Press RESET on the ACU front panel to initialize the system. Verify the display shows "SEA TEL INC<br />
- MASTER" and the ACU software version number. Wait 10 seconds for the display to change to<br />
"SEA TEL INC - REMOTE" and the PCU software version number. If the display shows "REMOTE<br />
INITIALIZING”, wait approximately 2 minutes for the antenna to complete initialization and report<br />
the <strong>Antenna</strong> Model and PCU software version. If “REMOTE NOT RESPONDING" is displayed, refer to<br />
the Troubleshooting Section of this manual.<br />
2. Press the NEXT key repeatedly to display the Ship, Satellite, <strong>Antenna</strong> and Status menu displays.<br />
This verifies that the displays change in the correct response to the keys.<br />
6.3. Latitude/Longitude Auto-Update check<br />
This verifies that the GPS antenna mounted on the antenna pedestal is automatically updating the current<br />
ship’s position information. If the GPS is not updating the ACU properly, refer to the Troubleshooting<br />
Section of this manual.<br />
1. Press the NEXT key repeatedly to display the Ship menu. Press ENTER to access edit mode and<br />
view the current Latitude value.<br />
2. Press the LEFT arrow key to bring the cursor up under the ones digit, press UP and then hit ENTER.<br />
The display should immediately show a latitude value one degree higher. If the GPS engine<br />
mounted on the <strong>Antenna</strong> Pedestal is working properly the incorrect value will be overwritten within<br />
several seconds (back to the correct current value).<br />
3. This test does not need to be repeated in the Longitude menu.<br />
6.4. Azimuth & Elevation Drive<br />
This check verifies that the antenna moves in the correct direction in response to the keys. If the antenna is<br />
not driving properly, refer to the Troubleshooting Section of this manual.<br />
1. Press the NEXT key several times to display the <strong>Antenna</strong> menu.<br />
2. Press the Tracking key to toggle Tracking OFF.<br />
3. Press the UP arrow key repeatedly and verify that the antenna moves up in elevation.<br />
4. Press the DOWN arrow key repeatedly and verify that the antenna moves down in elevation.<br />
5. Press the RIGHT arrow key repeatedly and verify that the antenna moves up in azimuth.<br />
6. Press the LEFT arrow key repeatedly and verify that the antenna moves down in azimuth.<br />
6-1
![NC1147 (pdf 1.47 mb) Nitrogen Concentrator [OBIGGS] - Cobham plc](https://img.yumpu.com/51124104/1/190x245/nc1147-pdf-147-mb-nitrogen-concentrator-obiggs-cobham-plc.jpg?quality=85)