Series 04 Ku-Band TVRO Antenna
Series 04 Ku-Band TVRO Antenna
Series 04 Ku-Band TVRO Antenna

You also want an ePaper? Increase the reach of your titles
YUMPU automatically turns print PDFs into web optimized ePapers that Google loves.
<strong>Series</strong> <strong>04</strong> <strong>Ku</strong>-<strong>Band</strong> <strong>TVRO</strong> <strong>Antenna</strong><br />
Troubleshooting and Maintenance<br />
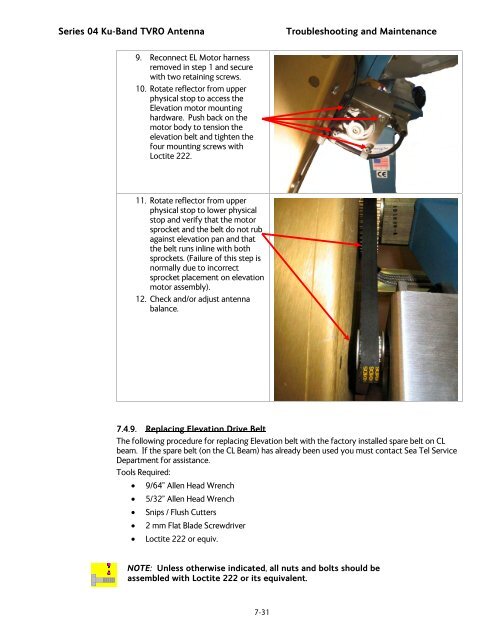
9. Reconnect EL Motor harness<br />
removed in step 1 and secure<br />
with two retaining screws.<br />
10. Rotate reflector from upper<br />
physical stop to access the<br />
Elevation motor mounting<br />
hardware. Push back on the<br />
motor body to tension the<br />
elevation belt and tighten the<br />
four mounting screws with<br />
Loctite 222.<br />
11. Rotate reflector from upper<br />
physical stop to lower physical<br />
stop and verify that the motor<br />
sprocket and the belt do not rub<br />
against elevation pan and that<br />
the belt runs inline with both<br />
sprockets. (Failure of this step is<br />
normally due to incorrect<br />
sprocket placement on elevation<br />
motor assembly).<br />
12. Check and/or adjust antenna<br />
balance.<br />
7.4.9. Replacing Elevation Drive Belt<br />
The following procedure for replacing Elevation belt with the factory installed spare belt on CL<br />
beam. If the spare belt (on the CL Beam) has already been used you must contact Sea Tel Service<br />
Department for assistance.<br />
Tools Required:<br />
• 9/64” Allen Head Wrench<br />
• 5/32” Allen Head Wrench<br />
• Snips / Flush Cutters<br />
• 2 mm Flat Blade Screwdriver<br />
• Loctite 222 or equiv.<br />
NOTE: Unless otherwise indicated, all nuts and bolts should be<br />
assembled with Loctite 222 or its equivalent.<br />
7-31
![NC1147 (pdf 1.47 mb) Nitrogen Concentrator [OBIGGS] - Cobham plc](https://img.yumpu.com/51124104/1/190x245/nc1147-pdf-147-mb-nitrogen-concentrator-obiggs-cobham-plc.jpg?quality=85)