Series 04 Ku-Band TVRO Antenna
Series 04 Ku-Band TVRO Antenna
Series 04 Ku-Band TVRO Antenna

You also want an ePaper? Increase the reach of your titles
YUMPU automatically turns print PDFs into web optimized ePapers that Google loves.
<strong>Series</strong> <strong>04</strong> <strong>Ku</strong>-<strong>Band</strong> <strong>TVRO</strong> <strong>Antenna</strong><br />
Troubleshooting and Maintenance<br />
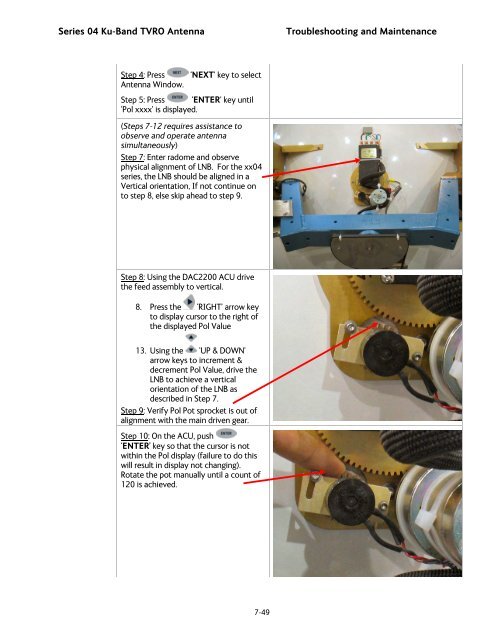
Step 4: Press ‘NEXT’ key to select<br />
<strong>Antenna</strong> Window.<br />
Step 5: Press ‘ENTER’ key until<br />
‘Pol xxxx’ is displayed.<br />
(Steps 7-12 requires assistance to<br />
observe and operate antenna<br />
simultaneously)<br />
Step 7: Enter radome and observe<br />
physical alignment of LNB. For the xx<strong>04</strong><br />
series, the LNB should be aligned in a<br />
Vertical orientation, If not continue on<br />
to step 8, else skip ahead to step 9.<br />
Step 8: Using the DAC2200 ACU drive<br />
the feed assembly to vertical.<br />
8. Press the ‘RIGHT’ arrow key<br />
to display cursor to the right of<br />
the displayed Pol Value<br />
13. Using the ‘UP & DOWN’<br />
arrow keys to increment &<br />
decrement Pol Value, drive the<br />
LNB to achieve a vertical<br />
orientation of the LNB as<br />
described in Step 7.<br />
Step 9: Verify Pol Pot sprocket is out of<br />
alignment with the main driven gear.<br />
Step 10: On the ACU, push<br />
‘ENTER’ key so that the cursor is not<br />
within the Pol display (failure to do this<br />
will result in display not changing).<br />
Rotate the pot manually until a count of<br />
120 is achieved.<br />
7-49
![NC1147 (pdf 1.47 mb) Nitrogen Concentrator [OBIGGS] - Cobham plc](https://img.yumpu.com/51124104/1/190x245/nc1147-pdf-147-mb-nitrogen-concentrator-obiggs-cobham-plc.jpg?quality=85)