Series 04 Ku-Band TVRO Antenna
Series 04 Ku-Band TVRO Antenna
Series 04 Ku-Band TVRO Antenna

You also want an ePaper? Increase the reach of your titles
YUMPU automatically turns print PDFs into web optimized ePapers that Google loves.
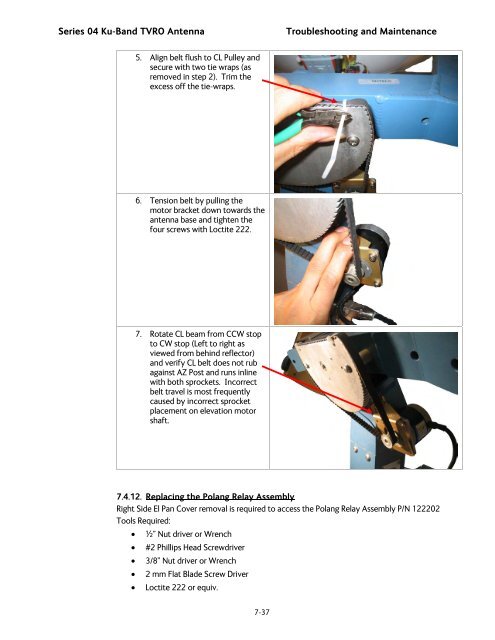
<strong>Series</strong> <strong>04</strong> <strong>Ku</strong>-<strong>Band</strong> <strong>TVRO</strong> <strong>Antenna</strong><br />
Troubleshooting and Maintenance<br />
5. Align belt flush to CL Pulley and<br />
secure with two tie wraps (as<br />
removed in step 2). Trim the<br />
excess off the tie-wraps.<br />
6. Tension belt by pulling the<br />
motor bracket down towards the<br />
antenna base and tighten the<br />
four screws with Loctite 222.<br />
7. Rotate CL beam from CCW stop<br />
to CW stop (Left to right as<br />
viewed from behind reflector)<br />
and verify CL belt does not rub<br />
against AZ Post and runs inline<br />
with both sprockets. Incorrect<br />
belt travel is most frequently<br />
caused by incorrect sprocket<br />
placement on elevation motor<br />
shaft.<br />
7.4.12. Replacing the Polang Relay Assembly<br />
Right Side El Pan Cover removal is required to access the Polang Relay Assembly P/N 122202<br />
Tools Required:<br />
• ½” Nut driver or Wrench<br />
• #2 Phillips Head Screwdriver<br />
• 3/8” Nut driver or Wrench<br />
• 2 mm Flat Blade Screw Driver<br />
• Loctite 222 or equiv.<br />
7-37
![NC1147 (pdf 1.47 mb) Nitrogen Concentrator [OBIGGS] - Cobham plc](https://img.yumpu.com/51124104/1/190x245/nc1147-pdf-147-mb-nitrogen-concentrator-obiggs-cobham-plc.jpg?quality=85)