Series 04 Ku-Band TVRO Antenna
Series 04 Ku-Band TVRO Antenna
Series 04 Ku-Band TVRO Antenna
You also want an ePaper? Increase the reach of your titles
YUMPU automatically turns print PDFs into web optimized ePapers that Google loves.
Troubleshooting and Maintenance<br />
<strong>Series</strong> <strong>04</strong> <strong>Ku</strong>-<strong>Band</strong> <strong>TVRO</strong> <strong>Antenna</strong><br />
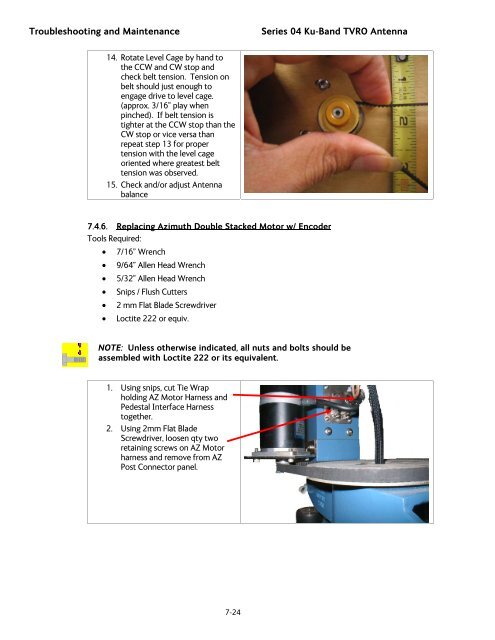
14. Rotate Level Cage by hand to<br />
the CCW and CW stop and<br />
check belt tension. Tension on<br />
belt should just enough to<br />
engage drive to level cage.<br />
(approx. 3/16” play when<br />
pinched). If belt tension is<br />
tighter at the CCW stop than the<br />
CW stop or vice versa than<br />
repeat step 13 for proper<br />
tension with the level cage<br />
oriented where greatest belt<br />
tension was observed.<br />
15. Check and/or adjust <strong>Antenna</strong><br />
balance<br />
7.4.6. Replacing Azimuth Double Stacked Motor w/ Encoder<br />
Tools Required:<br />
• 7/16” Wrench<br />
• 9/64” Allen Head Wrench<br />
• 5/32” Allen Head Wrench<br />
• Snips / Flush Cutters<br />
• 2 mm Flat Blade Screwdriver<br />
• Loctite 222 or equiv.<br />
NOTE: Unless otherwise indicated, all nuts and bolts should be<br />
assembled with Loctite 222 or its equivalent.<br />
1. Using snips, cut Tie Wrap<br />
holding AZ Motor Harness and<br />
Pedestal Interface Harness<br />
together.<br />
2. Using 2mm Flat Blade<br />
Screwdriver, loosen qty two<br />
retaining screws on AZ Motor<br />
harness and remove from AZ<br />
Post Connector panel.<br />
7-24


![NC1147 (pdf 1.47 mb) Nitrogen Concentrator [OBIGGS] - Cobham plc](https://img.yumpu.com/51124104/1/190x245/nc1147-pdf-147-mb-nitrogen-concentrator-obiggs-cobham-plc.jpg?quality=85)
