Series 04 Ku-Band TVRO Antenna
Series 04 Ku-Band TVRO Antenna
Series 04 Ku-Band TVRO Antenna

You also want an ePaper? Increase the reach of your titles
YUMPU automatically turns print PDFs into web optimized ePapers that Google loves.
Troubleshooting and Maintenance<br />
<strong>Series</strong> <strong>04</strong> <strong>Ku</strong>-<strong>Band</strong> <strong>TVRO</strong> <strong>Antenna</strong><br />
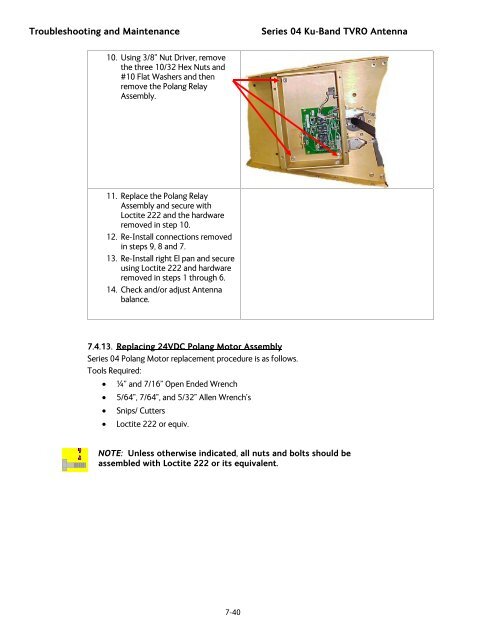
10. Using 3/8” Nut Driver, remove<br />
the three 10/32 Hex Nuts and<br />
#10 Flat Washers and then<br />
remove the Polang Relay<br />
Assembly.<br />
11. Replace the Polang Relay<br />
Assembly and secure with<br />
Loctite 222 and the hardware<br />
removed in step 10.<br />
12. Re-Install connections removed<br />
in steps 9, 8 and 7.<br />
13. Re-Install right El pan and secure<br />
using Loctite 222 and hardware<br />
removed in steps 1 through 6.<br />
14. Check and/or adjust <strong>Antenna</strong><br />
balance.<br />
7.4.13. Replacing 24VDC Polang Motor Assembly<br />
<strong>Series</strong> <strong>04</strong> Polang Motor replacement procedure is as follows.<br />
Tools Required:<br />
• ¼” and 7/16” Open Ended Wrench<br />
• 5/64”, 7/64”, and 5/32” Allen Wrench’s<br />
• Snips/ Cutters<br />
• Loctite 222 or equiv.<br />
NOTE: Unless otherwise indicated, all nuts and bolts should be<br />
assembled with Loctite 222 or its equivalent.<br />
7-40
![NC1147 (pdf 1.47 mb) Nitrogen Concentrator [OBIGGS] - Cobham plc](https://img.yumpu.com/51124104/1/190x245/nc1147-pdf-147-mb-nitrogen-concentrator-obiggs-cobham-plc.jpg?quality=85)