Series 04 Ku-Band TVRO Antenna
Series 04 Ku-Band TVRO Antenna
Series 04 Ku-Band TVRO Antenna

You also want an ePaper? Increase the reach of your titles
YUMPU automatically turns print PDFs into web optimized ePapers that Google loves.
Troubleshooting and Maintenance<br />
<strong>Series</strong> <strong>04</strong> <strong>Ku</strong>-<strong>Band</strong> <strong>TVRO</strong> <strong>Antenna</strong><br />
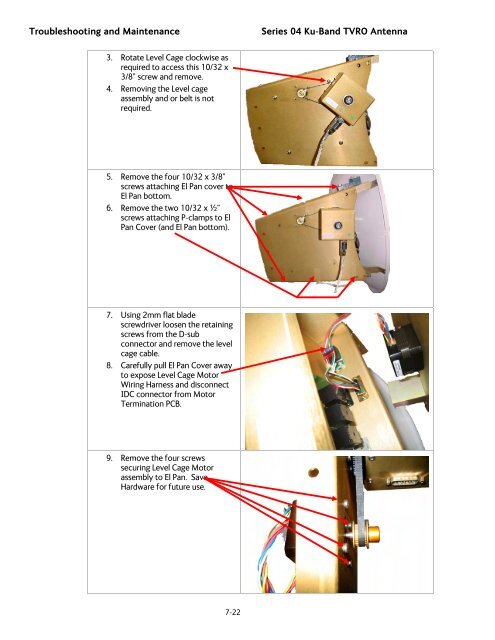
3. Rotate Level Cage clockwise as<br />
required to access this 10/32 x<br />
3/8” screw and remove.<br />
4. Removing the Level cage<br />
assembly and or belt is not<br />
required.<br />
5. Remove the four 10/32 x 3/8”<br />
screws attaching El Pan cover to<br />
El Pan bottom.<br />
6. Remove the two 10/32 x ½”<br />
screws attaching P-clamps to El<br />
Pan Cover (and El Pan bottom).<br />
7. Using 2mm flat blade<br />
screwdriver loosen the retaining<br />
screws from the D-sub<br />
connector and remove the level<br />
cage cable.<br />
8. Carefully pull El Pan Cover away<br />
to expose Level Cage Motor<br />
Wiring Harness and disconnect<br />
IDC connector from Motor<br />
Termination PCB.<br />
9. Remove the four screws<br />
securing Level Cage Motor<br />
assembly to El Pan. Save<br />
Hardware for future use.<br />
7-22
![NC1147 (pdf 1.47 mb) Nitrogen Concentrator [OBIGGS] - Cobham plc](https://img.yumpu.com/51124104/1/190x245/nc1147-pdf-147-mb-nitrogen-concentrator-obiggs-cobham-plc.jpg?quality=85)