User Manual Samsung SRD-470D/470DC DVR
User Manual Samsung SRD-470D/470DC DVR
User Manual Samsung SRD-470D/470DC DVR

Create successful ePaper yourself
Turn your PDF publications into a flip-book with our unique Google optimized e-Paper software.
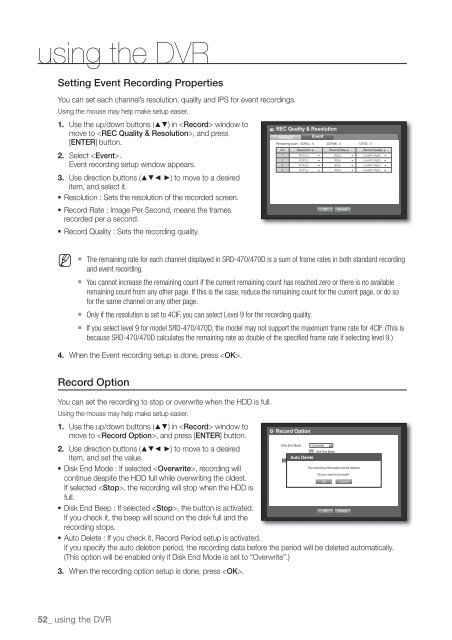
using the <strong>DVR</strong>Setting Event Recording PropertiesYou can set each channel’s resolution, quality and IPS for event recordings.Using the mouse may help make setup easier.1. Use the up/down buttons () in window tomove to , and press[ENTER] button.2. Select .Event recording setup window appears.3. Use direction buttons (◄ ►) to move to a desireditem, and select it.• Resolution : Sets the resolution of the recorded screen.• Record Rate : Image Per Second, means the framesrecorded per a second.• Record Quality : Sets the recording quality.REC Quality & ResolutionStandardEventRemaining count : 4CIF(L) : 0 2CIF(M) : 0 CIF(S) : 0CH Resolution Record Rate Record Quality 1 4CIF(L) 30ips Level8 (High) 2 4CIF(L) 30ips Level8 (High) 3 4CIF(L) 30ips Level8 (High) 4 4CIF(L) 30ips Level8 (High) OKCancelM The remaining rate for each channel displayed in <strong>SRD</strong>-470/<strong>470D</strong> is a sum of frame rates in both standard recordingand event recording. You cannot increase the remaining count if the current remaining count has reached zero or there is no availableremaining count from any other page. If this is the case, reduce the remaining count for the current page, or do sofor the same channel on any other page. Only if the resolution is set to 4CIF, you can select Level 9 for the recording quality. If you select level 9 for model <strong>SRD</strong>-470/<strong>470D</strong>, the model may not support the maximum frame rate for 4CIF. (This isbecause <strong>SRD</strong>-470/<strong>470D</strong> calculates the remaining rate as double of the specified frame rate if selecting level 9.)4. When the Event recording setup is done, press .Record OptionYou can set the recording to stop or overwrite when the HDD is full.Using the mouse may help make setup easier.1. Use the up/down buttons () in window tomove to , and press [ENTER] button.2. Use direction buttons (◄ ►) to move to a desireditem, and set the value.• Disk End Mode : If selected , recording willcontinue despite the HDD full while overwriting the oldest.If selected , the recording will stop when the HDD isfull.• Disk End Beep : If selected , the button is activated.If you check it, the beep will sound on the disk full and therecording stops.• Auto Delete : If you check it, Record Period setup is activated.If you specify the auto deletion period, the recording data before the period will be deleted automatically.(This option will be enabled only if Disk End Mode is set to “Overwrite”.)3. When the recording option setup is done, press .Record Option• Disk End Mode OverwriteDisk End BeepAuto Delete• Auto Delete 180 dayThe recording information will be deleted.Do you want to proceed?OKOKCancelCancel52_ using the <strong>DVR</strong>