
Create successful ePaper yourself
Turn your PDF publications into a flip-book with our unique Google optimized e-Paper software.
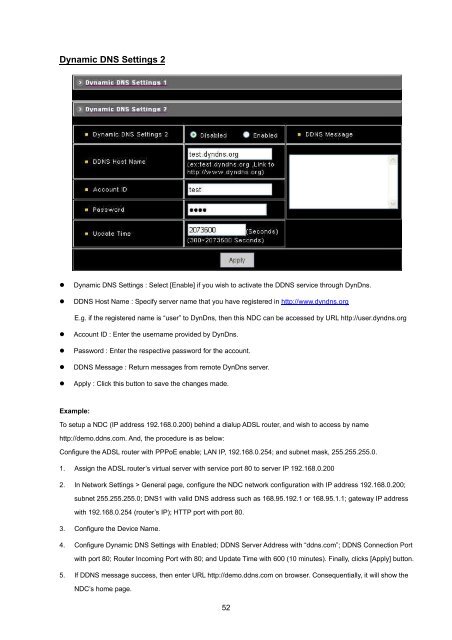
Dynamic DNS Settings 2• Dynamic DNS Settings : Select [Enable] if you wish to activate the DDNS service through DynDns.• DDNS Host Name : Specify server name that you have registered in http://www.dyndns.orgE.g. if the registered name is “user” to DynDns, then this NDC can be accessed by URL http://user.dyndns.org• Account ID : Enter the username provided by DynDns.• Password : Enter the respective password for the account.• DDNS Message : Return messages from remote DynDns server.• Apply : Click this button to save the changes made.Example:To setup a NDC (IP address 192.168.0.200) behind a dialup ADSL router, and wish to access by namehttp://demo.ddns.com. And, the procedure is as below:Configure the ADSL router with PPPoE enable; LAN IP, 192.168.0.254; and subnet mask, 255.255.255.0.1. Assign the ADSL router’s virtual server with service port 80 to server IP 192.168.0.2002. In Network Settings > General page, configure the NDC network configuration with IP address 192.168.0.200;subnet 255.255.255.0; DNS1 with valid DNS address such as 168.95.192.1 or 168.95.1.1; gateway IP addresswith 192.168.0.254 (router’s IP); HTTP port with port 80.3. Configure the Device Name.4. Configure Dynamic DNS Settings with Enabled; DDNS Server Address with “ddns.com”; DDNS Connection Portwith port 80; Router Incoming Port with 80; and Update Time with 600 (10 minutes). Finally, clicks [Apply] button.5. If DDNS message success, then enter URL http://demo.ddns.com on browser. Consequentially, it will show theNDC’s home page.52