
You also want an ePaper? Increase the reach of your titles
YUMPU automatically turns print PDFs into web optimized ePapers that Google loves.
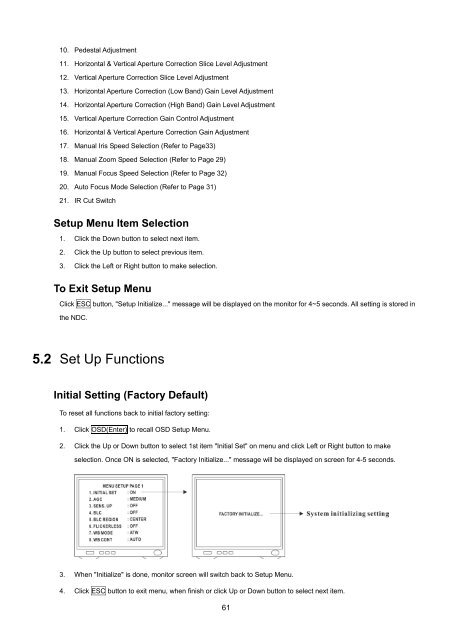
10. Pedestal Adjustment11. Horizontal & Vertical Aperture Correction Slice Level Adjustment12. Vertical Aperture Correction Slice Level Adjustment13. Horizontal Aperture Correction (Low Band) Gain Level Adjustment14. Horizontal Aperture Correction (High Band) Gain Level Adjustment15. Vertical Aperture Correction Gain Control Adjustment16. Horizontal & Vertical Aperture Correction Gain Adjustment17. <strong>Manual</strong> Iris Speed Selection (Refer to Page33)18. <strong>Manual</strong> Zoom Speed Selection (Refer to Page 29)19. <strong>Manual</strong> Focus Speed Selection (Refer to Page 32)20. Auto Focus Mode Selection (Refer to Page 31)21. IR Cut SwitchSetup Menu Item Selection1. Click the Down button to select next item.2. Click the Up button to select previous item.3. Click the Left or Right button to make selection.To Exit Setup MenuClick ESC button, "Setup Initialize..." message will be displayed on the monitor for 4~5 seconds. All setting is stored inthe NDC.5.2 Set Up FunctionsInitial Setting (Factory Default)To reset all functions back to initial factory setting:1. Click OSD(Enter) to recall OSD Setup Menu.2. Click the Up or Down button to select 1st item "Initial Set" on menu and click Left or Right button to makeselection. Once ON is selected, "Factory Initialize..." message will be displayed on screen for 4-5 seconds.3. When "Initialize" is done, monitor screen will switch back to Setup Menu.4. Click ESC button to exit menu, when finish or click Up or Down button to select next item.61