- Page 1:
HX2 Reference GuideLXE | FLEX | Wea
- Page 5 and 6:
Table of ContentsLAUNCH.EXE and Per
- Page 7 and 8:
Table of ContentsLaunch Button 71Au
- Page 9 and 10:
Table of ContentsStatus Popup 130Ow
- Page 11 and 12:
Table of ContentsSummit Tray Icon 1
- Page 13 and 14:
IntroductionThe LXE® HX2 is a smal
- Page 15 and 16:
ComponentsComponentsFrontNote: Alph
- Page 17 and 18:
BackBackWear on Left Side, Ring on
- Page 19 and 20:
Ring Scanner and Ring ImagerRing Sc
- Page 21 and 22:
Li-Ion BatteryLi-Ion BatteryMain ba
- Page 23 and 24:
DisconnectDisconnect1. Push down on
- Page 25 and 26:
RebootRebootWhen the Windows CE des
- Page 27 and 28:
System MemorySystem MemoryThe 400MH
- Page 29 and 30:
Audio SupportAudio SupportSpeakerTh
- Page 31 and 32:
KeypadsKeypadsThere are three keypa
- Page 33 and 34:
The Dual Alpha KeypadThe Dual Alpha
- Page 35 and 36:
PowerPowerPower ModesPrimary Events
- Page 37 and 38:
BatteriesBatteriesThe HX2 is design
- Page 39 and 40:
Handling Batteries SafelyHandling B
- Page 41 and 42:
General Windows CE Keyboard Shortcu
- Page 43 and 44:
Folders Copied at StartupFolders Co
- Page 45 and 46:
Software DevelopmentSoftware Develo
- Page 47 and 48:
LAUNCH.EXE and Persistent Storage
- Page 49 and 50:
DesktopDesktopFor general use instr
- Page 51 and 52:
My Device FoldersMy Device FoldersF
- Page 53 and 54:
Start FTP Server / Stop FTP ServerS
- Page 55 and 56:
TranscriberTranscriberTo make chang
- Page 57 and 58:
Advanced TabAdvanced TabTaskbar Pro
- Page 59 and 60:
Taskbar IconsIconFunctionShift modi
- Page 61 and 62:
Using ActiveSyncUsing ActiveSyncInt
- Page 63 and 64:
Serial ConnectionIf a cradle is not
- Page 65 and 66:
ConnectConnectConnect the modem cab
- Page 67 and 68:
Configuring the HX2 with LXEConnect
- Page 69 and 70:
Using LXEConnectUsing LXEConnect1.
- Page 71 and 72:
Control PanelOptionPC ConnectionPow
- Page 73 and 74:
Identifying Software VersionsIdenti
- Page 75 and 76:
Administration - for AppLockAdminis
- Page 77 and 78:
Administration ModeAdministration M
- Page 79 and 80:
End-User Switching TechniqueEnd-Use
- Page 81 and 82:
Application ConfigurationApplicatio
- Page 83 and 84:
Launch ButtonOptionGlobalDelayInput
- Page 85 and 86:
Auto Re-LaunchAuto Re-LaunchAuto Re
- Page 87 and 88:
Allow CloseAllow CloseAllow Close C
- Page 89 and 90:
Security PanelSecurity PanelSecurit
- Page 91 and 92:
Status PanelStatus PanelUse the Sta
- Page 93 and 94:
BatteryBatteryStart | Settings | Co
- Page 95 and 96:
Bluetooth DevicesBluetooth taskbar
- Page 97 and 98:
Clear ButtonAn icon with a white ba
- Page 99 and 100:
Bluetooth Device PropertiesBluetoot
- Page 101 and 102:
OptionsOptionPrompt if devices requ
- Page 103 and 104:
OptionsOptionFunctionThis option is
- Page 105 and 106:
OPP SendOPP SendIf LXEZ Pairing OPP
- Page 107 and 108:
Using BluetoothUsing BluetoothStart
- Page 109 and 110:
Bluetooth IndicatorsBluetooth Indic
- Page 111 and 112:
HX2 without LabelHX2 without LabelI
- Page 113 and 114:
Using OPPUsing OPPPairing with an O
- Page 115 and 116:
CertificatesCertificatesStart | Set
- Page 117 and 118:
Device ManagementDevice ManagementS
- Page 119 and 120:
DisplayDisplayStart | Settings | Co
- Page 121 and 122:
BacklightBacklightThe backlight set
- Page 123 and 124:
Installed ProgramsInstalled Program
- Page 125 and 126:
Internet OptionsE-EQ-HX2RG-M [ 113
- Page 127 and 128:
KeyPadKeyPadStart | Settings | Cont
- Page 129 and 130:
KeyMap TabKeyMap TabAlpha Mode 3 Ta
- Page 131 and 132:
LaunchApp TabLaunchApp TabThe defau
- Page 133 and 134:
License ViewerLicense ViewerStart |
- Page 135 and 136:
MouseMouseStart | Settings | Contro
- Page 137 and 138:
Network CaptureNetwork CaptureStart
- Page 139 and 140:
NDISLogRun cmdPerforms the command
- Page 141 and 142:
Misc1. Use ActiveSync to copy GrabT
- Page 143 and 144:
OwnerOwnerStart | Settings | Contro
- Page 145 and 146:
PasswordPasswordStart | Settings |
- Page 147 and 148:
PowerPowerStart | Settings | Contro
- Page 149 and 150:
Regional and Language SettingsRegio
- Page 151 and 152:
Remove ProgramsRemove ProgramsStart
- Page 153 and 154: Barcode Processing OverviewBarcode
- Page 155 and 156: Continuous Scan ModeContinuous Scan
- Page 157 and 158: COM1 TabCOM1 TabStart | Settings |
- Page 159 and 160: ButtonsButtonsSymbology SettingsCtr
- Page 161 and 162: Enable Code IDNotes• When Strip:
- Page 163 and 164: ButtonsButtonsAddEntering data into
- Page 165 and 166: Barcode Processing ExamplesBarcode
- Page 167 and 168: ParametersReplacementThe edit contr
- Page 169 and 170: ParametersParametersEnableThis chec
- Page 171 and 172: Barcode Data Match ListBarcode Data
- Page 173 and 174: Add Prefix/Suffix ControlAdd Prefix
- Page 175 and 176: Length Based Barcode StrippingClick
- Page 177 and 178: SystemSystemStart | Settings | Cont
- Page 179 and 180: Copyrights TabCopyrights TabThis sc
- Page 181 and 182: Good Scan and Bad Scan SoundsThe vo
- Page 183 and 184: Briefly . . .Briefly . . .The Avala
- Page 185 and 186: Preparing an LXE Device for Remote
- Page 187 and 188: User InterfaceUser InterfaceThe Ena
- Page 189 and 190: Avalanche Update using File | Setti
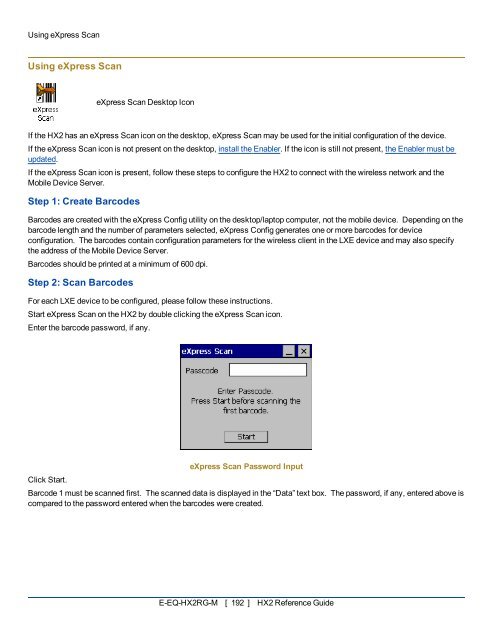
- Page 191 and 192: ExecutionExecutionNote the dimmed o
- Page 193 and 194: Startup/ShutdownStartup/ShutdownLXE
- Page 195 and 196: TaskbarTaskbarLXE recommends using
- Page 197 and 198: DisplayDisplayWindow Display Option
- Page 199 and 200: AdaptersAdaptersNote: LXE recommend
- Page 201 and 202: AdaptersNote: A reboot may be requi
- Page 203: ExitExitThe Exit option is password
- Page 207 and 208: Wireless Network Configuration for
- Page 209 and 210: Summit Tray IconSummit Tray IconThe
- Page 211 and 212: Main TabMain TabStart | Programs |
- Page 213 and 214: Admin LoginAdmin LoginTo login to A
- Page 215 and 216: ButtonsButtonsButtonCommitCredentia
- Page 217 and 218: Profile ParametersParameter Default
- Page 219 and 220: Diags TabDiags TabStart | Programs
- Page 221 and 222: Custom Parameter OptionFactory Defa
- Page 223 and 224: Global ParametersParameter Default
- Page 225 and 226: Global ParametersParameter Default
- Page 227 and 228: How to: Use Sign On ScreenSign-On S
- Page 229 and 230: Root CA CertificatesHow To: Use Win
- Page 231 and 232: WEPWEPTo connect using WEP, make su
- Page 233 and 234: LEAPTo use Stored Credentials, clic
- Page 235 and 236: PEAP/MSCHAPClick OK then click Comm
- Page 237 and 238: PEAP/GTCSee Windows Certificate Sto
- Page 239 and 240: WPA/LEAPTo use Stored Credentials,
- Page 241 and 242: EAP-FASTTo use Stored Credentials,
- Page 243 and 244: EAP-TLSOnce successfully authentica
- Page 245 and 246: CertificatesCertificatesNote: Pleas
- Page 247 and 248: Generating a Root CA CertificateCer
- Page 249 and 250: Generating a Root CA CertificateCli
- Page 251 and 252: Installing a Root CA CertificateBro
- Page 253 and 254: Generating a User CertificateClick
- Page 255 and 256:
Generating a User CertificateAdvanc
- Page 257 and 258:
Generating a User CertificateClick
- Page 259 and 260:
Installing a User CertificateBrowsi
- Page 261 and 262:
KeymapsAlpha Mode 3 TapDual AlphaTr
- Page 263 and 264:
Alpha Mode 3 TapTo get this Key / F
- Page 265 and 266:
Alpha Mode 3 Tap90To get this Key /
- Page 267 and 268:
Dual AlphaTo get this Key / Functio
- Page 269 and 270:
Dual AlphaTo get this Key / Functio
- Page 271 and 272:
Triple TapTriple TapHints• Any ke
- Page 273 and 274:
Triple TapTo get this Key / Functio
- Page 275 and 276:
Triple TapTo get this Key / Functio
- Page 277 and 278:
Environmental SpecificationsEnviron
- Page 279 and 280:
AppLock Error MessagesMessage Expla
- Page 281 and 282:
AppLock Error MessagesMessage Expla
- Page 283 and 284:
AppLock Error MessagesMessage Expla
- Page 285 and 286:
Hat EncodingHat EncodingE-EQ-HX2RG-
- Page 287 and 288:
Revision HistoryRevision HistoryRev
- Page 289 and 290:
IndexAAbout 60Accessibility 62Activ
- Page 291 and 292:
Index F - LEnabler Settings icon 17
- Page 293 and 294:
Index R - SProfile Tab 202 screensa