- Page 1 and 2: Concert Performer Series Digital Pi
- Page 3 and 4: Important Safety Instructions SAVE
- Page 5 and 6: Do not wipe the product with benzen
- Page 7 and 8: Loop Settings . . . . . . . . . . .
- Page 9 and 10: 22 25 29 42 21 26 DISPLAY CONTROL T
- Page 11 and 12: Rear Terminals 49 50 51 52 53 54 55
- Page 13 and 14: To keep things simple, this manual
- Page 15 and 16: Basic Controls This chapter discuss
- Page 17 and 18: Portamento for the Solo Part The So
- Page 19 and 20: Mixer This Mixer screen allows you
- Page 21 and 22: REVERB CHORUS EFFECT Effects You mi
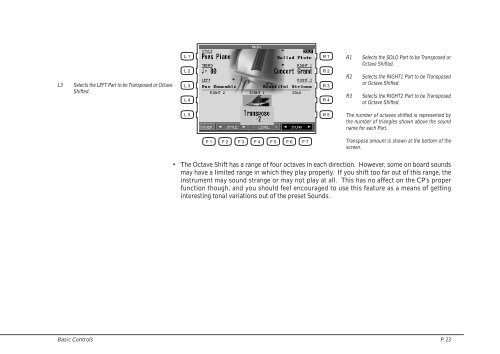
- Page 23 and 24: 5) Turn the Dial to change the valu
- Page 25 and 26: Effect Types Chorus Flanger Celeste
- Page 27: • The LED Indicator on the EFFECT
- Page 31 and 32: Piano Only The Piano Only button pr
- Page 33 and 34: L 1 R 1 Use the L or R buttons to s
- Page 35 and 36: Fingered One Finger Full Keyboard T
- Page 37 and 38: • Among the settings contained in
- Page 39 and 40: To create your own Registration: 1)
- Page 41 and 42: L 1 R 1 L 2 R 2 L 3 R 3 L 4 R 4 L 5
- Page 43 and 44: L 1 L 2 R 1 R 2 Use the L, R button
- Page 45 and 46: L1 Highlights the Style. L 1 R 1 R1
- Page 47 and 48: To use Harmony: 1) Press the HARMON
- Page 49 and 50: The current bar number is displayed
- Page 51 and 52: 2) Press the REC button. 3) Press t
- Page 53 and 54: ADVANCED RECORDER Advanced Recordin
- Page 55 and 56: 4) Start recording by pressing the
- Page 57 and 58: Track Settings The Track Settings s
- Page 59 and 60: 5) Press the L4 button to specify t
- Page 61 and 62: To use Punch-in recording: 1) Selec
- Page 63 and 64: Step Recording Step Recording is a
- Page 65 and 66: 4) If you would like to enter a res
- Page 67 and 68: Bar Editing Bar Edit contains many
- Page 69 and 70: ○ ○ ○ ○ ○ ○ ○ ○ ○
- Page 71 and 72: Delete Delete completely erases and
- Page 73 and 74: L 1 R 1 L2 L3 Selects the number of
- Page 75 and 76: Merge Merge combines data from two
- Page 77 and 78: Velocity Modify Velocity refers to
- Page 79 and 80:
Transpose This will transpose the n
- Page 81 and 82:
5) Select the function that you wou
- Page 83 and 84:
Advanced Style Edit This allows you
- Page 85 and 86:
To use Advanced Edit: 1) Select the
- Page 87 and 88:
RESET Resetting the Style You can r
- Page 89 and 90:
4) Press the ENTER button (F7). The
- Page 91 and 92:
11) To erase any unnecessary or inc
- Page 93 and 94:
Auto-accompaniment System The Conce
- Page 95 and 96:
Making a Style with Phrase Combinat
- Page 97 and 98:
L1 Sets the default tempo for the s
- Page 99 and 100:
5) After the CP reads the program,
- Page 101 and 102:
Creating Your Own Styles P. 95
- Page 103 and 104:
3) Press the L1 button and then tur
- Page 105 and 106:
To make a User Sound: 1) Select the
- Page 107 and 108:
Editing Sounds P. 101
- Page 109 and 110:
• The CP can also recognize most
- Page 111 and 112:
Controlling Playback of a Song As t
- Page 113 and 114:
If the song you are playing has lyr
- Page 115 and 116:
L 1 R 1 The L and R buttons select
- Page 117 and 118:
L 1 R 1 L 2 R 2 L 3 R 3 L 4 R 4 L 5
- Page 119 and 120:
Concert Magic Song Arrangements Con
- Page 121 and 122:
Playing with the Concert Magic P. 1
- Page 123 and 124:
L1 Selects the overall tuning of th
- Page 125 and 126:
Touch Curve When playing a piano, t
- Page 127 and 128:
4) Use the Dial to select either Us
- Page 129 and 130:
To create a User EQ: 1) Select one
- Page 131 and 132:
Resonance When the sustain pedal is
- Page 133 and 134:
Pedal Assign The Soft and Sostenuto
- Page 135 and 136:
2) Use the L and R buttons to selec
- Page 137 and 138:
Solo Settings This configures the s
- Page 139 and 140:
Effect for Sound This function dete
- Page 141 and 142:
Brief explanation of temperaments T
- Page 143 and 144:
L 1 R 1 L 2 R 2 L 3 R 3 L 4 R 4 L 5
- Page 145 and 146:
Clock Clock is a data code that a M
- Page 147 and 148:
On page three of the MIDI Settings
- Page 149 and 150:
Power Up Settings This determines w
- Page 151 and 152:
Software Version This function is u
- Page 153 and 154:
Display Control P. 147
- Page 155 and 156:
L 1 L 2 R 1 R 2 Use the L and R but
- Page 157 and 158:
Duet Harmonies create one harmony n
- Page 159 and 160:
Note: The suggestions given for the
- Page 161 and 162:
L 1 R 1 L 2 R 2 L 3 R 3 L 4 R 4 L 5
- Page 163 and 164:
L 1 R 1 L2 Loads data from a floppy
- Page 165 and 166:
Example: Saving a Style L 1 R 1 L 2
- Page 167 and 168:
4) When loading User Style, User Co
- Page 169 and 170:
Erasing Data from a Floppy Disk Thi
- Page 171 and 172:
L 1 R 1 L2 Formats a 2HD disk. L 2
- Page 173 and 174:
Playing an audio CD The operation o
- Page 175 and 176:
Recording onto a CD You can record
- Page 177 and 178:
Closing (Finalizing) Your CD To lis
- Page 179 and 180:
L 1 L 2 R 1 R 2 Use the L and R but
- Page 181 and 182:
L 1 R 1 L 2 R 2 L 3 R 3 L 4 R 4 L 5
- Page 183 and 184:
Playing Piano Music The Concert Per
- Page 185 and 186:
Making your Favorites list You can
- Page 187 and 188:
DRAWBAR PAGE 1 PAGE 2 PAGE 3 PAGE 4
- Page 189 and 190:
GUITAR PAGE 1 PAGE 2 PAGE 3 PAGE 4
- Page 191 and 192:
List of Styles SWING & BIG BAND 50
- Page 193 and 194:
List of Song Stylists 16 Tons 3 Coi
- Page 195 and 196:
Islands In Stream Isn’t It Romant
- Page 197 and 198:
The Rose The Way We Were The Way Yo
- Page 199 and 200:
Song Title Type Lyrics Song Title T
- Page 201 and 202:
Song Title Type Lyrics Largo from S
- Page 203 and 204:
Cm9 Cm add9 Cm7 11 Cm9 11 C7 #9 C7
- Page 205 and 206:
D. Using the Concert Performer with
- Page 207 and 208:
MIDI Data Format 3. Exclusive data
- Page 209 and 210:
3.1.6 Key-Based Instrument Controll
- Page 211 and 212:
3.3.5.Accompaniment Control *SMF sa
- Page 213 and 214:
Specifications CP205 / CP185 Keyboa