

AS-3640
AS-3640
AS-3640

Create successful ePaper yourself
Turn your PDF publications into a flip-book with our unique Google optimized e-Paper software.
Pos: 65 /Bedienungsanleitungen/Geräte spezifisch/Transportbänder/CSV-810 (Base)/6.1_Einstellungen Materialtransport_Base2.0 @ 0\mod_1254145095802_912.doc @ 3883 @<br />
Pos: 66 /Bedienungsanleitungen/Geräte spezifisch/Drucker/<strong>AS</strong>-3060A/5.5_Ü3_Adjusting_the_paper_guide_kit_<strong>AS</strong>-3060A/<strong>AS</strong>-2060/OrbitBase @ 1\mod_1263828962811_912.doc @ 10386 @ 2<br />
Pos: 67 /Bedienungsanleitungen/Geräte spezifisch/Drucker/<strong>AS</strong>-OrbitBase/5.2_Ü2_How to position the print units_<strong>AS</strong>-OrbitBase @ 2\mod_1266325391520_912.doc @ 12151 @ 2<br />
5.5 How to position the material (print media)<br />
The Neopost <strong>AS</strong>-<strong>3640</strong> has an integrated vacuum suction to ensure a proper transport of<br />
lightweight and bowed materials.<br />
To enable a smooth transport, the product position and the force of the vacuum suction<br />
have to be adjusted by the user to the requirements of the application.<br />
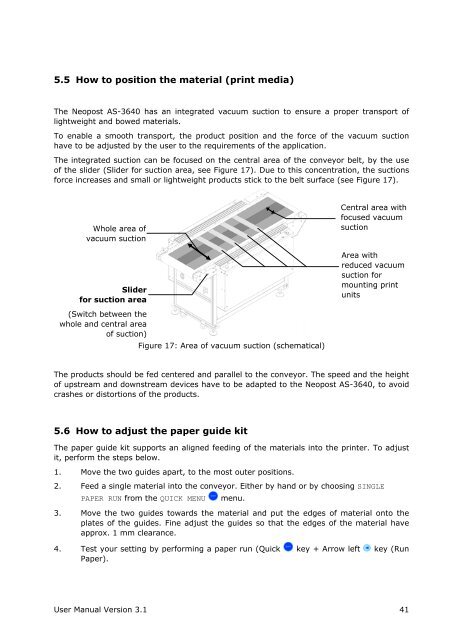
The integrated suction can be focused on the central area of the conveyor belt, by the use<br />
of the slider (Slider for suction area, see Figure 17). Due to this concentration, the suctions<br />
force increases and small or lightweight products stick to the belt surface (see Figure 17).<br />
Whole area of<br />
vacuum suction<br />
Slider<br />
for suction area<br />
Central area with<br />
focused vacuum<br />
suction<br />
Area with<br />
reduced vacuum<br />
suction for<br />
mounting print<br />
units<br />
(Switch between the<br />
whole and central area<br />
of suction)<br />
Figure 17: Area of vacuum suction (schematical)<br />
The products should be fed centered and parallel to the conveyor. The speed and the height<br />
of upstream and downstream devices have to be adapted to the Neopost <strong>AS</strong>-<strong>3640</strong>, to avoid<br />
crashes or distortions of the products.<br />
5.6 How to adjust the paper guide kit<br />
The paper guide kit supports an aligned feeding of the materials into the printer. To adjust<br />
it, perform the steps below.<br />
1. Move the two guides apart, to the most outer positions.<br />
2. Feed a single material into the conveyor. Either by hand or by choosing SINGLE<br />
PAPER RUN from the QUICK MENU menu.<br />
3. Move the two guides towards the material and put the edges of material onto the<br />
plates of the guides. Fine adjust the guides so that the edges of the material have<br />
approx. 1 mm clearance.<br />
4. Test your setting by performing a paper run (Quick key + Arrow left key (Run<br />
Paper).<br />
User Manual Version 3.1 41


