fortigate-ipsec-40-mr3
fortigate-ipsec-40-mr3
fortigate-ipsec-40-mr3

Create successful ePaper yourself
Turn your PDF publications into a flip-book with our unique Google optimized e-Paper software.
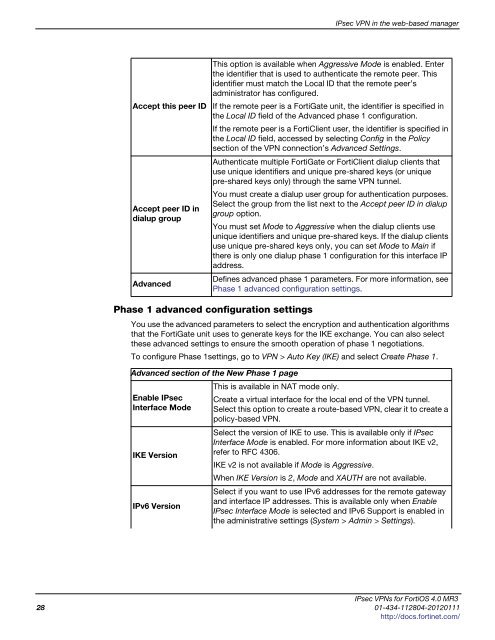
Accept this peer ID<br />
Accept peer ID in<br />
dialup group<br />
Advanced<br />
Phase 1 advanced configuration settings<br />
IPsec VPN in the web-based manager<br />
This option is available when Aggressive Mode is enabled. Enter<br />
the identifier that is used to authenticate the remote peer. This<br />
identifier must match the Local ID that the remote peer’s<br />
administrator has configured.<br />
If the remote peer is a FortiGate unit, the identifier is specified in<br />
the Local ID field of the Advanced phase 1 configuration.<br />
If the remote peer is a FortiClient user, the identifier is specified in<br />
the Local ID field, accessed by selecting Config in the Policy<br />
section of the VPN connection’s Advanced Settings.<br />
Authenticate multiple FortiGate or FortiClient dialup clients that<br />
use unique identifiers and unique pre-shared keys (or unique<br />
pre-shared keys only) through the same VPN tunnel.<br />
You must create a dialup user group for authentication purposes.<br />
Select the group from the list next to the Accept peer ID in dialup<br />
group option.<br />
You must set Mode to Aggressive when the dialup clients use<br />
unique identifiers and unique pre-shared keys. If the dialup clients<br />
use unique pre-shared keys only, you can set Mode to Main if<br />
there is only one dialup phase 1 configuration for this interface IP<br />
address.<br />
Defines advanced phase 1 parameters. For more information, see<br />
Phase 1 advanced configuration settings.<br />
You use the advanced parameters to select the encryption and authentication algorithms<br />
that the FortiGate unit uses to generate keys for the IKE exchange. You can also select<br />
these advanced settings to ensure the smooth operation of phase 1 negotiations.<br />
To configure Phase 1settings, go to VPN > Auto Key (IKE) and select Create Phase 1.<br />
Advanced section of the New Phase 1 page<br />
Enable IPsec<br />
Interface Mode<br />
IKE Version<br />
IPv6 Version<br />
This is available in NAT mode only.<br />
Create a virtual interface for the local end of the VPN tunnel.<br />
Select this option to create a route-based VPN, clear it to create a<br />
policy-based VPN.<br />
Select the version of IKE to use. This is available only if IPsec<br />
Interface Mode is enabled. For more information about IKE v2,<br />
refer to RFC 4306.<br />
IKE v2 is not available if Mode is Aggressive.<br />
When IKE Version is 2, Mode and XAUTH are not available.<br />
Select if you want to use IPv6 addresses for the remote gateway<br />
and interface IP addresses. This is available only when Enable<br />
IPsec Interface Mode is selected and IPv6 Support is enabled in<br />
the administrative settings (System > Admin > Settings).<br />
IPsec VPNs for FortiOS 4.0 MR3<br />
28 01-434-112804-20120111<br />
http://docs.fortinet.com/