fortigate-ipsec-40-mr3
fortigate-ipsec-40-mr3
fortigate-ipsec-40-mr3

Create successful ePaper yourself
Turn your PDF publications into a flip-book with our unique Google optimized e-Paper software.
Dynamic spokes configuration example Hub-and-spoke configurations<br />
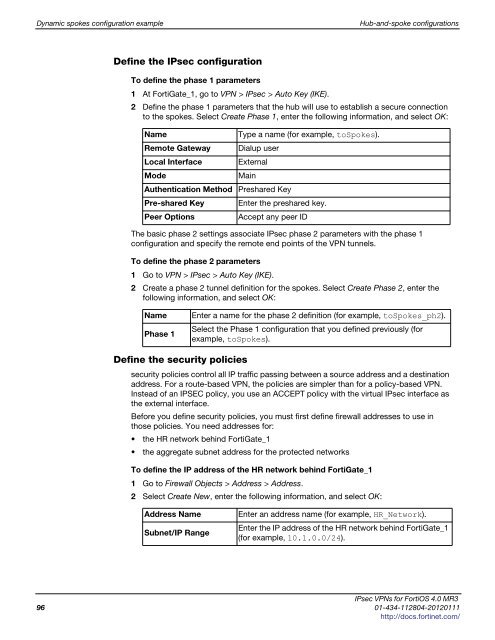
Define the IPsec configuration<br />
To define the phase 1 parameters<br />
1 At FortiGate_1, go to VPN > IPsec > Auto Key (IKE).<br />
2 Define the phase 1 parameters that the hub will use to establish a secure connection<br />
to the spokes. Select Create Phase 1, enter the following information, and select OK:<br />
Name Type a name (for example, toSpokes).<br />
Remote Gateway Dialup user<br />
Local Interface External<br />
Mode Main<br />
Authentication Method Preshared Key<br />
Pre-shared Key Enter the preshared key.<br />
Peer Options Accept any peer ID<br />
The basic phase 2 settings associate IPsec phase 2 parameters with the phase 1<br />
configuration and specify the remote end points of the VPN tunnels.<br />
To define the phase 2 parameters<br />
1 Go to VPN > IPsec > Auto Key (IKE).<br />
2 Create a phase 2 tunnel definition for the spokes. Select Create Phase 2, enter the<br />
following information, and select OK:<br />
Name Enter a name for the phase 2 definition (for example, toSpokes_ph2).<br />
Phase 1<br />
Define the security policies<br />
Select the Phase 1 configuration that you defined previously (for<br />
example, toSpokes).<br />
security policies control all IP traffic passing between a source address and a destination<br />
address. For a route-based VPN, the policies are simpler than for a policy-based VPN.<br />
Instead of an IPSEC policy, you use an ACCEPT policy with the virtual IPsec interface as<br />
the external interface.<br />
Before you define security policies, you must first define firewall addresses to use in<br />
those policies. You need addresses for:<br />
the HR network behind FortiGate_1<br />
the aggregate subnet address for the protected networks<br />
To define the IP address of the HR network behind FortiGate_1<br />
1 Go to Firewall Objects > Address > Address.<br />
2 Select Create New, enter the following information, and select OK:<br />
Address Name Enter an address name (for example, HR_Network).<br />
Subnet/IP Range<br />
Enter the IP address of the HR network behind FortiGate_1<br />
(for example, 10.1.0.0/24).<br />
IPsec VPNs for FortiOS 4.0 MR3<br />
96 01-434-112804-20120111<br />
http://docs.fortinet.com/