PV*SOL Expert 6.0 - Manual - Valentin Software
PV*SOL Expert 6.0 - Manual - Valentin Software
PV*SOL Expert 6.0 - Manual - Valentin Software

You also want an ePaper? Increase the reach of your titles
YUMPU automatically turns print PDFs into web optimized ePapers that Google loves.
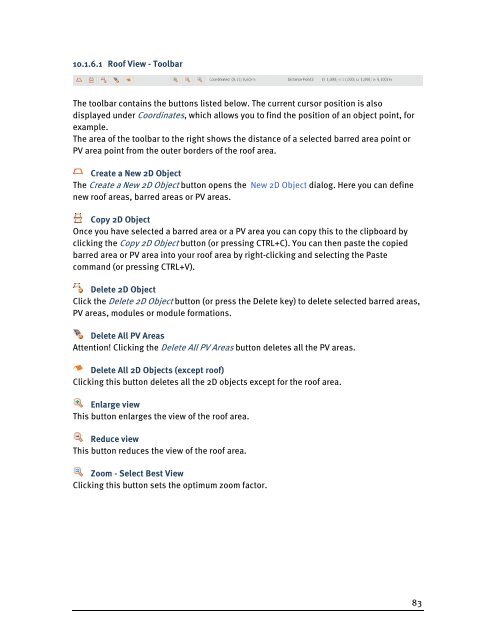
10.1.6.1 Roof View - Toolbar<br />
The toolbar contains the buttons listed below. The current cursor position is also<br />
displayed under Coordinates, which allows you to find the position of an object point, for<br />
example.<br />
The area of the toolbar to the right shows the distance of a selected barred area point or<br />
PV area point from the outer borders of the roof area.<br />
Create a New 2D Object<br />
The Create a New 2D Object button opens the New 2D Object dialog. Here you can define<br />
new roof areas, barred areas or PV areas.<br />
Copy 2D Object<br />
Once you have selected a barred area or a PV area you can copy this to the clipboard by<br />
clicking the Copy 2D Object button (or pressing CTRL+C). You can then paste the copied<br />
barred area or PV area into your roof area by right-clicking and selecting the Paste<br />
command (or pressing CTRL+V).<br />
Delete 2D Object<br />
Click the Delete 2D Object button (or press the Delete key) to delete selected barred areas,<br />
PV areas, modules or module formations.<br />
Delete All PV Areas<br />
Attention! Clicking the Delete All PV Areas button deletes all the PV areas.<br />
Delete All 2D Objects (except roof)<br />
Clicking this button deletes all the 2D objects except for the roof area.<br />
Enlarge view<br />
This button enlarges the view of the roof area.<br />
Reduce view<br />
This button reduces the view of the roof area.<br />
Zoom - Select Best View<br />
Clicking this button sets the optimum zoom factor.<br />
83