User Manual - Belkin
User Manual - Belkin
User Manual - Belkin

Create successful ePaper yourself
Turn your PDF publications into a flip-book with our unique Google optimized e-Paper software.
Using the Web-Based Advanced <strong>User</strong> Interface<br />
Setting Up a Bridge Between your Wireless Router and a<br />
Secondary Access Point<br />
Bridging your <strong>Belkin</strong> Router to a secondary Access Point requires that<br />
you access the Router’s Advanced Setup Utility and enter the MAC<br />
address of the Access Point in the appropriate area. There are also a<br />
few other requirements. PLEASE BE SURE TO FOLLOW THE STEPS BELOW,<br />
CAREFULLY.<br />
1. Set your Access Point to the same channel as the Router. By<br />
default, the Router and Access Point channels are set to channel<br />
11 at the factory. If you have never changed the channel, you<br />
don’t need to do anything (for more information on changing<br />
channels, see page 47 of this manual).<br />
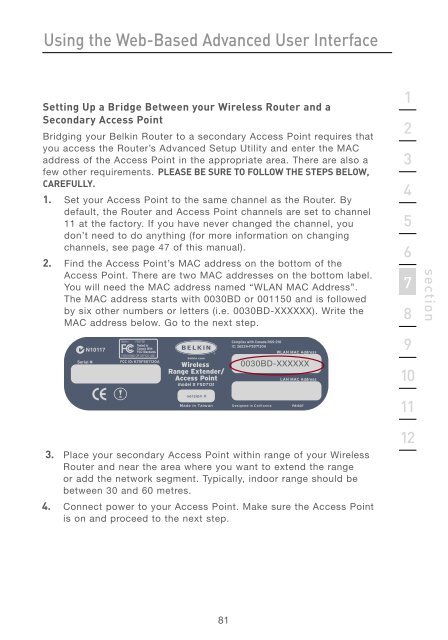
2. Find the Access Point’s MAC address on the bottom of the<br />
Access Point. There are two MAC addresses on the bottom label.<br />
You will need the MAC address named “WLAN MAC Address”.<br />
The MAC address starts with 0030BD or 001150 and is followed<br />
by six other numbers or letters (i.e. 0030BD-XXXXXX). Write the<br />
MAC address below. Go to the next step.<br />
Serial #<br />
F5D7131<br />
FCC ID: K7SF5D7130A<br />
Wireless<br />
Range Extender/<br />
Access Point<br />
model # F5D7131<br />
81<br />
Complies with Canada RSS-210<br />
IC: 3623A-F5D7130A<br />
WLAN MAC Address<br />
0030BD-XXXXXX<br />
LAN MAC Address<br />
3. Place your secondary Access Point within range of your Wireless<br />
Router and near the area where you want to extend the range<br />
or add the network segment. Typically, indoor range should be<br />
between 30 and 60 metres.<br />
4. Connect power to your Access Point. Make sure the Access Point<br />
is on and proceed to the next step.<br />
P81807<br />
1<br />
2<br />
3<br />
4<br />
5<br />
6<br />
7<br />
8<br />
9<br />
10<br />
11<br />
12<br />
section