User Guide for the Polycom SoundStation IP 5000 Phone
User Guide for the Polycom SoundStation IP 5000 Phone
User Guide for the Polycom SoundStation IP 5000 Phone

Create successful ePaper yourself
Turn your PDF publications into a flip-book with our unique Google optimized e-Paper software.
<strong>User</strong> <strong>Guide</strong> <strong>for</strong> <strong>the</strong> <strong>Polycom</strong> ® <strong>SoundStation</strong> ® <strong>IP</strong> <strong>5000</strong> <strong>Phone</strong><br />
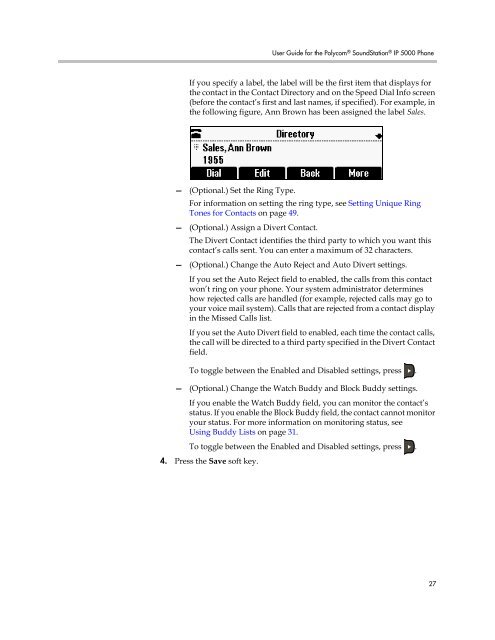
If you specify a label, <strong>the</strong> label will be <strong>the</strong> first item that displays <strong>for</strong><br />
<strong>the</strong> contact in <strong>the</strong> Contact Directory and on <strong>the</strong> Speed Dial Info screen<br />
(be<strong>for</strong>e <strong>the</strong> contact’s first and last names, if specified). For example, in<br />
<strong>the</strong> following figure, Ann Brown has been assigned <strong>the</strong> label Sales.<br />
— (Optional.) Set <strong>the</strong> Ring Type.<br />
For in<strong>for</strong>mation on setting <strong>the</strong> ring type, see Setting Unique Ring<br />
Tones <strong>for</strong> Contacts on page 49.<br />
— (Optional.) Assign a Divert Contact.<br />
The Divert Contact identifies <strong>the</strong> third party to which you want this<br />
contact’s calls sent. You can enter a maximum of 32 characters.<br />
— (Optional.) Change <strong>the</strong> Auto Reject and Auto Divert settings.<br />
If you set <strong>the</strong> Auto Reject field to enabled, <strong>the</strong> calls from this contact<br />
won’t ring on your phone. Your system administrator determines<br />
how rejected calls are handled (<strong>for</strong> example, rejected calls may go to<br />
your voice mail system). Calls that are rejected from a contact display<br />
in <strong>the</strong> Missed Calls list.<br />
If you set <strong>the</strong> Auto Divert field to enabled, each time <strong>the</strong> contact calls,<br />
<strong>the</strong> call will be directed to a third party specified in <strong>the</strong> Divert Contact<br />
field.<br />
To toggle between <strong>the</strong> Enabled and Disabled settings, press .<br />
— (Optional.) Change <strong>the</strong> Watch Buddy and Block Buddy settings.<br />
If you enable <strong>the</strong> Watch Buddy field, you can monitor <strong>the</strong> contact’s<br />
status. If you enable <strong>the</strong> Block Buddy field, <strong>the</strong> contact cannot monitor<br />
your status. For more in<strong>for</strong>mation on monitoring status, see<br />
Using Buddy Lists on page 31.<br />
To toggle between <strong>the</strong> Enabled and Disabled settings, press .<br />
4. Press <strong>the</strong> Save soft key.<br />
27