Manuale italiano-inglese Oberheim-Viscount MC3000 - Synth Zone
Manuale italiano-inglese Oberheim-Viscount MC3000 - Synth Zone
Manuale italiano-inglese Oberheim-Viscount MC3000 - Synth Zone

You also want an ePaper? Increase the reach of your titles
YUMPU automatically turns print PDFs into web optimized ePapers that Google loves.
MC 3000<br />
Operating Manual<br />
Once the group required is displayed, the chosen patch can be selected using the cursor<br />
keys or the encoder, and as soon as the choice is confirmed with ENTER the instrument<br />
switches to the desired patch, which will appear with its TOP PAGE<br />
The usefulness of the LIST page lies in the rapid consultation it allows. For example, if we<br />
do not remember the number to which we have associated the patch required, instead of<br />
scrolling through them one by one in the TOP PAGE, the patches can be displayed in<br />
groups of ten at a time. Note that the patch being played remains active even during the<br />
location process, until ENTER is pressed.<br />
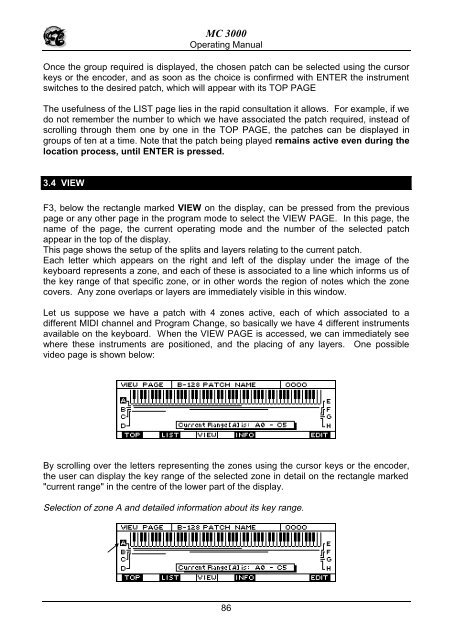
3.4 VIEW<br />
F3, below the rectangle marked VIEW on the display, can be pressed from the previous<br />
page or any other page in the program mode to select the VIEW PAGE. In this page, the<br />
name of the page, the current operating mode and the number of the selected patch<br />
appear in the top of the display.<br />
This page shows the setup of the splits and layers relating to the current patch.<br />
Each letter which appears on the right and left of the display under the image of the<br />
keyboard represents a zone, and each of these is associated to a line which informs us of<br />
the key range of that specific zone, or in other words the region of notes which the zone<br />
covers. Any zone overlaps or layers are immediately visible in this window.<br />
Let us suppose we have a patch with 4 zones active, each of which associated to a<br />
different MIDI channel and Program Change, so basically we have 4 different instruments<br />
available on the keyboard. When the VIEW PAGE is accessed, we can immediately see<br />
where these instruments are positioned, and the placing of any layers. One possible<br />
video page is shown below:<br />
By scrolling over the letters representing the zones using the cursor keys or the encoder,<br />
the user can display the key range of the selected zone in detail on the rectangle marked<br />
"current range" in the centre of the lower part of the display.<br />
Selection of zone A and detailed information about its key range.<br />
86