Manuale italiano-inglese Oberheim-Viscount MC3000 - Synth Zone
Manuale italiano-inglese Oberheim-Viscount MC3000 - Synth Zone
Manuale italiano-inglese Oberheim-Viscount MC3000 - Synth Zone

You also want an ePaper? Increase the reach of your titles
YUMPU automatically turns print PDFs into web optimized ePapers that Google loves.
MC 3000<br />
Operating Manual<br />
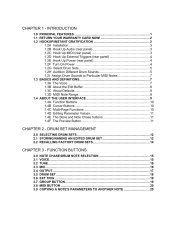
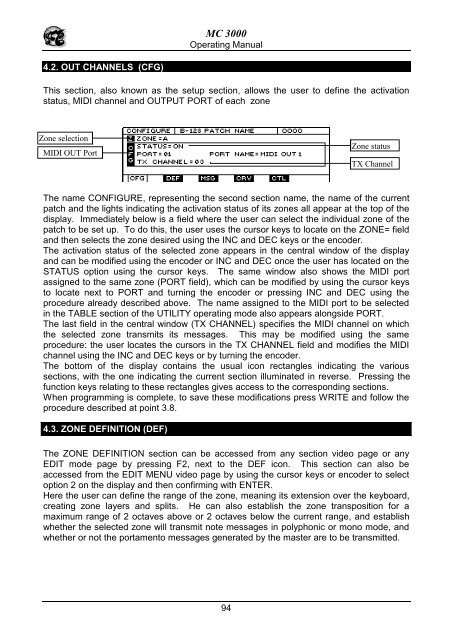
4.2. OUT CHANNELS (CFG)<br />
This section, also known as the setup section, allows the user to define the activation<br />
status, MIDI channel and OUTPUT PORT of each zone<br />
<strong>Zone</strong> selection<br />
MIDI OUT Port<br />
<strong>Zone</strong> status<br />
TX Channel<br />
The name CONFIGURE, representing the second section name, the name of the current<br />
patch and the lights indicating the activation status of its zones all appear at the top of the<br />
display. Immediately below is a field where the user can select the individual zone of the<br />
patch to be set up. To do this, the user uses the cursor keys to locate on the ZONE= field<br />
and then selects the zone desired using the INC and DEC keys or the encoder.<br />
The activation status of the selected zone appears in the central window of the display<br />
and can be modified using the encoder or INC and DEC once the user has located on the<br />
STATUS option using the cursor keys. The same window also shows the MIDI port<br />
assigned to the same zone (PORT field), which can be modified by using the cursor keys<br />
to locate next to PORT and turning the encoder or pressing INC and DEC using the<br />
procedure already described above. The name assigned to the MIDI port to be selected<br />
in the TABLE section of the UTILITY operating mode also appears alongside PORT.<br />
The last field in the central window (TX CHANNEL) specifies the MIDI channel on which<br />
the selected zone transmits its messages. This may be modified using the same<br />
procedure: the user locates the cursors in the TX CHANNEL field and modifies the MIDI<br />
channel using the INC and DEC keys or by turning the encoder.<br />
The bottom of the display contains the usual icon rectangles indicating the various<br />
sections, with the one indicating the current section illuminated in reverse. Pressing the<br />
function keys relating to these rectangles gives access to the corresponding sections.<br />
When programming is complete, to save these modifications press WRITE and follow the<br />
procedure described at point 3.8.<br />
4.3. ZONE DEFINITION (DEF)<br />
The ZONE DEFINITION section can be accessed from any section video page or any<br />
EDIT mode page by pressing F2, next to the DEF icon. This section can also be<br />
accessed from the EDIT MENU video page by using the cursor keys or encoder to select<br />
option 2 on the display and then confirming with ENTER.<br />
Here the user can define the range of the zone, meaning its extension over the keyboard,<br />
creating zone layers and splits. He can also establish the zone transposition for a<br />
maximum range of 2 octaves above or 2 octaves below the current range, and establish<br />
whether the selected zone will transmit note messages in polyphonic or mono mode, and<br />
whether or not the portamento messages generated by the master are to be transmitted.<br />
94