Manuale italiano-inglese Oberheim-Viscount MC3000 - Synth Zone
Manuale italiano-inglese Oberheim-Viscount MC3000 - Synth Zone
Manuale italiano-inglese Oberheim-Viscount MC3000 - Synth Zone
You also want an ePaper? Increase the reach of your titles
YUMPU automatically turns print PDFs into web optimized ePapers that Google loves.
MC 3000<br />
Operating Manual<br />
The bottom of the screen contains the usual icon rectangles indicating the pages of the<br />
current section, with the icon of the current page in reverse. As well as the EDIT function<br />
icon, the bottom right-hand corner contains the List icon, associated to function key F5.<br />
This video page is similar to that of the LIST PAGE of the program operating mode. With<br />
this subpage, the user can display all the names of the patches in a given table, and thus<br />
all the names of the programs of a given expander, in groups of ten at a time.<br />
The group shown as soon as this list is accessed is the one to which the program change<br />
selected inside the chosen table belongs. If program n 02 of the table is selected when F5<br />
is pressed, this subpage will show programs 00 to 09. If program change 23, the page will<br />
display all the program change names between n. 20 and n. 29. At this point, to display<br />
the groups which follow, the user simply presses F6, next to the rectangle marked +10 in<br />
the bottom right-hand corner of the display; whenever the key is pressed the groups<br />
belonging to gradually rising tens, 30-39, 40-49, 50-59, etc., will appear. Similarly, to<br />
display the previous groups press F5 close to the rectangle marked -10, and whenever the<br />
key is pressed the groups of lower tens, 90-99, 80-89, 70-79, etc., will appear.<br />
The user presses ESC to exit from the List subpage and return to the PROGRAM<br />
CHANGE TABLES page.<br />
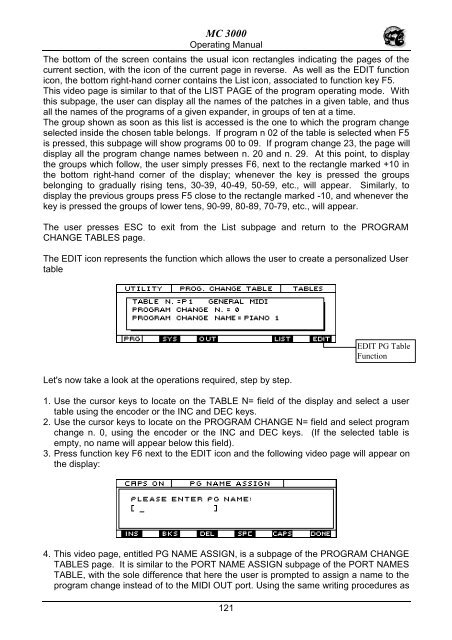
The EDIT icon represents the function which allows the user to create a personalized User<br />
table<br />
EDIT PG Table<br />
Function<br />
Let's now take a look at the operations required, step by step.<br />
1. Use the cursor keys to locate on the TABLE N= field of the display and select a user<br />
table using the encoder or the INC and DEC keys.<br />
2. Use the cursor keys to locate on the PROGRAM CHANGE N= field and select program<br />
change n. 0, using the encoder or the INC and DEC keys. (If the selected table is<br />
empty, no name will appear below this field).<br />
3. Press function key F6 next to the EDIT icon and the following video page will appear on<br />
the display:<br />
4. This video page, entitled PG NAME ASSIGN, is a subpage of the PROGRAM CHANGE<br />
TABLES page. It is similar to the PORT NAME ASSIGN subpage of the PORT NAMES<br />
TABLE, with the sole difference that here the user is prompted to assign a name to the<br />
program change instead of to the MIDI OUT port. Using the same writing procedures as<br />
121


