Manuale italiano-inglese Oberheim-Viscount MC3000 - Synth Zone
Manuale italiano-inglese Oberheim-Viscount MC3000 - Synth Zone
Manuale italiano-inglese Oberheim-Viscount MC3000 - Synth Zone

You also want an ePaper? Increase the reach of your titles
YUMPU automatically turns print PDFs into web optimized ePapers that Google loves.
MC 3000<br />
Operating Manual<br />
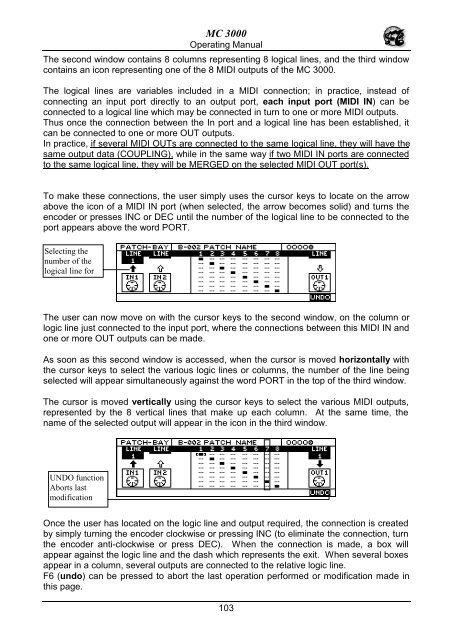
The second window contains 8 columns representing 8 logical lines, and the third window<br />
contains an icon representing one of the 8 MIDI outputs of the MC 3000.<br />
The logical lines are variables included in a MIDI connection; in practice, instead of<br />
connecting an input port directly to an output port, each input port (MIDI IN) can be<br />
connected to a logical line which may be connected in turn to one or more MIDI outputs.<br />
Thus once the connection between the In port and a logical line has been established, it<br />
can be connected to one or more OUT outputs.<br />
In practice, if several MIDI OUTs are connected to the same logical line, they will have the<br />
same output data (COUPLING), while in the same way if two MIDI IN ports are connected<br />
to the same logical line, they will be MERGED on the selected MIDI OUT port(s).<br />
To make these connections, the user simply uses the cursor keys to locate on the arrow<br />
above the icon of a MIDI IN port (when selected, the arrow becomes solid) and turns the<br />
encoder or presses INC or DEC until the number of the logical line to be connected to the<br />
port appears above the word PORT.<br />
Selecting the<br />
number of the<br />
logical line for<br />
The user can now move on with the cursor keys to the second window, on the column or<br />
logic line just connected to the input port, where the connections between this MIDI IN and<br />
one or more OUT outputs can be made.<br />
As soon as this second window is accessed, when the cursor is moved horizontally with<br />
the cursor keys to select the various logic lines or columns, the number of the line being<br />
selected will appear simultaneously against the word PORT in the top of the third window.<br />
The cursor is moved vertically using the cursor keys to select the various MIDI outputs,<br />
represented by the 8 vertical lines that make up each column. At the same time, the<br />
name of the selected output will appear in the icon in the third window.<br />
UNDO function<br />
Aborts last<br />
modification<br />
Once the user has located on the logic line and output required, the connection is created<br />
by simply turning the encoder clockwise or pressing INC (to eliminate the connection, turn<br />
the encoder anti-clockwise or press DEC). When the connection is made, a box will<br />
appear against the logic line and the dash which represents the exit. When several boxes<br />
appear in a column, several outputs are connected to the relative logic line.<br />
F6 (undo) can be pressed to abort the last operation performed or modification made in<br />
this page.<br />
103