Manuale italiano-inglese Oberheim-Viscount MC3000 - Synth Zone
Manuale italiano-inglese Oberheim-Viscount MC3000 - Synth Zone
Manuale italiano-inglese Oberheim-Viscount MC3000 - Synth Zone

You also want an ePaper? Increase the reach of your titles
YUMPU automatically turns print PDFs into web optimized ePapers that Google loves.
MC 3000<br />
Operating Manual<br />
the user must access the UTILITY mode in the DYNAMIC CURVES page of the EDIT<br />
CURVES section and follow the instructions given in the part of this manual which<br />
discusses that page. The name of the selected curve also appears, for display only.<br />
The possibility of assigning different dynamic curves to several zones allows the user to<br />
create dynamic layers and splits between different zones and MIDI channels. For<br />
example, it is possible to create a patch with 2 overlapping zones where the first controls<br />
the piano sound with a curve capable of reading all Key Velocity values, and the second<br />
controls a brass sound but with a curve which only reads values above 70. This means<br />
that as when the keyboard is played with a Key Velocity of less than 70, only the piano will<br />
sound, but as soon as this value is exceeded, the brass sound will be overlapped with the<br />
piano (dynamic Layer). If the dynamic curve of the piano were programmed to respond up<br />
to a Key Velocity value of 70, above that value the piano would no longer sound and only<br />
the brass would be heard (dynamic Split). This example can be extended to a larger<br />
number of overlapping zones transmitting on different MIDI channels.<br />
The bottom of the display contains the usual icon rectangles indicating the sections of the<br />
EDIT mode, with the current section shown in reverse.<br />
The last rectangle contains the word MORE. F6 can be pressed for access to the second<br />
page of the section, dedicated to the Aftertouch curves which can be assigned to the<br />
single zones.<br />
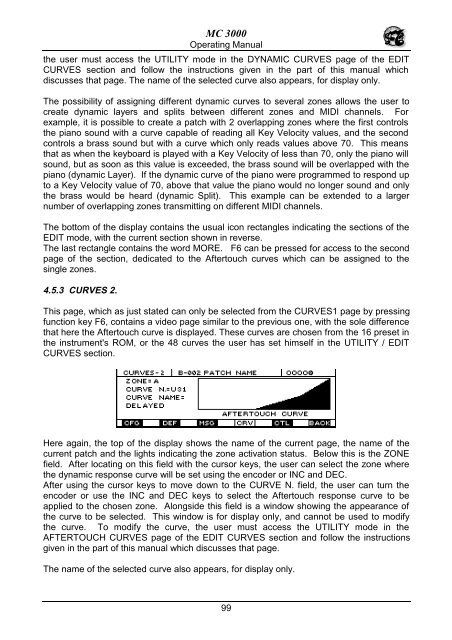
4.5.3 CURVES 2.<br />
This page, which as just stated can only be selected from the CURVES1 page by pressing<br />
function key F6, contains a video page similar to the previous one, with the sole difference<br />
that here the Aftertouch curve is displayed. These curves are chosen from the 16 preset in<br />
the instrument's ROM, or the 48 curves the user has set himself in the UTILITY / EDIT<br />
CURVES section.<br />
Here again, the top of the display shows the name of the current page, the name of the<br />
current patch and the lights indicating the zone activation status. Below this is the ZONE<br />
field. After locating on this field with the cursor keys, the user can select the zone where<br />
the dynamic response curve will be set using the encoder or INC and DEC.<br />
After using the cursor keys to move down to the CURVE N. field, the user can turn the<br />
encoder or use the INC and DEC keys to select the Aftertouch response curve to be<br />
applied to the chosen zone. Alongside this field is a window showing the appearance of<br />
the curve to be selected. This window is for display only, and cannot be used to modify<br />
the curve. To modify the curve, the user must access the UTILITY mode in the<br />
AFTERTOUCH CURVES page of the EDIT CURVES section and follow the instructions<br />
given in the part of this manual which discusses that page.<br />
The name of the selected curve also appears, for display only.<br />
99