Manuale italiano-inglese Oberheim-Viscount MC3000 - Synth Zone
Manuale italiano-inglese Oberheim-Viscount MC3000 - Synth Zone
Manuale italiano-inglese Oberheim-Viscount MC3000 - Synth Zone

Create successful ePaper yourself
Turn your PDF publications into a flip-book with our unique Google optimized e-Paper software.
MC 3000<br />
Operating Manual<br />
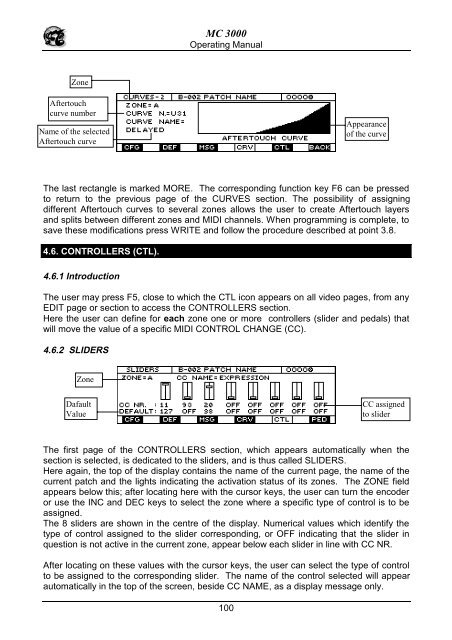
<strong>Zone</strong><br />
Aftertouch<br />
curve number<br />
Name of the selected<br />
Aftertouch curve<br />
Appearance<br />
of the curve<br />
The last rectangle is marked MORE. The corresponding function key F6 can be pressed<br />
to return to the previous page of the CURVES section. The possibility of assigning<br />
different Aftertouch curves to several zones allows the user to create Aftertouch layers<br />
and splits between different zones and MIDI channels. When programming is complete, to<br />
save these modifications press WRITE and follow the procedure described at point 3.8.<br />
4.6. CONTROLLERS (CTL).<br />
4.6.1 Introduction<br />
The user may press F5, close to which the CTL icon appears on all video pages, from any<br />
EDIT page or section to access the CONTROLLERS section.<br />
Here the user can define for each zone one or more controllers (slider and pedals) that<br />
will move the value of a specific MIDI CONTROL CHANGE (CC).<br />
4.6.2 SLIDERS<br />
<strong>Zone</strong><br />
Dafault<br />
Value<br />
CC assigned<br />
to slider<br />
The first page of the CONTROLLERS section, which appears automatically when the<br />
section is selected, is dedicated to the sliders, and is thus called SLIDERS.<br />
Here again, the top of the display contains the name of the current page, the name of the<br />
current patch and the lights indicating the activation status of its zones. The ZONE field<br />
appears below this; after locating here with the cursor keys, the user can turn the encoder<br />
or use the INC and DEC keys to select the zone where a specific type of control is to be<br />
assigned.<br />
The 8 sliders are shown in the centre of the display. Numerical values which identify the<br />
type of control assigned to the slider corresponding, or OFF indicating that the slider in<br />
question is not active in the current zone, appear below each slider in line with CC NR.<br />
After locating on these values with the cursor keys, the user can select the type of control<br />
to be assigned to the corresponding slider. The name of the control selected will appear<br />
automatically in the top of the screen, beside CC NAME, as a display message only.<br />
100