Manuale italiano-inglese Oberheim-Viscount MC3000 - Synth Zone
Manuale italiano-inglese Oberheim-Viscount MC3000 - Synth Zone
Manuale italiano-inglese Oberheim-Viscount MC3000 - Synth Zone
You also want an ePaper? Increase the reach of your titles
YUMPU automatically turns print PDFs into web optimized ePapers that Google loves.
MC 3000<br />
Operating Manual<br />
Below the central window there is a window identified by the icon S, indicating that it is<br />
dedicated to exclusive systems.<br />
After locating in the SYS N field, the user can select the desired exclusive system table by<br />
turning the encoder or pressing the INC and DEC keys.<br />
The MC 3000 offers the user 16 preset tables in the instrument memory, P1-P16, and 48,<br />
U17-U64, which can be programmed by the user himself in the UTILITY mode.<br />
Each table contains exclusive system strings. When the patch is recalled, they are taken<br />
from the table and sent to the connected expander before all the others.<br />
CAUTION: When the exclusive code selected has a RESET function, the unit connected<br />
by MIDI takes a few milliseconds to reset the data; during this time, it is probable that the<br />
other messages belonging to the zone will be ignored.<br />
The SYS NAME field which appears alongside the SYS N field is for display only and will<br />
contain the name corresponding to the Sys-ex table selected.<br />
On completion of programming, to save these modifications press the WRITE key and<br />
follow the procedure described in point 3.8.<br />
4.5 CURVES (CRV)<br />
4.5.1 Introduction<br />
The user may press F4, below the CVR icon, from the previous page or any other page or<br />
any section of the EDIT mode to access the CURVES section, where he is able to assign<br />
the dynamic or aftertouch curve to each zone. These curves are chosen from the 16<br />
preset in the instrument's ROM, or the 48 curves the user has set himself in the UTILITY /<br />
EDIT CURVES section.<br />
4.5.2 CURVES 1.<br />
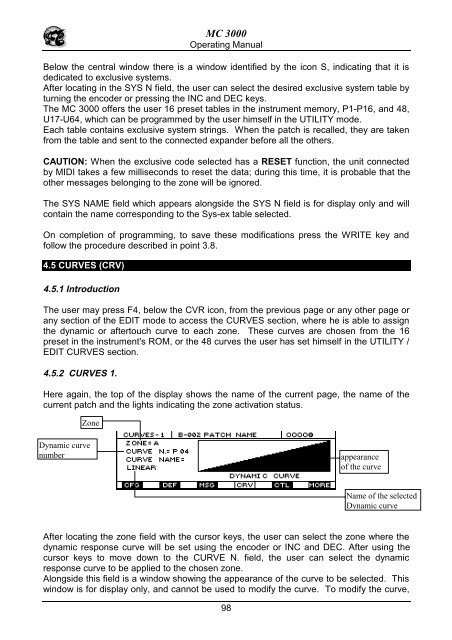
Here again, the top of the display shows the name of the current page, the name of the<br />
current patch and the lights indicating the zone activation status.<br />
<strong>Zone</strong><br />
Dynamic curve<br />
number<br />
appearance<br />
of the curve<br />
Name of the selected<br />
Dynamic curve<br />
After locating the zone field with the cursor keys, the user can select the zone where the<br />
dynamic response curve will be set using the encoder or INC and DEC. After using the<br />
cursor keys to move down to the CURVE N. field, the user can select the dynamic<br />
response curve to be applied to the chosen zone.<br />
Alongside this field is a window showing the appearance of the curve to be selected. This<br />
window is for display only, and cannot be used to modify the curve. To modify the curve,<br />
98


