SwitchBlade x3112 Installation Guide - Allied Telesis
SwitchBlade x3112 Installation Guide - Allied Telesis
SwitchBlade x3112 Installation Guide - Allied Telesis
You also want an ePaper? Increase the reach of your titles
YUMPU automatically turns print PDFs into web optimized ePapers that Google loves.
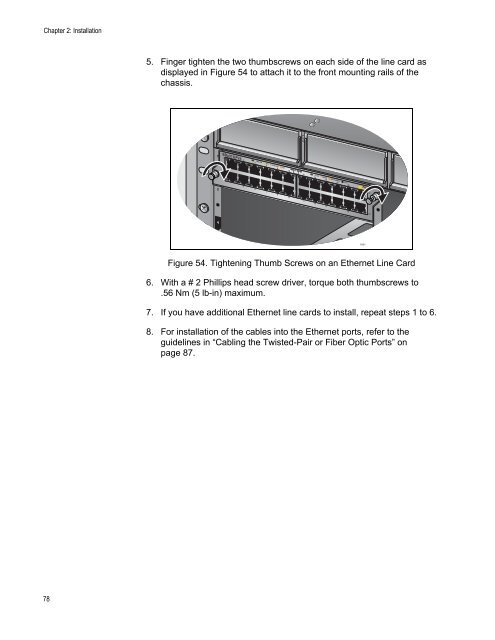
Chapter 2: <strong>Installation</strong><br />
5. Finger tighten the two thumbscrews on each side of the line card as<br />
displayed in Figure 54 to attach it to the front mounting rails of the<br />
chassis.<br />
P<br />
O<br />
E<br />
P<br />
O<br />
E<br />
0<br />
SBx31GP24<br />
0<br />
2 4 6 8 10 12 14 16 18 20<br />
1<br />
2<br />
plus<br />
22<br />
3 5 7 9 11<br />
13 15 17 19 21<br />
23<br />
4<br />
1801<br />
Figure 54. Tightening Thumb Screws on an Ethernet Line Card<br />
6. With a # 2 Phillips head screw driver, torque both thumbscrews to<br />
.56 Nm (5 lb-in) maximum.<br />
7. If you have additional Ethernet line cards to install, repeat steps 1 to 6.<br />
8. For installation of the cables into the Ethernet ports, refer to the<br />
guidelines in “Cabling the Twisted-Pair or Fiber Optic Ports” on<br />
page 87.<br />
78


![AT-8100L/8POE-E [Rev B] - Allied Telesis](https://img.yumpu.com/25714603/1/190x245/at-8100l-8poe-e-rev-b-allied-telesis.jpg?quality=85)
