Accusetter Manual - BC MacDonald & Co.
Accusetter Manual - BC MacDonald & Co.
Accusetter Manual - BC MacDonald & Co.
You also want an ePaper? Increase the reach of your titles
YUMPU automatically turns print PDFs into web optimized ePapers that Google loves.
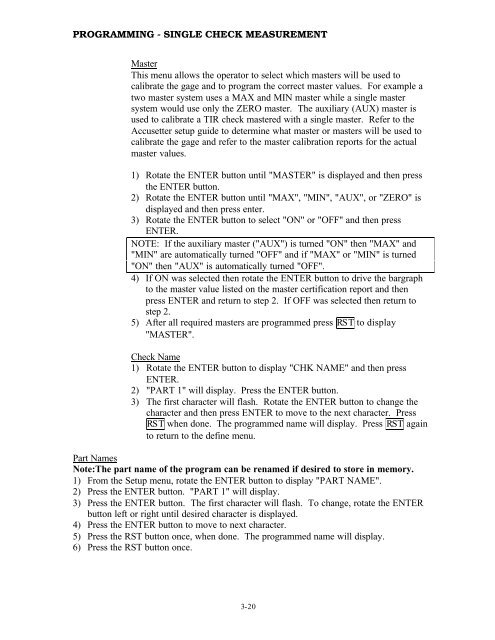
PROGRAMMING - SINGLE CHECK MEASUREMENT<br />
Master<br />
This menu allows the operator to select which masters will be used to<br />
calibrate the gage and to program the correct master values. For example a<br />
two master system uses a MAX and MIN master while a single master<br />
system would use only the ZERO master. The auxiliary (AUX) master is<br />
used to calibrate a TIR check mastered with a single master. Refer to the<br />
<strong>Accusetter</strong> setup guide to determine what master or masters will be used to<br />
calibrate the gage and refer to the master calibration reports for the actual<br />
master values.<br />
1) Rotate the ENTER button until "MASTER" is displayed and then press<br />
the ENTER button.<br />
2) Rotate the ENTER button until "MAX", "MIN", "AUX", or "ZERO" is<br />
displayed and then press enter.<br />
3) Rotate the ENTER button to select "ON" or "OFF" and then press<br />
ENTER.<br />
NOTE: If the auxiliary master ("AUX") is turned "ON" then "MAX" and<br />
"MIN" are automatically turned "OFF" and if "MAX" or "MIN" is turned<br />
"ON" then "AUX" is automatically turned "OFF".<br />
4) If ON was selected then rotate the ENTER button to drive the bargraph<br />
to the master value listed on the master certification report and then<br />
press ENTER and return to step 2. If OFF was selected then return to<br />
step 2.<br />
5) After all required masters are programmed press RST to display<br />
"MASTER".<br />
Check Name<br />
1) Rotate the ENTER button to display "CHK NAME" and then press<br />
ENTER.<br />
2) "PART 1" will display. Press the ENTER button.<br />
3) The first character will flash. Rotate the ENTER button to change the<br />
character and then press ENTER to move to the next character. Press<br />
RST when done. The programmed name will display. Press RST again<br />
to return to the define menu.<br />
Part Names<br />
Note:The part name of the program can be renamed if desired to store in memory.<br />
1) From the Setup menu, rotate the ENTER button to display "PART NAME".<br />
2) Press the ENTER button. "PART 1" will display.<br />
3) Press the ENTER button. The first character will flash. To change, rotate the ENTER<br />
button left or right until desired character is displayed.<br />
4) Press the ENTER button to move to next character.<br />
5) Press the RST button once, when done. The programmed name will display.<br />
6) Press the RST button once.<br />
3-20


