- Page 3 and 4: 3 Software version 2.0 Operator's M
- Page 5 and 6: 5 • Avoid using spray type insect
- Page 7 and 8: 7 3.14 The recording metronome 3.15
- Page 9 and 10: Section 1: Introduction
- Page 11: Section l: Introduction 11 1.2 How
- Page 14 and 15: 14 2.1 Overview This section is a s
- Page 16 and 17: 16 Turning the MPC60 on 1. Of the d
- Page 18 and 19: 18 2.3 The CURSOR keys While the PL
- Page 20 and 21: 20 selections, but only one may be
- Page 22 and 23: 22 2.6 The HELP key Whenever this k
- Page 24 and 25: 24 2. "16 TUNINGS": If this option
- Page 26 and 27: 26 2.8 The DRUM MIX key - adjusting
- Page 28 and 29: 28 This indicates that the MPC60 is
- Page 30 and 31: 30 2.11 The MAIN SCREEN key- how to
- Page 33 and 34: Section 3: Recording Sequences
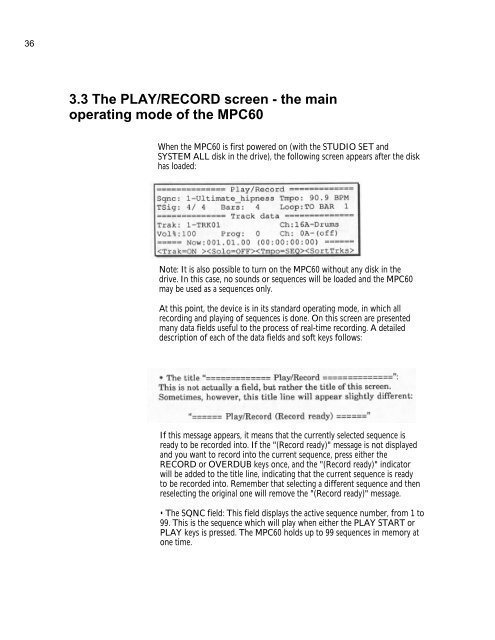
- Page 35: Section 3: Recording sequences 35 3
- Page 39 and 40: Section 3: Recording sequences 39 a
- Page 41 and 42: Section 3: Recording sequences 41
- Page 43 and 44: Section 3: Recording sequences 43 3
- Page 45 and 46: Section 3: Recording sequences 45 3
- Page 47 and 48: Section 3: Recording sequences 47 T
- Page 49 and 50: Section 3: Recording sequences 49 t
- Page 51 and 52: Section 3: Recording sequences 51 M
- Page 53 and 54: Section 3: Recording sequences 53 3
- Page 55 and 56: Section 3: Recording sequences 55 3
- Page 57 and 58: Section 3: Recording sequences 57 T
- Page 59 and 60: Section 3: Recording sequences 59 p
- Page 61 and 62: Section 3: Recording sequences 61 3
- Page 63 and 64: Section 3: Recording sequences 63
- Page 65 and 66: Section 3: Recording sequences 65 T
- Page 67 and 68: Section 3: Recording sequences 67 s
- Page 69 and 70: Section 3: Recording sequences 69 3
- Page 71 and 72: Section 3: Recording sequences 71 3
- Page 73 and 74: Section 3: Recording sequences 73 3
- Page 75 and 76: Section 3: Recording sequences 75 f
- Page 77 and 78: Section 3: Recording sequences 77 3
- Page 79 and 80: Section 3: Recording sequences 79 2
- Page 81: Section 3: Recording sequences 81 3
- Page 84 and 85: 84 4.1 Overview This section of the
- Page 86 and 87:
86 These two screens allow a specif
- Page 88 and 89:
88 4.3 The EDIT key The EDIT key en
- Page 90 and 91:
90 onto the end). If set to TO BAR
- Page 92 and 93:
92 The on-screen fields are: • Th
- Page 94 and 95:
94 track. In this function, only th
- Page 96 and 97:
96 NOTE 3: If the copied data is lo
- Page 98 and 99:
98 • SOFT KEY 1- : Pressing this
- Page 100 and 101:
100 This is a choice field with 2 o
- Page 102 and 103:
102 LOCATE keys. As this value chan
- Page 104 and 105:
104 4.4.2 Using STEP EDIT Using STE
- Page 106 and 107:
106 settings in the TUNE DRUMS scre
- Page 108 and 109:
108 current step will be played (ou
- Page 110 and 111:
110 4.5 The EDIT LOOP key This func
- Page 112 and 113:
112 4.6 The TRANSPOSE key This func
- Page 115 and 116:
Section 5: Song Mode
- Page 117 and 118:
Section 5: Song mode 117 5.2 The So
- Page 119 and 120:
Section 5: Song mode 119 5.3 An exa
- Page 121:
Section 5: Song mode 121 Converting
- Page 124 and 125:
124 6.1 Overview The MPC60 may hold
- Page 126 and 127:
126 6.2 Sampling a new sound This f
- Page 128 and 129:
128 • The METER field: This is a
- Page 130 and 131:
130 more than you need, because you
- Page 132 and 133:
132 always one higher than the last
- Page 134 and 135:
134 • The ALSO PLAYS field: This
- Page 136 and 137:
136 As the screen warns, pressing
- Page 138 and 139:
138 • The FADEOUT(MSECS) field: T
- Page 140 and 141:
140 2. MASTER: In addition to the s
- Page 142 and 143:
142 6.6 Assigning the 8 assignable
- Page 144 and 145:
144 • The MIDI OUTPUT field: This
- Page 146 and 147:
146 Sending a Midi sample dump to a
- Page 148 and 149:
148 6.8 Triggering a sound from an
- Page 150 and 151:
150 3. MASTER: There is a single se
- Page 152 and 153:
152 to 1; to control the decay from
- Page 154 and 155:
154 7.1 Overview The MPC60 has a bu
- Page 156 and 157:
156 7.2 Saving a sequence This func
- Page 158 and 159:
158 7.4 Saving a drum sound This fu
- Page 160 and 161:
160 If you press SOFT KEY 1, , the
- Page 162 and 163:
162 (Step edit options screen) •
- Page 164 and 165:
164 To save a parameter file: 1. As
- Page 166 and 167:
166 • If an ALL file is selected
- Page 168 and 169:
168 As the screen warns, loading th
- Page 170 and 171:
170 7.8 Formatting a disk This func
- Page 172 and 173:
172 7.10 "Attention" messages encou
- Page 175 and 176:
Section 8: Syncing to tape and othe
- Page 177 and 178:
Section 8: Syncing to tape and othe
- Page 179 and 180:
Section 8: Syncing to tape and othe
- Page 181 and 182:
Section 8: Syncing to tape and othe
- Page 183 and 184:
Section 8: Syncing to tape and othe
- Page 185 and 186:
Section 8: Syncing to tape and othe
- Page 187 and 188:
Section 8: Syncing to tape and othe
- Page 189 and 190:
Section 8: Syncing to tape and othe
- Page 191 and 192:
Section 8: Syncing to tape and othe
- Page 193 and 194:
Section 8: Syncing to tape and othe
- Page 195:
Section 8: Syncing to tape and othe
- Page 198 and 199:
198 9.1 Overview The MIDI key provi
- Page 200 and 201:
200 While one of these event types
- Page 202 and 203:
202 • The DEFAULT CHAN field: Eac
- Page 204 and 205:
204 9.3 External drum triggering, t
- Page 206 and 207:
206 NOTE: Because "NONE" is the def
- Page 208 and 209:
208 of this field. If only one ME-3
- Page 210 and 211:
210 9. 5 The Midi implementation ch
- Page 212 and 213:
212 01000111 Akai ID (47H) 0000xxxx
- Page 214 and 215:
214 10.1 Features Here is a list of
- Page 216 and 217:
216 Sampler section: • 32 drums m
- Page 218 and 219:
218 218 • Assignable mix outputs:
- Page 221 and 222:
SECTION 11: INDEX
- Page 223 and 224:
Fadeout time (sounds), 6.2, 6.3 FAS
- Page 225:
Syncing to Midi Clock and Song Posi