PXR3 Instruction Manual - Coulton Instrumentation
PXR3 Instruction Manual - Coulton Instrumentation
PXR3 Instruction Manual - Coulton Instrumentation

You also want an ePaper? Increase the reach of your titles
YUMPU automatically turns print PDFs into web optimized ePapers that Google loves.
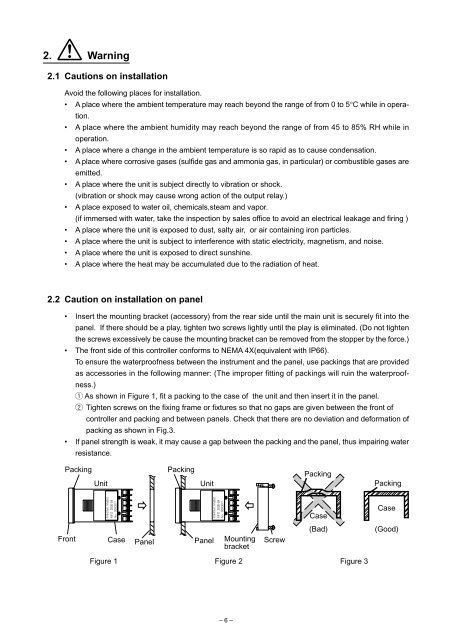
2. Warning2.1 Cautions on installationAvoid the following places for installation.• A place where the ambient temperature may reach beyond the range of from 0 to 5°C while in operation.• A place where the ambient humidity may reach beyond the range of from 45 to 85% RH while inoperation.• A place where a change in the ambient temperature is so rapid as to cause condensation.• A place where corrosive gases (sulfide gas and ammonia gas, in particular) or combustible gases areemitted.• A place where the unit is subject directly to vibration or shock.(vibration or shock may cause wrong action of the output relay.)• A place exposed to water oil, chemicals,steam and vapor.(if immersed with water, take the inspection by sales office to avoid an electrical leakage and firing )• A place where the unit is exposed to dust, salty air, or air containing iron particles.• A place where the unit is subject to interference with static electricity, magnetism, and noise.• A place where the unit is exposed to direct sunshine.• A place where the heat may be accumulated due to the radiation of heat.2.2 Caution on installation on panel• Insert the mounting bracket (accessory) from the rear side until the main unit is securely fit into thepanel. If there should be a play, tighten two screws lightly until the play is eliminated. (Do not tightenthe screws excessively be cause the mounting bracket can be removed from the stopper by the force.)• The front side of this controller conforms to NEMA 4X(equivalent with IP66).To ensure the waterproofness between the instrument and the panel, use packings that are providedas accessories in the following manner: (The improper fitting of packings will ruin the waterproofness.)q As shown in Figure 1, fit a packing to the case of the unit and then insert it in the panel.w Tighten screws on the fixing frame or fixtures so that no gaps are given between the front ofcontroller and packing and between panels. Check that there are no deviation and deformation ofpacking as shown in Fig.3.• If panel strength is weak, it may cause a gap between the packing and the panel, thus impairing waterresistance.PackingUnitPackingUnitPackingPackingCaseCaseFront Case PanelPanelMountingbracketScrew(Bad)(Good)Figure 1 Figure 2Figure 3– 6 –