TOTAL STATION InstructIon manual
TOTAL STATION InstructIon manual
TOTAL STATION InstructIon manual
- No tags were found...

Create successful ePaper yourself
Turn your PDF publications into a flip-book with our unique Google optimized e-Paper software.
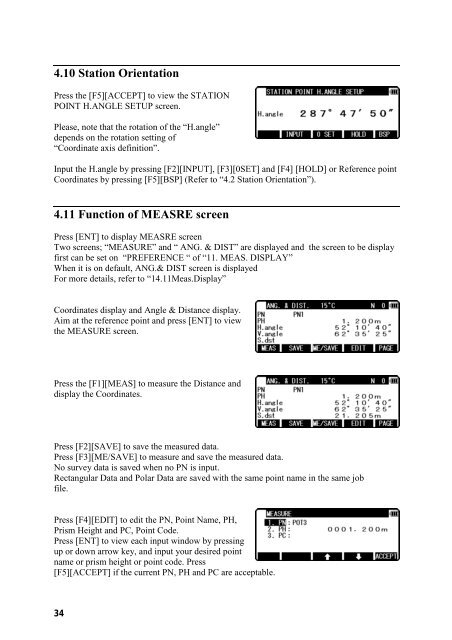
4.10 Station OrientationPress the [F5][ACCEPT] to view the <strong>STATION</strong>POINT H.ANGLE SETUP screen.Please, note that the rotation of the “H.angle”depends on the rotation setting of“Coordinate axis definition”.Input the H.angle by pressing [F2][INPUT], [F3][0SET] and [F4] [HOLD] or Reference pointCoordinates by pressing [F5][BSP] (Refer to “4.2Station Orientation”).4.11 Function of MEASRE screenPress [ENT] to display MEASRE screenTwo screens;“MEASURE”and“ANG. & DIST”are displayed and the screen to be displayfirst can be set on “PREFERENCE“of“11. MEAS. DISPLAY”When it is on default, ANG.& DIST screen is displayedFor more details, refer to“14.11Meas.Display”Coordinates display and Angle & Distance display.Aim at the reference point and press [ENT] to viewthe MEASURE screen.Press the [F1][MEAS] to measure the Distance anddisplay the Coordinates.Press [F2][SAVE] to save the measured data.Press [F3][ME/SAVE] to measure and save the measured data.No survey data is saved when no PN is input.Rectangular Data and Polar Data are saved with the same point name in the same jobfile.Press [F4][EDIT] to edit the PN, Point Name, PH,Prism Height and PC, Point Code.Press [ENT] to view each input window by pressingup or down arrow key, and input your desired pointname or prism height or point code. Press[F5][ACCEPT] if the current PN, PH and PC are acceptable.34