PC3000 Complete Installation guide iss 12 - Elektro-Trading
PC3000 Complete Installation guide iss 12 - Elektro-Trading
PC3000 Complete Installation guide iss 12 - Elektro-Trading

Create successful ePaper yourself
Turn your PDF publications into a flip-book with our unique Google optimized e-Paper software.
CONFIGURATION OPTIONS<br />
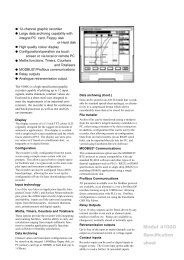
Setting the rack address<br />
<strong>PC3000</strong> - <strong>Installation</strong> Guide <strong>iss</strong>. 3<br />
Rack Interface Module<br />
The Rack Address for the rack in which the RIM will be fitted is set by means of a<br />
rotary switch.<br />
It is located at the front of the module, above the inter-rack serial ports and should be<br />
set by means of a screwdriver. It can be accessed without removing the module from<br />
the rack. It should be set to any address in the range 1 to 7. (address 0 is used as a<br />
diagnostic position and is also the address taken by the Local Controller Module<br />
located in the main rack).<br />
9<br />
0 1<br />
2<br />
8<br />
7<br />
6 5 4<br />
3<br />
Set pointer to indicate<br />
correct extension rack<br />
number 1 to 7<br />
Link 8<br />
Link 9<br />
Selecting the termination<br />
impedance<br />
A link selects the termination impedance on<br />
the receive pair. The module is supplied with<br />
the link fitted. The metal sleeve must be<br />
removed in order to carry out this operation.<br />
Link 8 terminates the transmit pair with 100R.<br />
Link 9 terminates the receive pair.<br />
Only the last extension rack in the chain<br />
should have the termination resistors fitted.<br />
7-3