

Samsung Multifunzione a colori MultiXpress X7600GX (A3) (60ppm) - User Manual_36.16 MB, pdf, ENGLISH
Samsung Multifunzione a colori MultiXpress X7600GX (A3) (60ppm) - User Manual_36.16 MB, pdf, ENGLISH
Samsung Multifunzione a colori MultiXpress X7600GX (A3) (60ppm) - User Manual_36.16 MB, pdf, ENGLISH

You also want an ePaper? Increase the reach of your titles
YUMPU automatically turns print PDFs into web optimized ePapers that Google loves.
ID Send<br />
4<br />
5<br />
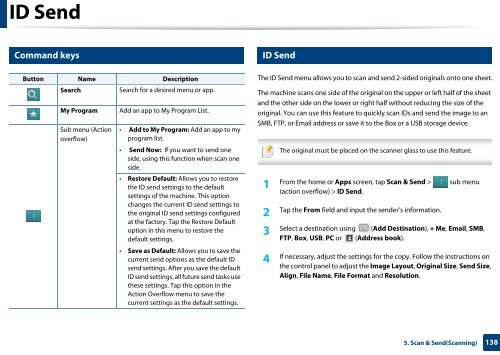
Command keys<br />
ID Send<br />
Button Name Description<br />
Search<br />
Search for a desired menu or app.<br />
My Program<br />
Sub menu (Action<br />
overflow)<br />
Add an app to My Program List.<br />
• Add to My Program: Add an app to my<br />
program list.<br />
• Send Now: If you want to send one<br />
side, using this function when scan one<br />
side.<br />
• Restore Default: Allows you to restore<br />
the ID send settings to the default<br />
settings of the machine. This option<br />
changes the current ID send settings to<br />
the original ID send settings configured<br />
at the factory. Tap the Restore Default<br />
option in this menu to restore the<br />
default settings.<br />
• Save as Default: Allows you to save the<br />
current send options as the default ID<br />
send settings. After you save the default<br />
ID send settings, all future send tasks use<br />
these settings. Tap this option in the<br />
Action Overflow menu to save the<br />
current settings as the default settings.<br />
The ID Send menu allows you to scan and send 2-sided originals onto one sheet.<br />
The machine scans one side of the original on the upper or left half of the sheet<br />
and the other side on the lower or right half without reducing the size of the<br />
original. You can use this feature to quickly scan IDs and send the image to an<br />
S<strong>MB</strong>, FTP, or Email address or save it to the Box or a USB storage device.<br />
1<br />
The original must be placed on the scanner glass to use this feature.<br />
From the home or Apps screen, tap Scan & Send > sub menu<br />
(action overflow) > ID Send.<br />
Tap the From field and input the sender’s information.<br />
2<br />
Select a destination using (Add Destination), + Me, Email, S<strong>MB</strong>,<br />
3<br />
FTP, Box, USB, PC or (Address book).<br />
4<br />
If necessary, adjust the settings for the copy. Follow the instructions on<br />
the control panel to adjust the Image Layout, Original Size, Send Size,<br />
Align, File Name, File Format and Resolution.<br />
5. Scan & Send(Scanning)<br />
138


