User Guide for 3050 ICP Users - Mitel Edocs
User Guide for 3050 ICP Users - Mitel Edocs
User Guide for 3050 ICP Users - Mitel Edocs

Create successful ePaper yourself
Turn your PDF publications into a flip-book with our unique Google optimized e-Paper software.
5055 SIP Phone <strong>User</strong> <strong>Guide</strong> (Rev. A)<br />
6. Click the OK button. Your SIP Phone is updated.<br />
Using the SIP Phone Menu Interface<br />
1. Press the Menu key.<br />
2. Press the >> softkey until “FEATURE CONFIG?” is displayed.<br />
3. Press the OK softkey. “CALL FORWARDING?” is displayed.<br />
4. Press the OK softkey. “FWD ALWAYS:” is displayed, with its status beside it (“*ON*” or<br />
“*OFF*”).<br />
• If you do not need to change your Call Forward Always settings, go to step 10.<br />
• To program your Call Forward Always settings, continue below.<br />
5. Press the Review softkey. The display shows the current <strong>for</strong>warding address.<br />
• If the address is blank, the SIP Phone will <strong>for</strong>ward calls to your voice mailbox if you<br />
have one.<br />
6. Press the Program softkey to change the address to which the call will be <strong>for</strong>warded.<br />
7. To <strong>for</strong>ward your calls to your voice mailbox, press the Yes softkey and continue with<br />
step 10. To <strong>for</strong>ward your calls to another address, press the No softkey and continue with<br />
the next step.<br />
8. Enter the address where your calls will be <strong>for</strong>warded.<br />
• To enter a name, press the Name softkey be<strong>for</strong>e entering any characters.<br />
• To enter a URL, press the URL softkey be<strong>for</strong>e entering any characters.<br />
9. Press the Submit softkey.<br />
10. Press the Next softkey. “FWD NO ANSWER:” is displayed, with its status beside it<br />
(“*ON*” or “*OFF*”)<br />
• If you do not need to change your Call Forward No Answer settings, go to step 14.<br />
11. Press the Options softkey to change the number of rings be<strong>for</strong>e a call is <strong>for</strong>warded.<br />
12. Enter the number of rings (from 0 to 9) with the keypad, and press the Save softkey.<br />
13. To program your other Call Forward No Answer settings, repeat steps 5 to 9, then<br />
continue below.<br />
14. Press the Next softkey. “FWD BUSY:” is displayed, with its status beside it (“*ON*” or<br />
“*OFF*”)<br />
• To program your Call Forward Busy settings, repeat steps 5 to 9, then continue<br />
below.<br />
• If you do not need to change your Call Forward Busy settings, continue below.<br />
15. Press the Exit softkey, then the Menu key to return to the default display.<br />
Enabling/Disabling Call Forward<br />
Using the Web Configuration Tool<br />
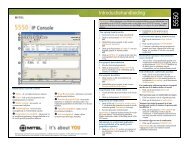
1. Access the Web Configuration Tool (see The Web Configuration Tool on page 8).<br />
2. Click Feature Configuration.<br />
3. For each type of Call Forward (Always, No Answer, Busy), change its status (On or Off)<br />
using the drop down menu beside its name.<br />
4. Click the Apply button at the bottom of the web page. A confirmation screen is displayed.<br />
- 20 -