User Guide for 3050 ICP Users - Mitel Edocs
User Guide for 3050 ICP Users - Mitel Edocs
User Guide for 3050 ICP Users - Mitel Edocs

Create successful ePaper yourself
Turn your PDF publications into a flip-book with our unique Google optimized e-Paper software.
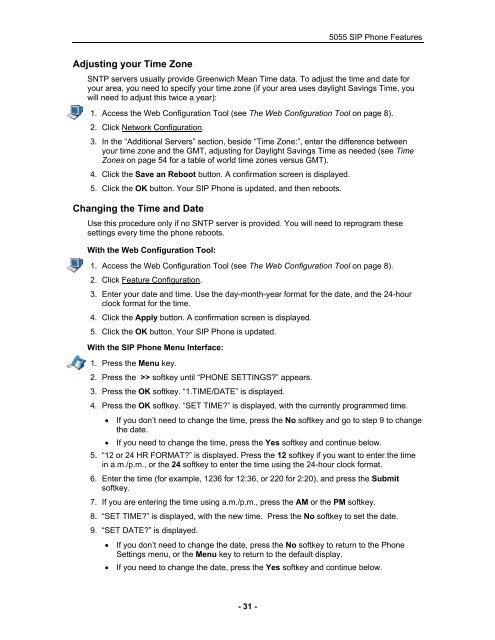
Adjusting your Time Zone<br />
- 31 -<br />
5055 SIP Phone Features<br />
SNTP servers usually provide Greenwich Mean Time data. To adjust the time and date <strong>for</strong><br />
your area, you need to specify your time zone (if your area uses daylight Savings Time, you<br />
will need to adjust this twice a year):<br />
1. Access the Web Configuration Tool (see The Web Configuration Tool on page 8).<br />
2. Click Network Configuration.<br />
3. In the “Additional Servers” section, beside “Time Zone:”, enter the difference between<br />
your time zone and the GMT, adjusting <strong>for</strong> Daylight Savings Time as needed (see Time<br />
Zones on page 54 <strong>for</strong> a table of world time zones versus GMT).<br />
4. Click the Save an Reboot button. A confirmation screen is displayed.<br />
5. Click the OK button. Your SIP Phone is updated, and then reboots.<br />
Changing the Time and Date<br />
Use this procedure only if no SNTP server is provided. You will need to reprogram these<br />
settings every time the phone reboots.<br />
With the Web Configuration Tool:<br />
1. Access the Web Configuration Tool (see The Web Configuration Tool on page 8).<br />
2. Click Feature Configuration.<br />
3. Enter your date and time. Use the day-month-year <strong>for</strong>mat <strong>for</strong> the date, and the 24-hour<br />
clock <strong>for</strong>mat <strong>for</strong> the time.<br />
4. Click the Apply button. A confirmation screen is displayed.<br />
5. Click the OK button. Your SIP Phone is updated.<br />
With the SIP Phone Menu Interface:<br />
1. Press the Menu key.<br />
2. Press the >> softkey until “PHONE SETTINGS?” appears.<br />
3. Press the OK softkey. “1.TIME/DATE” is displayed.<br />
4. Press the OK softkey. “SET TIME?” is displayed, with the currently programmed time.<br />
• If you don’t need to change the time, press the No softkey and go to step 9 to change<br />
the date.<br />
• If you need to change the time, press the Yes softkey and continue below.<br />
5. “12 or 24 HR FORMAT?” is displayed. Press the 12 softkey if you want to enter the time<br />
in a.m./p.m., or the 24 softkey to enter the time using the 24-hour clock <strong>for</strong>mat.<br />
6. Enter the time (<strong>for</strong> example, 1236 <strong>for</strong> 12:36, or 220 <strong>for</strong> 2:20), and press the Submit<br />
softkey.<br />
7. If you are entering the time using a.m./p.m., press the AM or the PM softkey.<br />
8. “SET TIME?” is displayed, with the new time. Press the No softkey to set the date.<br />
9. “SET DATE?” is displayed.<br />
• If you don’t need to change the date, press the No softkey to return to the Phone<br />
Settings menu, or the Menu key to return to the default display.<br />
• If you need to change the date, press the Yes softkey and continue below.