DiMAGE Scan Elite II Hardware OM - Konica Minolta Photo Imaging ...
DiMAGE Scan Elite II Hardware OM - Konica Minolta Photo Imaging ...
DiMAGE Scan Elite II Hardware OM - Konica Minolta Photo Imaging ...

You also want an ePaper? Increase the reach of your titles
YUMPU automatically turns print PDFs into web optimized ePapers that Google loves.
INSTALLING DRIVER SOFTWARE – WINDOWS<br />
CAUTION<br />
The anti-virus system extensions may conflict with the operation of the software installer. Before<br />
installing the scanner utility software, remove or disable any extensions before launching the<br />
installer. Replace or re-enable the extensions when the installation is complete.<br />
TIPS<br />
About TWAIN drivers and plug-ins<br />
The scanner can be launched directly from an image-processing application like Adobe<br />
<strong>Photo</strong>shop Elements. When the scanner utility software is installed in a computer with a Windows<br />
operating system, a TWAIN driver is automatically installed with it. Although the TWAIN driver<br />
cannot be seen, it allows the utility to be launched from an application as well as allowing the<br />
computer and scanner to communicate.<br />
When the scanner utility software is installed on a Macintosh computer, a plug-in file is placed in<br />
the scanner utility folder. By simply dragging and dropping the plug-in file into an applications<br />
import folder, the scanner utility software can be launched from that application.<br />
98/98SE/2000 PROFESSIONAL/ME/XP<br />
• In the example below, the hard disk is drive C, and the CD-R<strong>OM</strong> drive is drive D. The letters designating<br />
the drives will vary between computers.<br />
1 Turn on the computer to start Windows.<br />
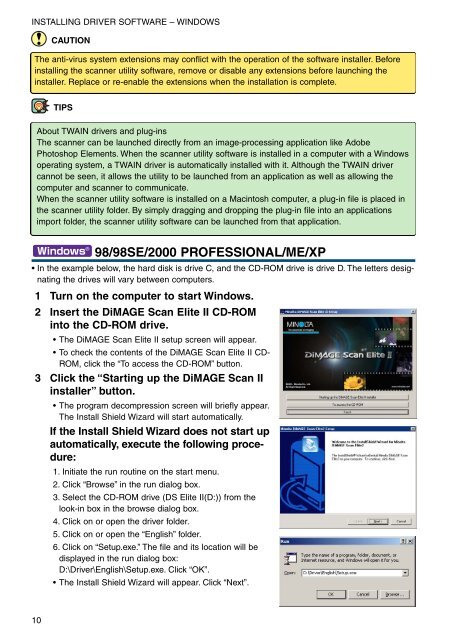
2 Insert the <strong>DiMAGE</strong> <strong>Scan</strong> <strong>Elite</strong> <strong>II</strong> CD-R<strong>OM</strong><br />
into the CD-R<strong>OM</strong> drive.<br />
• The <strong>DiMAGE</strong> <strong>Scan</strong> <strong>Elite</strong> <strong>II</strong> setup screen will appear.<br />
• To check the contents of the <strong>DiMAGE</strong> <strong>Scan</strong> <strong>Elite</strong> <strong>II</strong> CD-<br />
R<strong>OM</strong>, click the “To access the CD-R<strong>OM</strong>” button.<br />
3 Click the “Starting up the <strong>DiMAGE</strong> <strong>Scan</strong> <strong>II</strong><br />
installer” button.<br />
• The program decompression screen will briefly appear.<br />
The Install Shield Wizard will start automatically.<br />
If the Install Shield Wizard does not start up<br />
automatically, execute the following procedure:<br />
1. Initiate the run routine on the start menu.<br />
2. Click “Browse” in the run dialog box.<br />
3. Select the CD-R<strong>OM</strong> drive (DS <strong>Elite</strong> <strong>II</strong>(D:)) from the<br />
look-in box in the browse dialog box.<br />
4. Click on or open the driver folder.<br />
5. Click on or open the “English” folder.<br />
6. Click on “Setup.exe.” The file and its location will be<br />
displayed in the run dialog box:<br />
D:\Driver\English\Setup.exe. Click “OK”.<br />
• The Install Shield Wizard will appear. Click “Next”.<br />
10