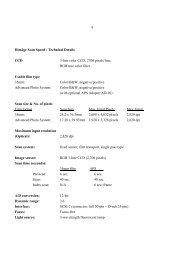
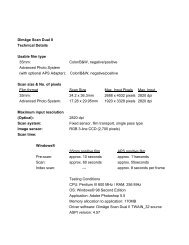
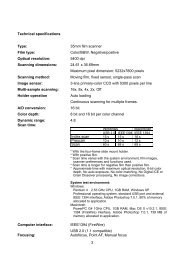
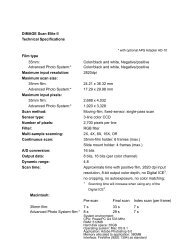
DiMAGE Scan Elite II Hardware OM - Konica Minolta Photo Imaging ...
DiMAGE Scan Elite II Hardware OM - Konica Minolta Photo Imaging ...
DiMAGE Scan Elite II Hardware OM - Konica Minolta Photo Imaging ...

You also want an ePaper? Increase the reach of your titles
YUMPU automatically turns print PDFs into web optimized ePapers that Google loves.
2. SETTING UP THE SCANNER<br />
MAIN WINDOW<br />
When the software is launched, the main window will open. For details on the scan-setting dialog<br />
box, see page 74.<br />
Film-format list box<br />
To select 35mm or APS film(see page 36).<br />
Film-type list box<br />
Colour negative, colour positive,<br />
B&W negative, and B&W positive<br />
(see page 36).<br />
Preferences button<br />
To set scan preferences (see<br />
page 34).<br />
Custom Wizard button<br />
To make automated<br />
scan settings (see<br />
page 83).<br />
Status bar<br />
Describes the button<br />
or function on which<br />
the mouse pointer is<br />
located.<br />
Help button<br />
<strong>Scan</strong> button<br />
To make the final<br />
scan (see page 81).<br />
Prescan button<br />
To make preview<br />
scans (see page<br />
43).<br />
Digital-GEM button<br />
To reduce the effect of film grain (see page<br />
72).<br />
Digital-ROC button<br />
To restore the colour of faded film (see page<br />
71).<br />
Digital-ICE button<br />
To reduce the effect of dust, flaws, scratches, and<br />
fingerprints on the film surface (see page 70).<br />
STANDARD SCAN UTILITY<br />
Index-scan button<br />
To make index scans (see page<br />
37).<br />
Eject button<br />
To eject the film holder or APS adaptor from the<br />
scanner.<br />
33